This article applies to Exalate Classic only. For New Exalate, refer to this documentation.
Local Synchronization Use Case
Warning: Despite our best efforts, code can change without notice due to a variety of factors. If you encounter an issue in any of the code shown here and find that a specific block of code is not correct, or is causing errors, please check with the Community to find an updated version.
You can use local synchronization when you have two projects in one Jira. Let's take a look at the case when you have the following projects: DEVELOPER and TESTER.
There are two different scenarios:
- you create a task for the developer and send the task to the tester
- you found a bug, created the Failed test, and then sent the task to the developer to fix it

Let's take a look at the example for the first scenario.
- Create the task for the developer by clicking the Create button.
- When the developer starts working on a task, he sees the status 'IMPLEMENT'.
- After finishing the work, the developer sends it to the tester, and the developer's task changes to the 'IN TESTING' status. By the way, Exalate creates a test on the TESTER side with the status 'TO DO'.
- The tester starts working and his status becomes 'TESTING'.
- Then, the tester can move the task to 'OK' or 'FAILURE' depending on the test result. If he finds a bug, he moves it to 'FAILURE', and Exalate changes the developer's status to 'TO DO' again. After that, all the transitions repeat until the work is done. If the test is passed, the transition 'OK' leads to the status 'OK' and Exalate does its work to inform the developer that everything is finished by marking the developer's status as 'DONE'. The reverse process is very similar.
How Does it Work?
You need to create two projects in your Jira: DEVELOPER and TESTER.
To set up synchronization for the use case above, you need to configure your Jira instance and the Exalate application.
Workflows
Now you can start to create Workflows.
Add the DEVELOPER workflow for the DEVELOPER project and the TESTER workflow for TESTER.
After that, create the statuses and transitions that you need.
Note: In Jira, click the status or transition to edit it.


Don't forget to add these workflows to your project and publish them every time you make changes.
Automatic Synchronization
First of all, when the status changes to 'To testing', Exalate should create the test. To make it possible, you should add Triggers that look like this:
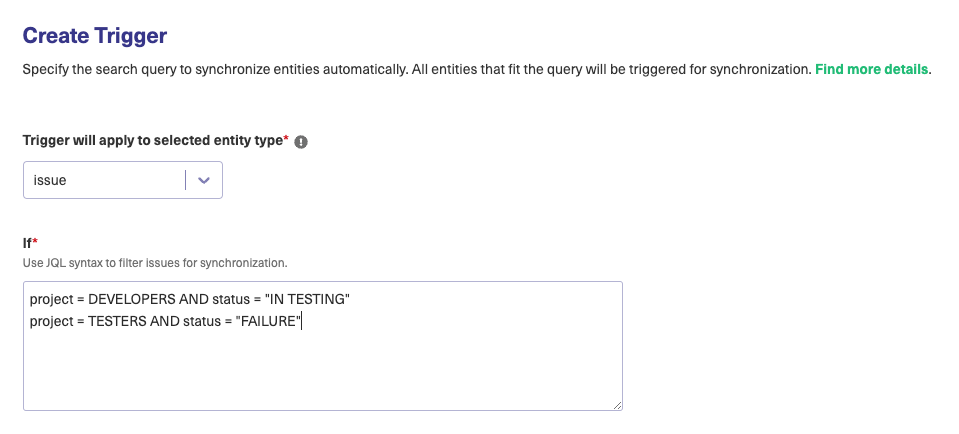
It means that if you create a task on the developer's side when you send it on testing, your status is 'IN TESTING', Exalate starts its work and creates the test on another side.
The second trigger means that you created a test on the TESTER side. If the project is Tester and the status is Failure, then Exalate makes a task for the developer to fix bugs.
Hidden Transitions
If you look at the screenshots above, you see some transitions the user should not see. For instance, the user cannot say that work is done, while his status is 'IN TESTING'. Only Exalate can do it. So we should hide some transitions. This is how you do it:
- Click the Done transition and add a condition on the right side.
- Select User Is In Group from the list and find a group you need.
Do the same for the transition 'Implement' in the DEVELOPER workflow and transition 'To Do' in the TESTER workflow in this case.
Local Connection
The last step for setting up Exalate is to create an Exalate Connection. You need to name it and choose the remote issue you created, for example, DEV-TEST. The Outgoing sync should contain scripts to compose a message with data you want to send to the other side.
replica.key            = issue.key
replica.assignee       = issue.assignee
replica.reporter       = issue.reporter
replica.summary        = issue.summary
replica.description    = issue.description
replica.comments       = issue.comments
replica.resolution     = issue.resolution
replica.status         = issue.status
replica.attachments    = issue.attachments
replica.workLogs       = issue.workLogs
replica.project        = issue.project
replica.type  		   = issue.type
The Incoming sync handles a message from the reporting node and creates an issue on the second side of the first time. This way Exalate would know that if the Task was created first, then it should create a Test on the other side, and vice versa.
if(replica.type.name == "Task") {
  issue.projectKey   = "TESTERS"
  issue.typeName 	 = "Test"
  workflowHelper.transition(issue, "To Do")
}
else{
  issue.projectKey 	 = "DEVELOPERS"
  issue.typeName 	 = "Task"
}

issue.status       = replica.status
issue.summary      = replica.summary
issue.description  = replica.description
issue.comments     = commentHelper.mergeComments(issue, replica)
issue.attachments  = attachmentHelper.mergeAttachments(issue, replica)
issue.workLogs     = workLogHelper.mergeWorkLogs(issue, replica)
The Incoming sync can then process and update values. It contains something like this:
if(replica.project.key == "TESTERS" && replica.status.name == "FAILURE"){
   	workflowHelper.transition(issue, "Implement")
}
if(replica.project.key == "DEVELOPERS" && replica.status.name == "IN TESTING"){
   	workflowHelper.transition(issue, "To Do")
}
if(replica.project.key == "TESTERS" && replica.status.name == "OK"){
   	workflowHelper.transition(issue, "Done")
}
issue.summary      = replica.summary
issue.description  = replica.description
issue.comments     = commentHelper.mergeComments(issue, replica)
issue.attachments  = attachmentHelper.mergeAttachments(issue, replica)
issue.workLogs     = workLogHelper.mergeWorkLogs(issue, replica)