Warning: We are moving Exalate for HP QC/ALM into basic maintenance mode. This transition period will last until November 2024, after which support will be halted completely. For more information, please see https://exalate.com/blog/end-of-support-hp/.
Exalate architecture requires installing one Exalate application for each instance.
Since HP ALM/QC does not offer any integration option for plugins, you need to install a separate server to store the Exalate for HP ALM/QC application and configure it to communicate with your HP ALM/QC.
System Requirements
Please read All system requirements before installing the Exalate app for HP ALM/QC.
Install Exalate for HP ALM/QC on CentOS 6
Exalate Server for HP ALM/QC hosts the applications to translate the HP ALM/QC defect information to a common format and the way around.
The application requires JAVA and PostgreSQL.
Note: Exalate for HP ALM/QC supports HP ALM v. 11.05 - 12.55. Starting from version 5.0.11, Exalate supports HP ALM/QC version 15.0.
Install and Configure the Database Server (PostgreSQL 9.6)
Please follow the steps to install PostgreSQL on the exalate server as documented here https://wiki.postgresql.org/wiki/YUM_Installation
Ensure that
- the database server comes up when the server is booted
- the data directories are included in the backup strategy
Enable PostgreSQL to Accept Login with Password
You need to modify /var/lib/pgsql/9.6/data/pg_hba.conf to require md5 for local IPv4 connections, such as at the end of the file it does look like
# TYPE  DATABASE        USER            ADDRESS                 METHOD
# "local" is for Unix domain socket connections only such as postgres
local   all             all                                     trust
# IPv4 local connections:
host    all             all             127.0.0.1/32            md5
Restart the Database
systemctl restart postgresql-9.6.service
Installing OpenJDK
Note:
- You need to have Exalate for HPQC version 5.0 and higher
- For versions lower than 5.0, please deploy Oracle Java version 1.8
Commands extracted from https://www.liquidweb.com/kb/install-java-8-on-centos-7/
#refresh repos
yum -y update

#install the openjdk - latest version in the 8 family
yum install java-1.8.0-openjdk

#ensure it is being used - choose the openjdk
update-alternatives --config java


#update the java home in your .bash_profile by adding (the openjdk path depends on what was installed)
export JAVA_HOME=/usr/lib/jvm/java-1.8.0-openjdk-1.8.0.242.b08-0.el7_7.x86_64
export JAVA_JRE=$JAVA_HOME/jre
export PATH=$PATH:@JAVA_JRE/bin/
Install the Exalate server for HP ALM/QC
Note: You can download the Exalate server for HP ALM/QC RPM from here.
Install the latest version of the Exalate app for HP ALM/QC :
# the version number will differ
yum localinstall exalate-hpqcnode-5.0.13.noarch.rpm
This creates these files:
- /opt/hpqcnode/data -> Contains configuration files
- /opt/hpqcnode/logs -> Contains log files
- /opt/hpqcnode/install -> contains all the files (binaries) which are necessary for the application to run
- /etc/init.d/hpqcnode -> Script which allows start, stop and restart hpqcnode application
- /etc/sysconfig/hpqcnode -> System properties
Copy dist files into prod files
cp /etc/sysconfig/hpqcnode.dist /etc/sysconfig/hpqcnode
cp /etc/init.d/hpqcnode.dist /etc/init.d/hpqcnode
cp /opt/hpqcnode/data/hpqcnode.conf.dist /opt/hpqcnode/data/hpqcnode.conf
cp /opt/hpqcnode/data/logger.xml.dist /opt/hpqcnode/data/logger.xml
Adapt configuration files
Adapt /etc/init.d/hpqcnode RUN_AS_USER variable to point to a valid user who is running the application
...
#
#

# Script arguments (start, stop, restart or status)
COMMAND=$1

# ***********************************************
# *************  Set these variables  ***********

RUN_AS_USER=root // Set the user that would be running the application
NAME=hpqcnode
HOME_DIR=/opt/hpqcnode
DATA_DIR=$HOME_DIR/data
APP_DIR=$HOME_DIR/install
SYSCONFIG=/etc/sysconfig/hpqcnode

# ***********************************************

# stop if no configuration available
if [ ! -f "$SYSCONFIG" ]; then printf "no config present ... exiting\n"; exit 1; fi
...
Adapt /etc/sysconfig/hpqcnode parameters:
# ---------
# Data Base specifics
DHPQCNODE_PG_USER=idalko
DHPQCNODE_PG_PWD=idalko
DHPQCNODE_PG_HOST=localhost
#DHPQCNODE_PG_HOST="localhost:5432"
DHPQCNODE_PG_DB=hpqcnode
# ---------
# OS User Name
# Name of the OS User to run the app with
DHPQCNODE_SYS_USER=root
# ---------
# Port specifics
DHPQCNODE_PORT=9000
# ---------
# SMTP specifics
DHPQCNODE_SMTP_HOST_NAME=mail.server.com
DHPQCNODE_SMTP_PORT=465
DHPQCNODE_SMTP_FROM=admin@admin.com
DHPQCNODE_SMTP_USER=admin
DHPQCNODE_SMTP_PASS=1234567
DHPQCNODE_SMTP_SSL=true
# ---------
Start the application
/etc/init.d/hpqcnode start
Troubleshooting
Problems during the installation using yum
If you have problems during the installation of the Exalate server for HP ALM/QC using yum, you can find logs describing possible problems inside /tmp The name for this file is generated randomly automatically by the OS but you should be able to find the file based on the creation date.
In case of 'yum list postgresql*' please see Problems during Installation using Yum .
Problems while running the Exalate server for HP ALM/QC
Logs are generated under the directory: /opt/hpqcnode/data/logs. Refer to these logs to get more information about possible problems and communicate with our support if you need any assistance.
Run Exalate for HP ALM/QC on Docker
Note: You need to install Docker. Check the docker documentation for more details.
1. Create directory and create docker-compose.yml file
Create a directory to hold the docker-compose file:
cd ~
mkdir exalate-hp-qc
Create the docker-compose.yml file in it:
cd exalate-hp-qc
touch docker-compose.yml
cat > docker-compose.yml << 'EOF'
version: '2'

services:
  database:
    restart: always
    image: postgres:12.19
    volumes:
      - voldatabase:/var/lib/postgresql/data
      - ./createdb.sh:/docker-entrypoint-initdb.d/init-user-db.sh
    environment:
      - DB_NAME=hpqcnode
      - DB_USER=idalko
      - DB_PASS=idalko
    networks:
      - database

  hpqcnode:
    restart: always
    ports:
      - 9000:9000
    image: idalko/hpqcnode:latest
    depends_on:
      - database #wait for postgres to be started, not for ready
    volumes:
      - volhpqcnode:/opt/hpqcnode/data
    environment:
      - HPQCNODE_PG_DB=hpqcnode
      - HPQCNODE_PG_USER=idalko
      - HPQCNODE_PG_PWD=idalko
    networks:
      - database
      - default

volumes:
  voldatabase:
  volhpqcnode:

networks:
  database:
    driver: bridge
  default:
    driver: bridge
EOF
2. Ensure that a correct database is setup using a createdb.sh
Create or download a createdb.sh file (referenced from docker-compose.yml):
Note: Click createdb.sh to download the file.
touch createdb.sh
cat > createdb.sh << 'EOCREATEDB'
#!/bin/bash

TEST=`psql -U postgres <<-EOSQL
   SELECT 1 FROM pg_database WHERE datname='$DB_NAME';
EOSQL`

echo "******CREATING DOCKER DATABASE******"
if [[ $TEST == "1" ]]; then
    # database exists
    # $? is 0
    exit 0
else
psql -U postgres <<-EOSQL
   CREATE ROLE $DB_USER WITH LOGIN ENCRYPTED PASSWORD '${DB_PASS}' SUPERUSER;
EOSQL

psql -U postgres <<-EOSQL
   CREATE DATABASE $DB_NAME WITH OWNER $DB_USER ENCODING 'UNICODE' LC_COLLATE 'C' LC_CTYPE 'C' TEMPLATE template0;
EOSQL

psql -U postgres <<-EOSQL
   GRANT ALL PRIVILEGES ON DATABASE $DB_NAME TO $DB_USER;
EOSQL
fi

echo ""
echo "******DOCKER DATABASE CREATED******"
EOCREATEDB
Ensure that the volumes are included in your backup strategy:
- voldatabase
- volhpqcnode
3. Set Environment Variables if necessary
Please note the environment variables used for hpqcnode container. All of them are optional, and in the given example, we've overridden HPQCNODE_PG_DB, HPQCNODE_PG_USER and HPQCNODE_PG_PWD just to explicitly how can different credentials be passed to the Exalate application.
Here's the full list of environment variables
Variable name | Default value | Example | Description |
|---|---|---|---|
| HPQCNODE_PG_HOST | HPQCNODE_PG_HOST=database | HPQCNODE_PG_HOST=localhost | tells Exalate where is the Postgres database to connect to host |
| HPQCNODE_PG_DB | HPQCNODE_PG_DB=hpqcnode | HPQCNODE_PG_DB=exalate | tells Exalate what is the Postgres database name for the exalate application |
| HPQCNODE_PG_USER | HPQCNODE_PG_USER=idalko | HPQCNODE_PG_USER=exalate | tells Exalate what is the Postgres database user name for the exalate application to perform queries with |
| HPQCNODE_PG_PWD | HPQCNODE_PG_PWD=idalko | HPQCNODE_PG_PWD=secret | tells Exalate what is the Postgres database user's password for Exalate to perform queries with |
| HPQCNODE_PORT | HPQCNODE_PORT=9000 | HPQCNODE_PORT=80 | tells what which is port to start Exalate on. Note that this is the port within the exalatehpqc_hpqcnode_1 container, thus if this variable is changed (for example to 80), the ports:
- 9000:9000should also be changed to ports:
- 80:80 |
| HPQCNODE_SMTP_HOST_NAME | HPQCNODE_SMTP_HOST_NAME=mail.server.com | HPQCNODE_SMTP_HOST_NAME=smtp.gmail.com | is used to send email notifications about errors blocking synchronization |
| HPQCNODE_SMTP_PORT | HPQCNODE_SMTP_PORT=465 | HPQCNODE_SMTP_PORT=587 | is used to send email notifications about errors blocking synchronization |
| HPQCNODE_SMTP_FROM | HPQCNODE_SMTP_FROM=admin@admin.com | HPQCNODE_SMTP_FROM=my.name@gmail.com | is used to send email notifications about errors blocking synchronization |
| HPQCNODE_SMTP_USER | HPQCNODE_SMTP_USER=admin | HPQCNODE_SMTP_USER=my.name | is used to send email notifications about errors blocking synchronization |
| HPQCNODE_SMTP_PASS | HPQCNODE_SMTP_PASS=1234567 | HPQCNODE_SMTP_PASS=secret | is used to send email notifications about errors blocking synchronization |
| HPQCNODE_SMTP_TLS | HPQCNODE_SMTP_TLS=true | HPQCNODE_SMTP_TLS=true | is used to send email notifications about errors blocking synchronization. Can be set to false, but then the HPQCNODE_SMTP_PORT should be set to the port, that accepts non-SSL and non-TLS connections |
4. Start the Application
cd ~/exalate-hp-qc
docker-compose up -d
How to Manage the Application on the Docker
Run queries to the application's database
cd ~/exalate-hp-qc
docker exec -it exalatehpqc_database_1 bash
su postgres
psql -A $DB_NAME
One can find all the tables using psql's \dt+ command:
\dt+
All the postgres SQL queries are permitted
To exit the application's DB:
\q
# \q exits the psql
exit
# exits the postgres user session
exit
# exits the exalatehpqc_database_1 bash session
Inspect the application's filesystem
cd ~/exalate-hp-qc
docker exec -it exalatehpqc_hpqcnode_1 bash
Remove the application
cd ~/exalate-hp-qc
docker-compose rm
Remove the application data
Warning: do this only if you want to delete all the synchronization information, including the current synchronizations enqueued to be performed and synchronization status. Make sure that the remote side (you exalate issues with) knows that you're stopping synchronization and are ready to handle synchronization errors.
cd ~/exalate-hp-qc
# docker volume ls | grep exalatehpqc_vol |  awk '{ print $2 }' | xargs docker volume rm
docker volume rm exalatehpqc_voldatabase
docker volume rm exalatehpqc_volhpqcnode
Configure Exalate to Communicate with HP ALM/QC Instance
To configure Exalate:
1. Open Exalate for HP ALM/QC.
2. Configure General Settings.
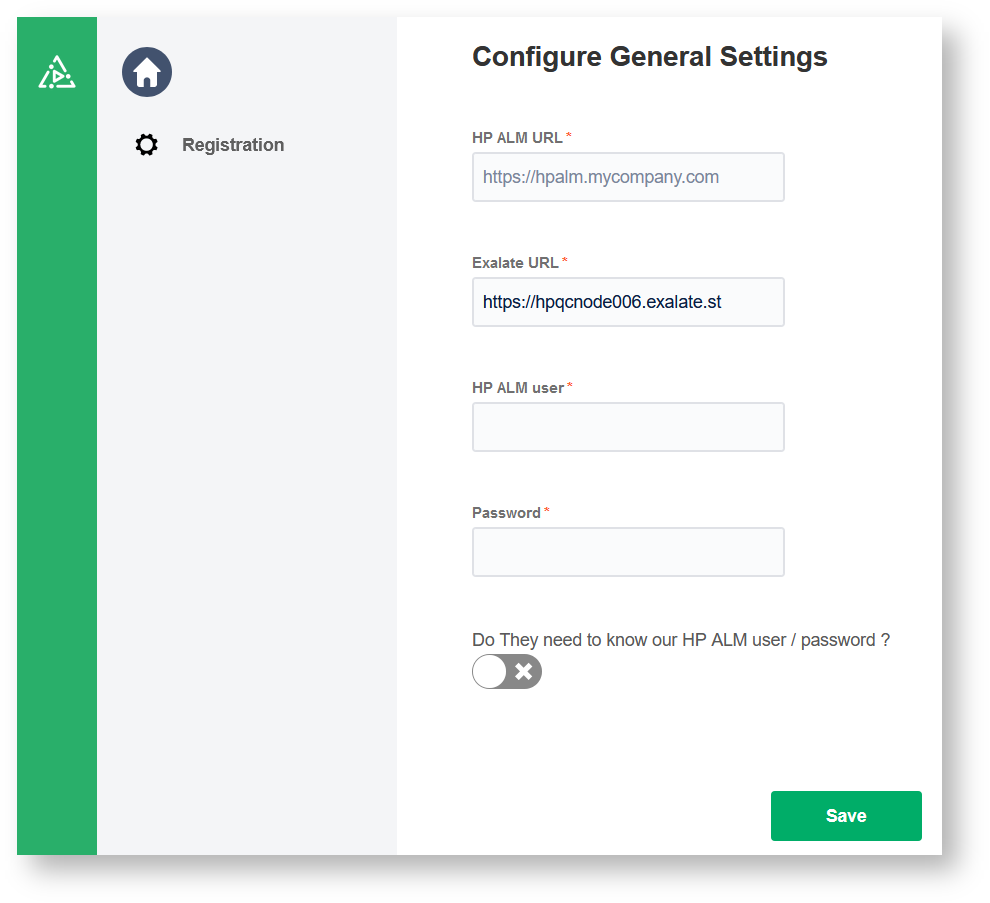
3. Click Save.
4. Fill in your contact details in the Registration screen.
Exalate uses this info to:
- Verify your instance.
- Activate an evaluation license.
- Create an admin account to receive error notifications.
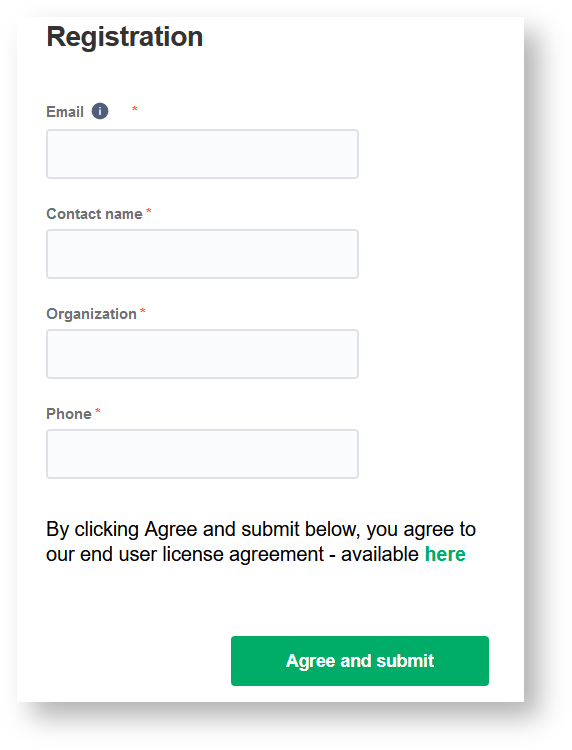
5. Click Agree and submit.
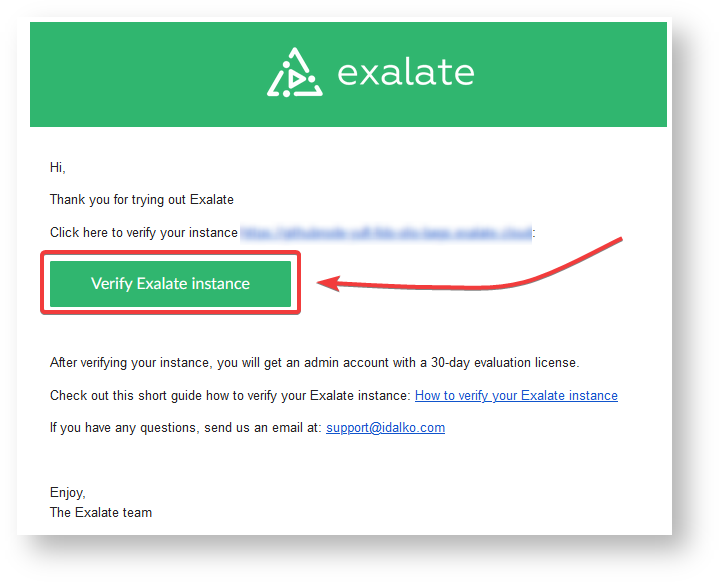
After clicking Agree and submit, you get an email to complete a security check.
Note: After clicking Agree and submit, you accept our End User License Agreement (EULA). It is also available here:
6. Open your email and click Verify Exalate instance.
You are redirected back to your Exalate console.
7. Click Continue.
After clicking Continue, you complete the verification procedure, so you can log in to the Exalate admin console.
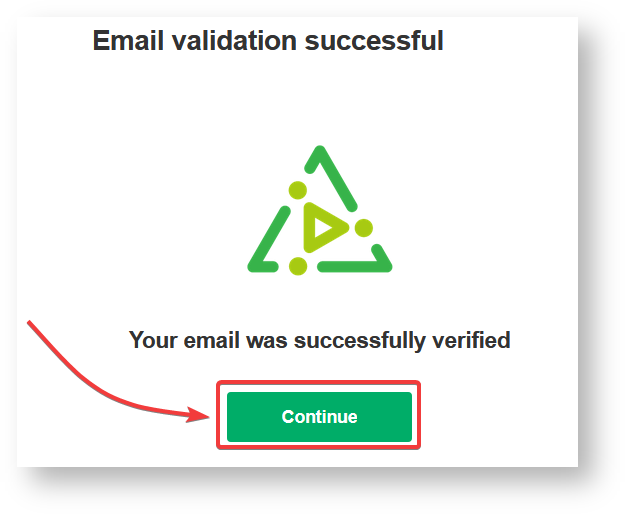
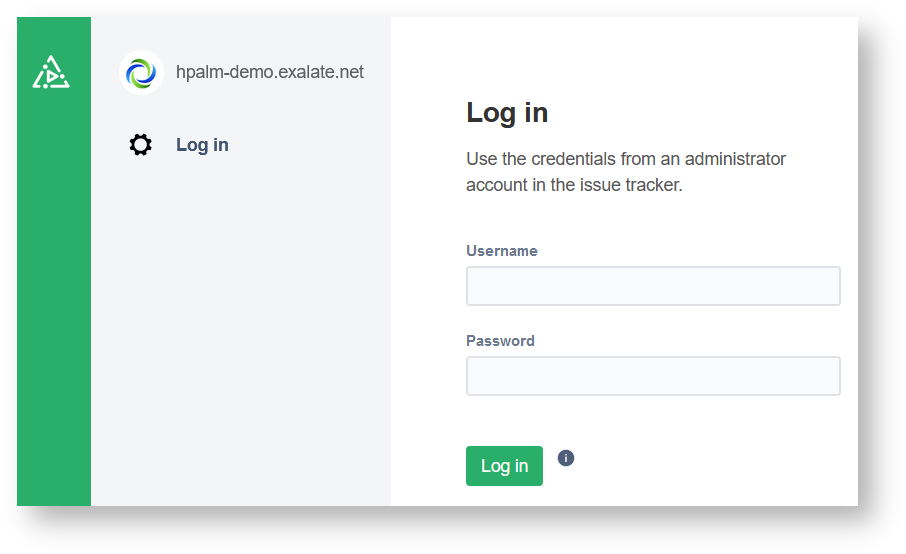
8. Log in to your Exalate admin console.
Input the Username and the Password of the proxy user to log in.
Troubleshooting
Problems during the installation of Exalate for HP ALM/QC
If you have problems during the installation of the Exalate app for HP ALM/QC, you can find logs describing possible problems inside /tmp. The name for this file is generated randomly automatically by the OS but you should be able to find the file based on the creation date.
Problems while running Exalate for HP ALM/QC
Logs are generated under the directory: /opt/hpqcnode/data/logs. Refer to these logs to get more information about possible problems and communicate with our support if you need any assistance.
Support
Please read our Support options.
Exalate needs to exchange information with the HP ALM instance. After Exalate for HP ALM/QC is deployed on the server, you need to establish the connection between the Exalate app for HP ALM/QC and HP ALM/QC instance.