A proxy user is a work management system user who is used by Exalate to make changes, such as:
- Creating issues
- Updating data
The proxy user impersonates external instances. All changes on local issues are performed on behalf of this user. You can use an existing user account or create a new one, specifically dedicated to Exalate.
Note: Changes made by the proxy user are not synchronized. If you set the administrator as a proxy user and create issues with the help of the 'create on behalf of ' Service Desk functionality, issues are not synchronized.
The proxy user configuration is different for each work management system.
Azure DevOps
Access to Azure DevOps Exalate Console (Log-in)
Exalate needs to authenticate to the Azure DevOps instance. You can provide such access using the Personal Access Token(PAT).
Note: Use the PAT to access the Exalate admin console. Please read How to generate the PAT (Personal Access Token) in your Azure DevOps instance.
Proxy user in Azure DevOps
The proxy user is the Azure DevOps user account that fetches information from the Azure DevOps instance and updates Work items with incoming changes.
The configuration of the proxy user takes place during the first installation of Exalate. The user who is installing Exalate automatically becomes the proxy user.
You can change the proxy user when the app is installed and running. To do so, navigate to Exalate Menu Panel → General Settings → Configure and enter the PAT of the new proxy user.
Proxy User Permissions in Azure DevOps
The proxy user must be a Project Administrator and a member of the Project Collection Administrator group on the Organization level
Note: You can add the Project Administrator to the Project Collection Administrator in your Azure DevOps under Organization Settings → Permissions → Project Collection Administrators.
GitHub
Access to GitHub Exalate Console (Log-in)
Use a personal access token to log in to Exalate for GitHub. The token needs to have access to private repositories with the repo scope.

Proxy User in GitHub
By default, Exalate for GitHub Proxy User is the repository admin or the organization owner who is installing Exalate.
The proxy user configuration takes place during the first installation of Exalate. The user who installs the app automatically becomes a proxy user.
The proxy user must have a Personal Access Token with authorization to private repositories with the repo scope.
Proxy User Permissions in GitHub
The proxy user has the same permissions as the admin or the organization owner in GitHub.
Note: For more information about user permissions, please read these GitHub articles:
Permission levels for a user account repository
Permission levels for an organization
Freshdesk
Access to Freshdesk Exalate Console (Log-in)
Exalate needs to authenticate to the Freshdesk instance. You can provide such access using the API Token.
Note: To generate an API token in Freshdesk, follow these steps:
- Log in to your Freshdesk instance using the proxy user account.
- The Agent role in Freshdesk is sufficient for the Exalate proxy user. It can perform ticket-related actions (view, update, comment, etc.) and interact with custom fields and ticket categories.
- Access profile settings by clicking on the profile picture located in the top-right corner of the dashboard.
- In the "Profile Settings" page, look for the "API Key" section on the right pane.
- Click on "View API Key", complete the CAPTCHA, and copy the API key.
Proxy user in Freshdesk
The proxy user is the Freshdesk user account that fetches information from the Freshdesk instance and updates Tickets with incoming changes.
The configuration of the proxy user takes place during the first installation of Exalate.
You can change the proxy user when the app is installed and running. To do so, navigate to Exalate Menu Panel → General Settings → Configure and enter the credentials of the new proxy user.
Freshservice
Access to Freshservice Exalate Console (Log-in)
Exalate needs to authenticate to the Freshservice instance. You can provide such access using an API Key.
🔒 Note: In Freshservice, only users with appropriate agent roles and API access permissions can generate an API key.
To generate an API key in Freshservice, follow these steps:
- Log in to your Freshservice instance using the proxy user account (this account will be used by Exalate).
- Ensure the proxy user has an Agent role with API access permissions*
- The role should allow the user to view and update tickets, add comments, and access custom fields or related entities.
- Click your profile picture in the top-right corner of the Freshservice dashboard.Navigate to "Profile Settings".
- On the right-hand pane, locate the "Your API Key" section.Click on "Show API Key", and copy the API key.
*In case the user does not have API access permission, this should be configured by the Account Admin in Agent permissions:
- Go to Admin
- Select Roles under User Management
- Select the agent to assign permissions
- Go to Permissions tab on the Agent profile page
- Enable API key toggle
Proxy user in Freshservice
The proxy user is the Freshservice user account that fetches information from the Freshservice instance and updates Tickets with incoming changes.
The configuration of the proxy user takes place during the first installation of Exalate.
You can change the proxy user when the app is installed and running. To do so, navigate to Exalate Menu Panel → General Settings → Configure and enter the credentials of the new proxy user.
Asana
Access to Asana Exalate Console (Log-in)
Exalate needs to authenticate to the Asana instance. You can provide such access using the API Token.
Note: To generate an API token in Asana, follow these steps:
- In Asana, click your profile picture in the top right
- Select Settings
- Go to the Apps tab
- Click Manage Developer Apps
- Click Create New Personal Access Token
- Give it a name like "Exalate Integration"
- Copy the token immediately
Proxy user in Asana
The proxy user is the Asana user account that fetches information from the Asana instance and updates Tickets with incoming changes.
The configuration of the Asana user takes place during the first installation of Exalate.
You can change the proxy user when the app is installed and running. To do so, navigate to Exalate Menu Panel → General Settings → Configure and enter the credentials of the new proxy user.
Jira Cloud
Proxy user in Jira Cloud
The proxy user in Jira Cloud is the app user that is being created automatically. This user cannot be modified. The username is Exalate and the email address is com.exalate.jiranode@connect.atlassian.com.
The proxy user in Jira Cloud is a member of the following user groups:
- atlassian-addons
- atlassian-addons-admin
- jira-core-users
- jira-servicedesk-users
- jira-software-users
Important: At the moment, there is a security vulnerability in Exalate that allows you to access private project data with the Connect operation. We recommend making sure that the proxy user has access only to public projects. For more info, please see Security Vulnerability — You can access restricted project data with the Connect operation.
Proxy User Permissions in Jira Cloud
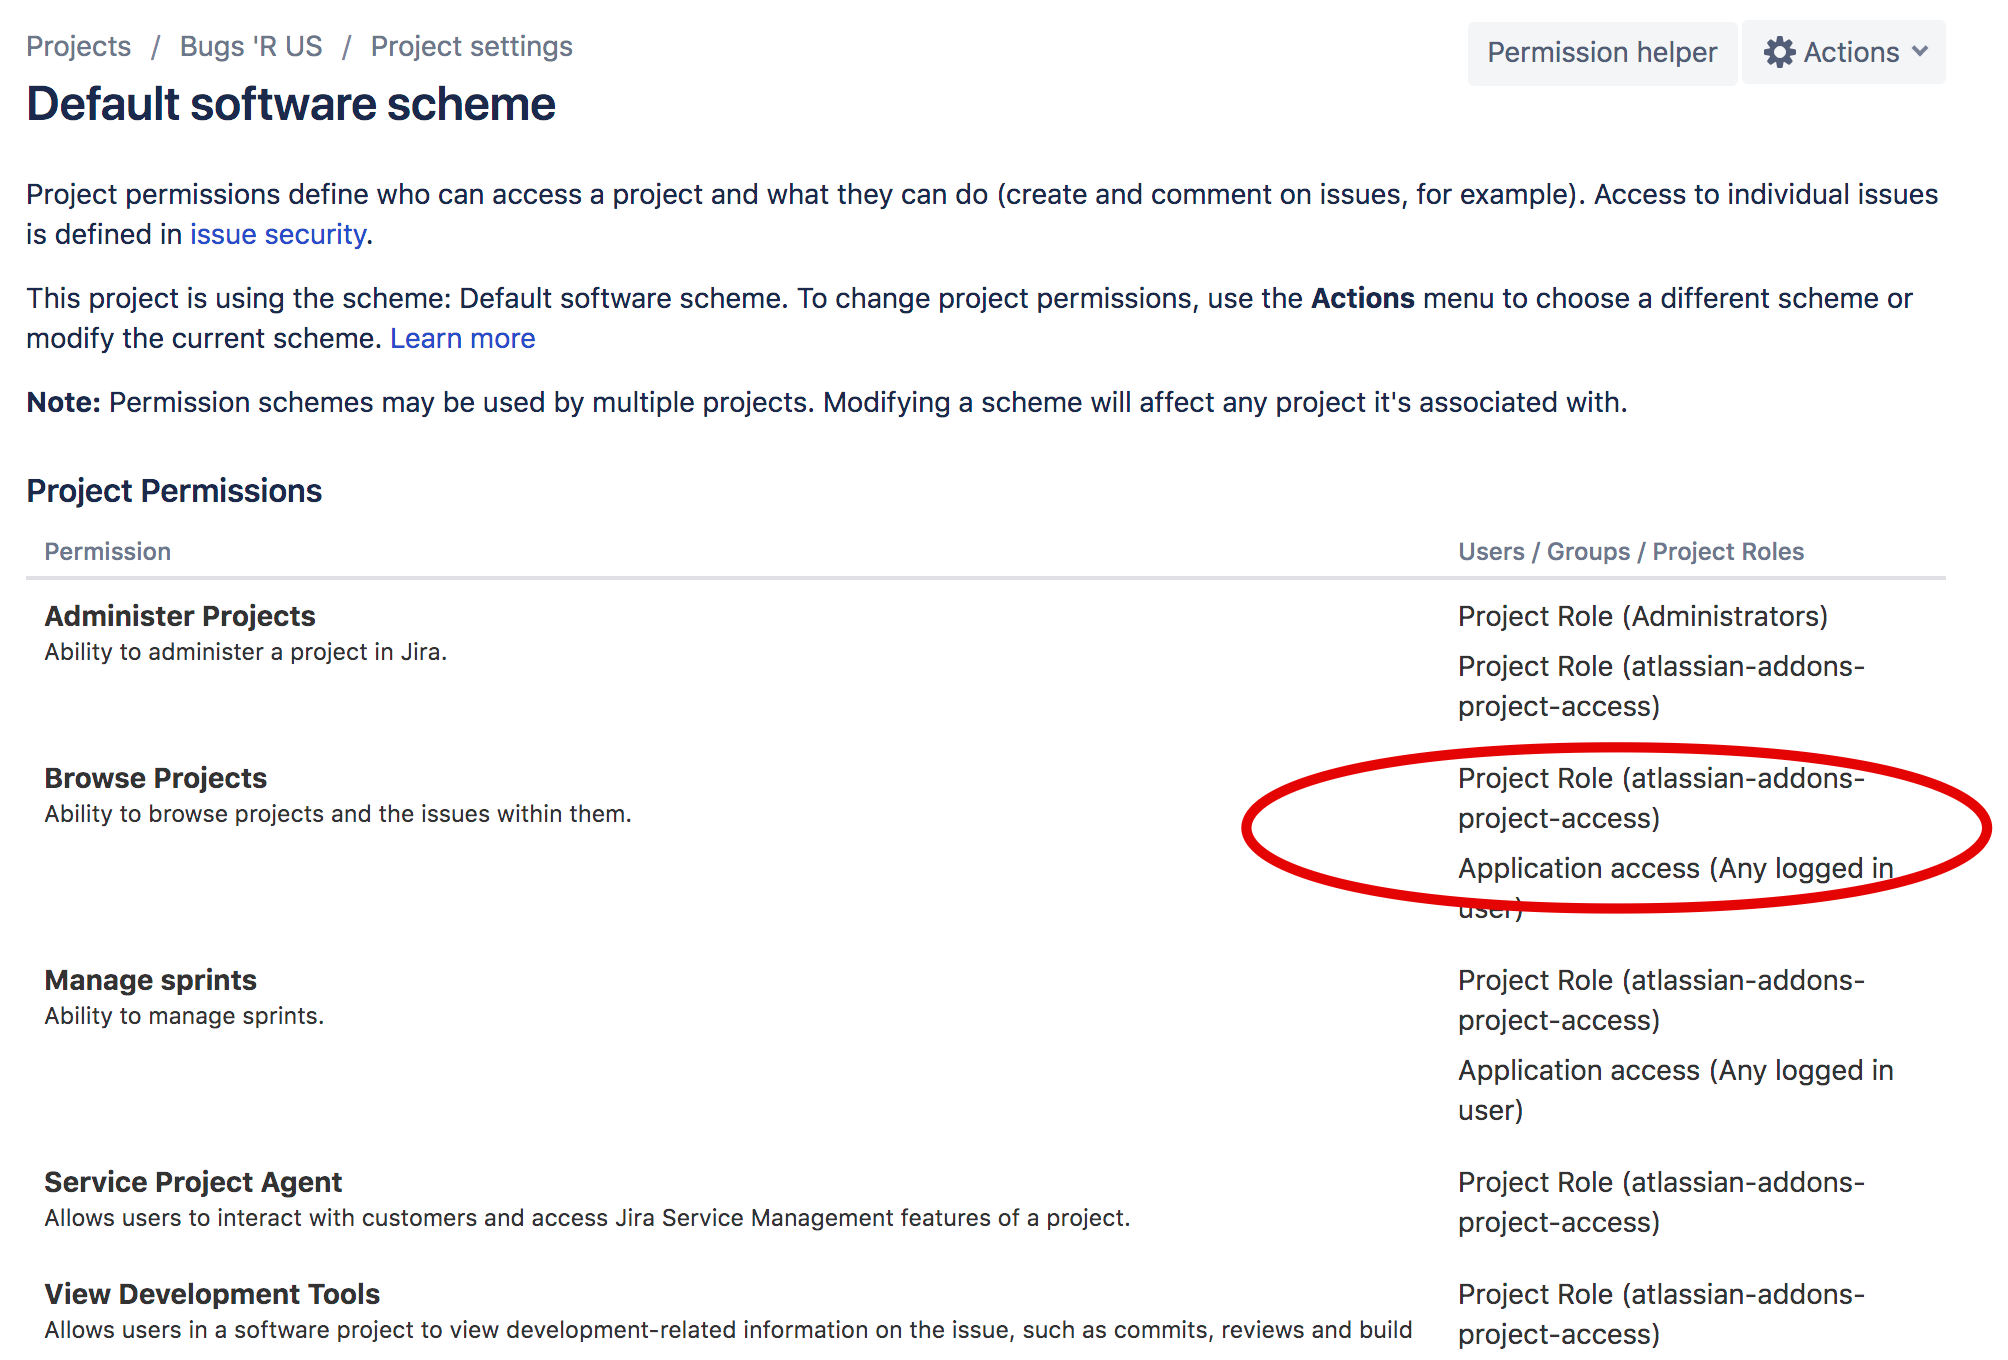
Jira Cloud grants correct permissions to apps through the atlassian-addons-project-access role. It is done after installing or updating an app. Jira Cloud also checks the permissions of existing apps across all Jira and Jira Service Desk projects and grants them the correct permissions.
If you want to ensure that the app has no access to the project, remove the group from the corresponding permission in the permission scheme.

Note: For more information, please see the Atlassian documentation
Jira on-premise
Proxy user in Jira on-premise
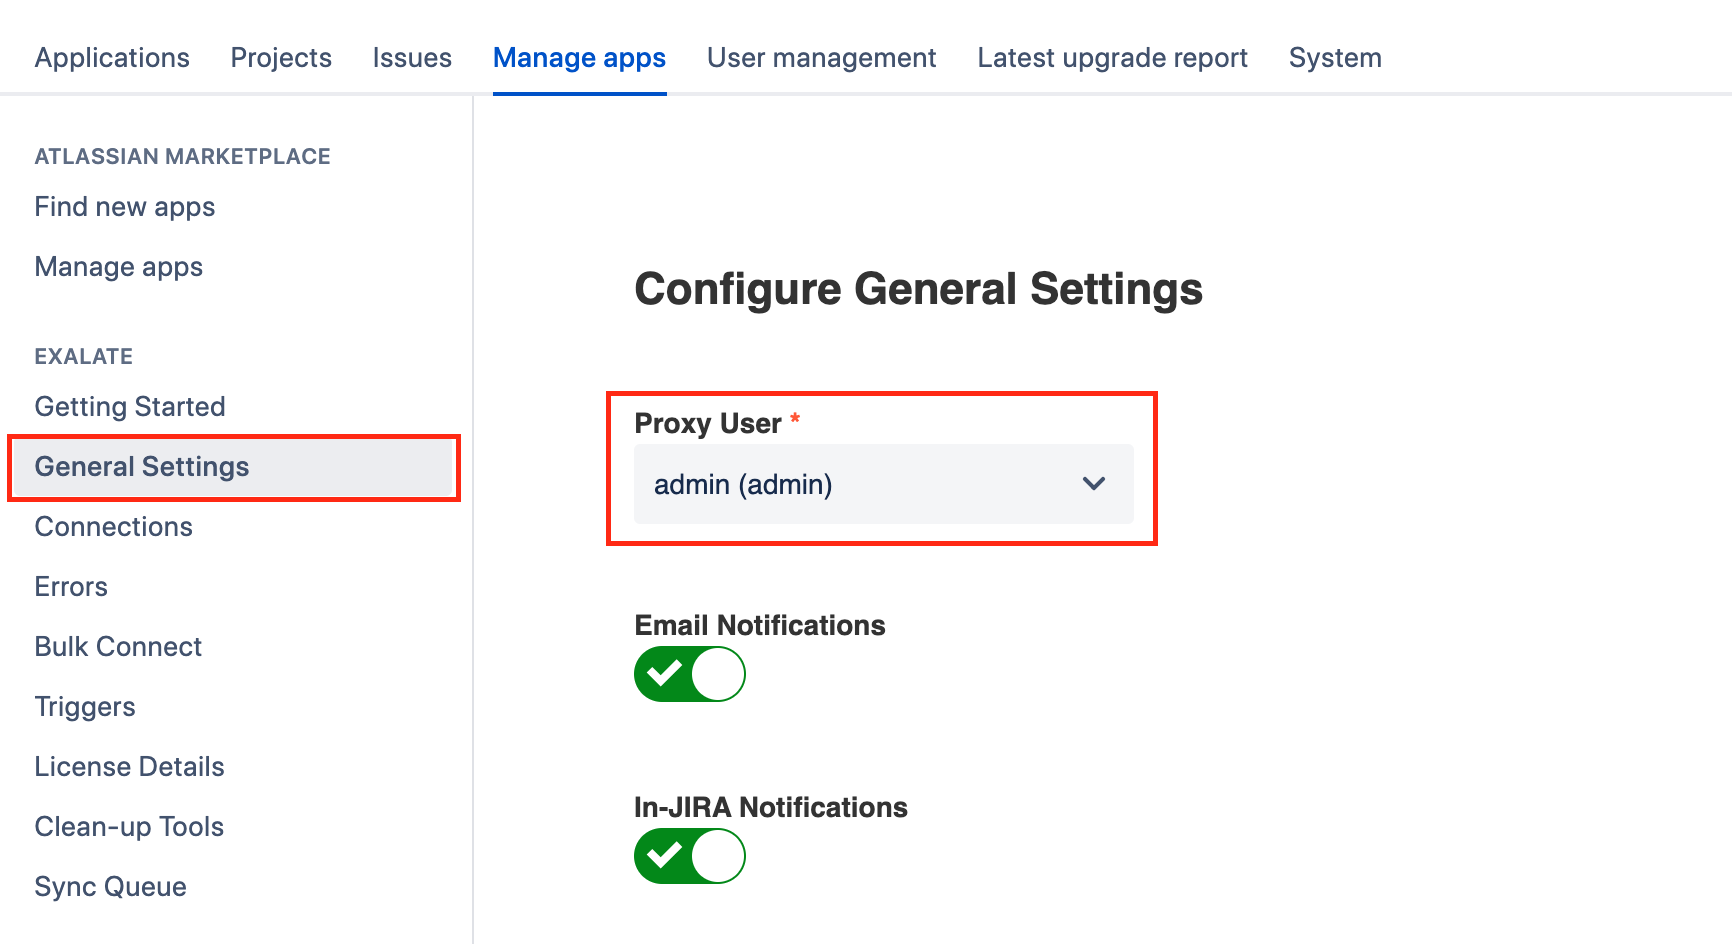
By default, the proxy user is the user who installs Exalate. You can change the proxy user by navigating to Exalate Menu Panel → General Settings → Configure.
Important: At the moment, there is a security vulnerability in Exalate that allows you to access private project data with the Connect operation. We recommend making sure that the proxy user has access only to public projects. For more info, please see Security Vulnerability — You can access restricted project data with the Connect operation.

Proxy User Permissions in Jira On-Premise
In Jira on-premise, the proxy user needs to have the following permissions:
- Browse Project
- Create issue
- Edit issue
- Link issue
- Transition issue: change statuses (on issue transition)
- If comments are synchronized, the proxy user needs to add, edit, and delete a comment
- If attachments are synchronized, the proxy user needs to add and delete attachments
- If work logs are synchronized, the proxy user needs to add, edit, and delete work logs
- If security levels are synchronized, the proxy user needs to access the security levels
- If you're using a trigger, the proxy user must be able to search for issues
Note: In Jira Service Management, the proxy user needs to be a service desk agent.
Salesforce
Proxy user in Salesforce
In Salesforce, the user who is installing Exalate automatically becomes a proxy user.
ServiceNow
Access to ServiceNow Exalate Console (Log-in)
You can access the ServiceNow instance in one of these ways:
- Basic login:
- In order to log in you use a Username and a Password. Exalate does not store the password in the database, but uses the rest connection to attempt to log in to the ServiceNow node.
- OAuth token:
- Authentication with a Username and an OAuth token. Exalate stores the token and uses it to access it. The token is refreshed every time the lifespan ends.
Note: The OAuth token can be used as long as the refresh token is valid. For more information on how to set up the refresh token, please see Access the Exalate app in ServiceNow. You need to generate a new refresh token after the old one expires. We suggest setting a longer lifespan for the refresh token.
Proxy user in ServiceNow
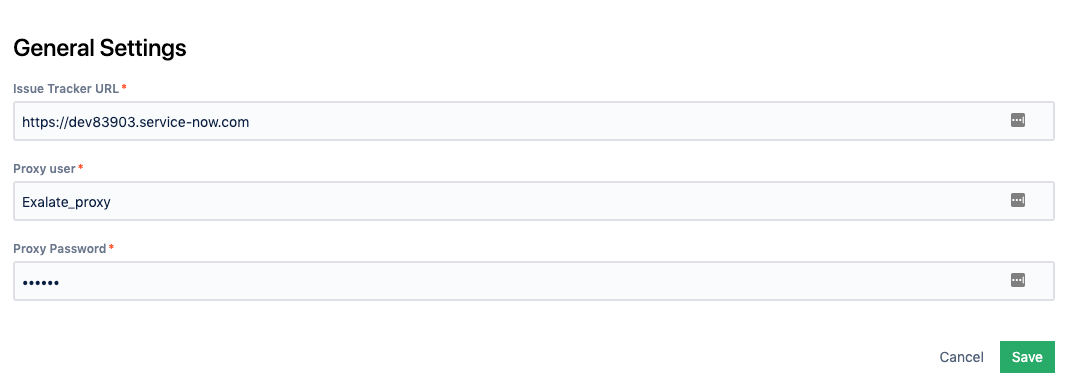
To change the proxy user in Exalate for ServiceNow:
- Log in to the Exalate admin console.
- Navigate to General Settings.
- Input details:
- ServiceNow instance URL.
- Proxy user name.
- Proxy user password.

Proxy user permissions in ServiceNow
Note: Please read what permissions the Proxy user must have in ServiceNow.
Users and Permissions
Note: For security reasons, it is better to create a separate role with specific permissions for a proxy user instead of giving him an administrator role.
To integrate Exalate with ServiceNow, you need 2 ServiceNow user accounts:
- Proxy User
ServiceNow user account that fetches information from the ServiceNow instance and updates the ServiceNow entities with incoming changes. - The proxy user can integrate various tables or attributes depending on the permissions defined by their user role in ServiceNow.
- Exalate Console users
The serviceNow user who is authorized to configure the Exalate app for ServiceNow. The Exalate console user must be an admin in your ServiceNow instance or the proxy user. -
Exalate uses Rthe EST API to communicate with the ServiceNow issue tracker. By default, ServiceNow REST APIs use basic authentication or OAuth to authorize user access to REST APIs/endpoints. Therefore, the Exalate console users must have access to the ServiceNow instance admin configuration.
Note: Role Management V2 REST API plugin must be installed and activated on your ServiceNow instance. Starting with the New York version, this plugin is included by default. If you have recently updated your ServiceNow instance to the latest version, you need to activate the Role Management V2 REST API plugin manually. For more information, please see ServiceNow contextual security.
Zendesk
Proxy user in Zendesk
By default, Exalate sets the Zendesk instance admin as the proxy user during installation.

Note: Exalate requires a dedicated Zendesk admin as a proxy user.
Proxy user permissions in Zendesk
The proxy user can restrict the roles or groups that can access Exalate. It is possible to perform during the installation of the app or in the Apps and Integrations settings.
