Introduction
You can install Exalate on Jira Cloud:
- From the Atlassian Marketplace.
- From the App Manager.
- On Docker.
Install Exalate from the marketplace
To install Exalate from the marketplace, follow the steps below:
- Search for the app on the marketplace.
- Click Try it Free.

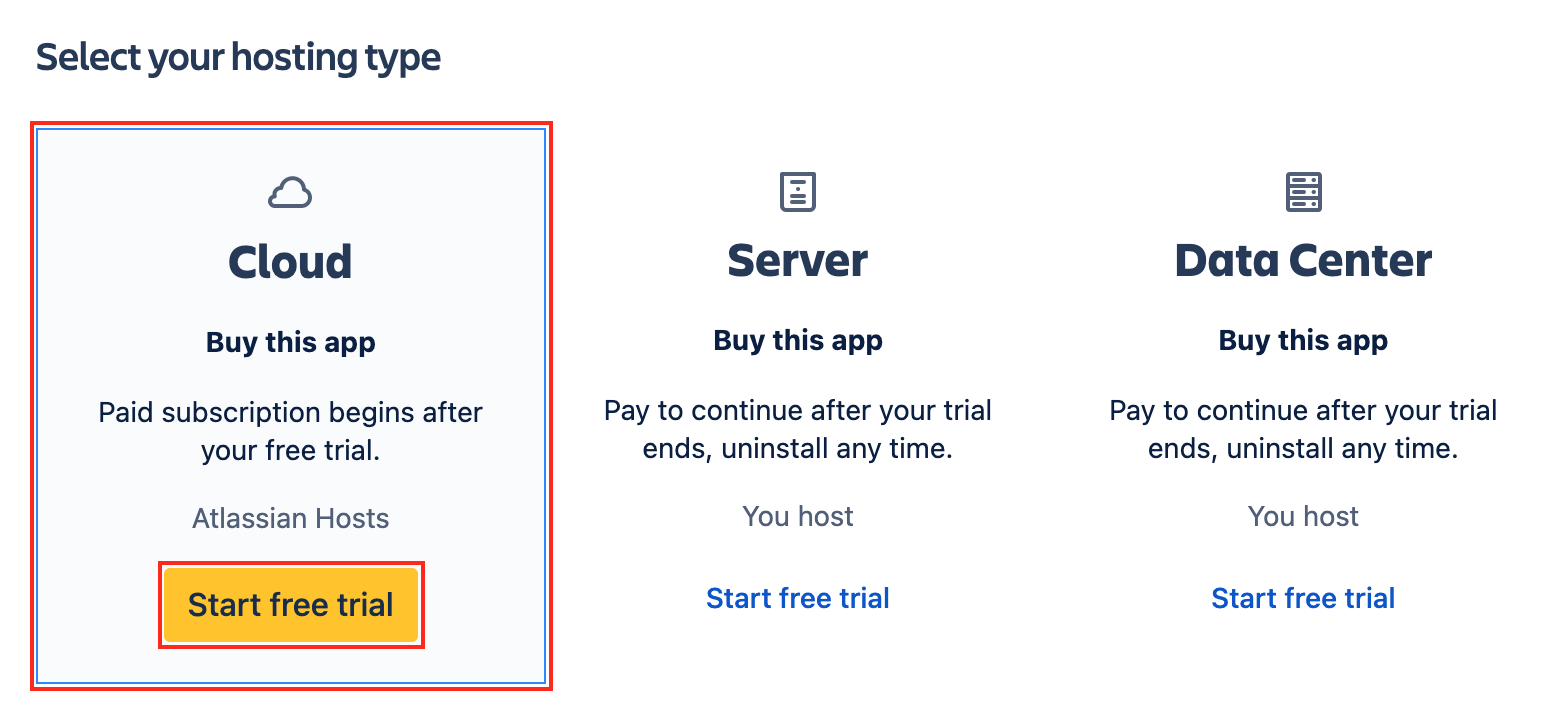
3. Select Cloud as your hosting type and click Start free trial.
4. Choose a site to install the app and click Start free trial
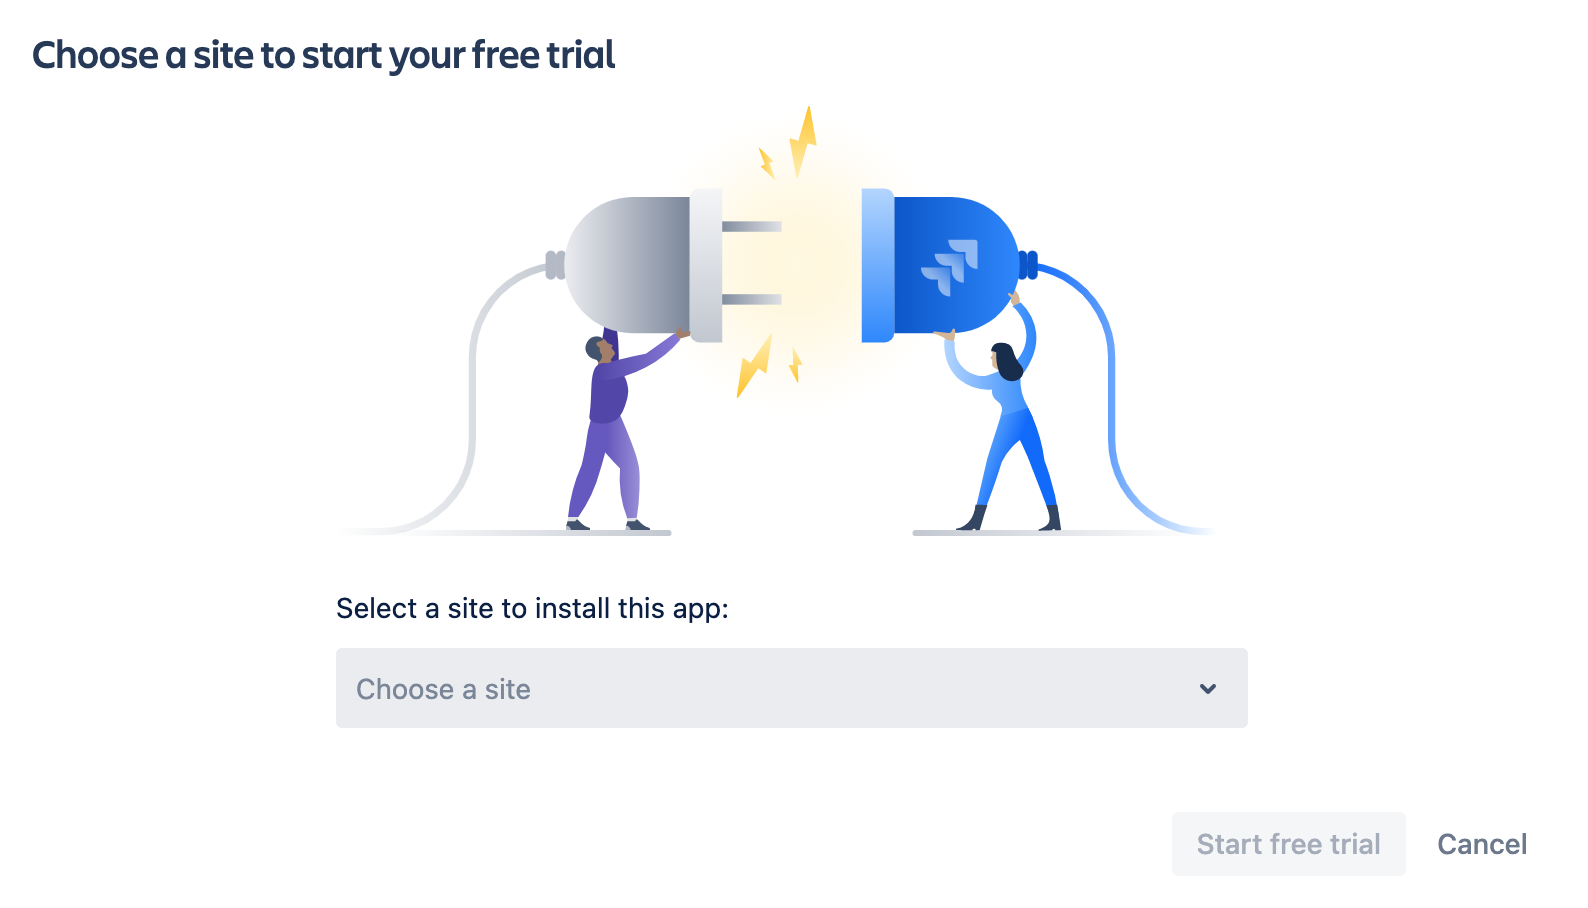
After this step, you are redirected to your Jira dashboard.
5. Confirm the free trial
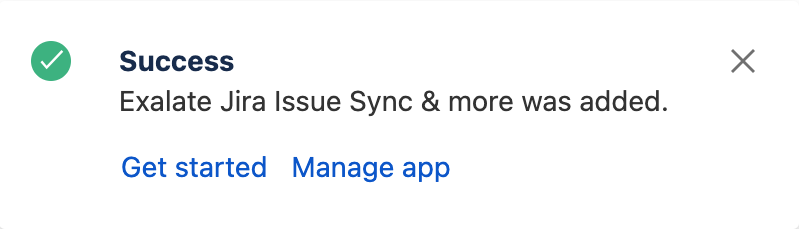
6. You're all set!
Install Exalate from the App Manager
To install the app from your Jira administration App manager follow the steps below:
1. Log into your Jira instance as an admin.
3. Type Exalate in a search field to find ExalateJira Issue Sync & more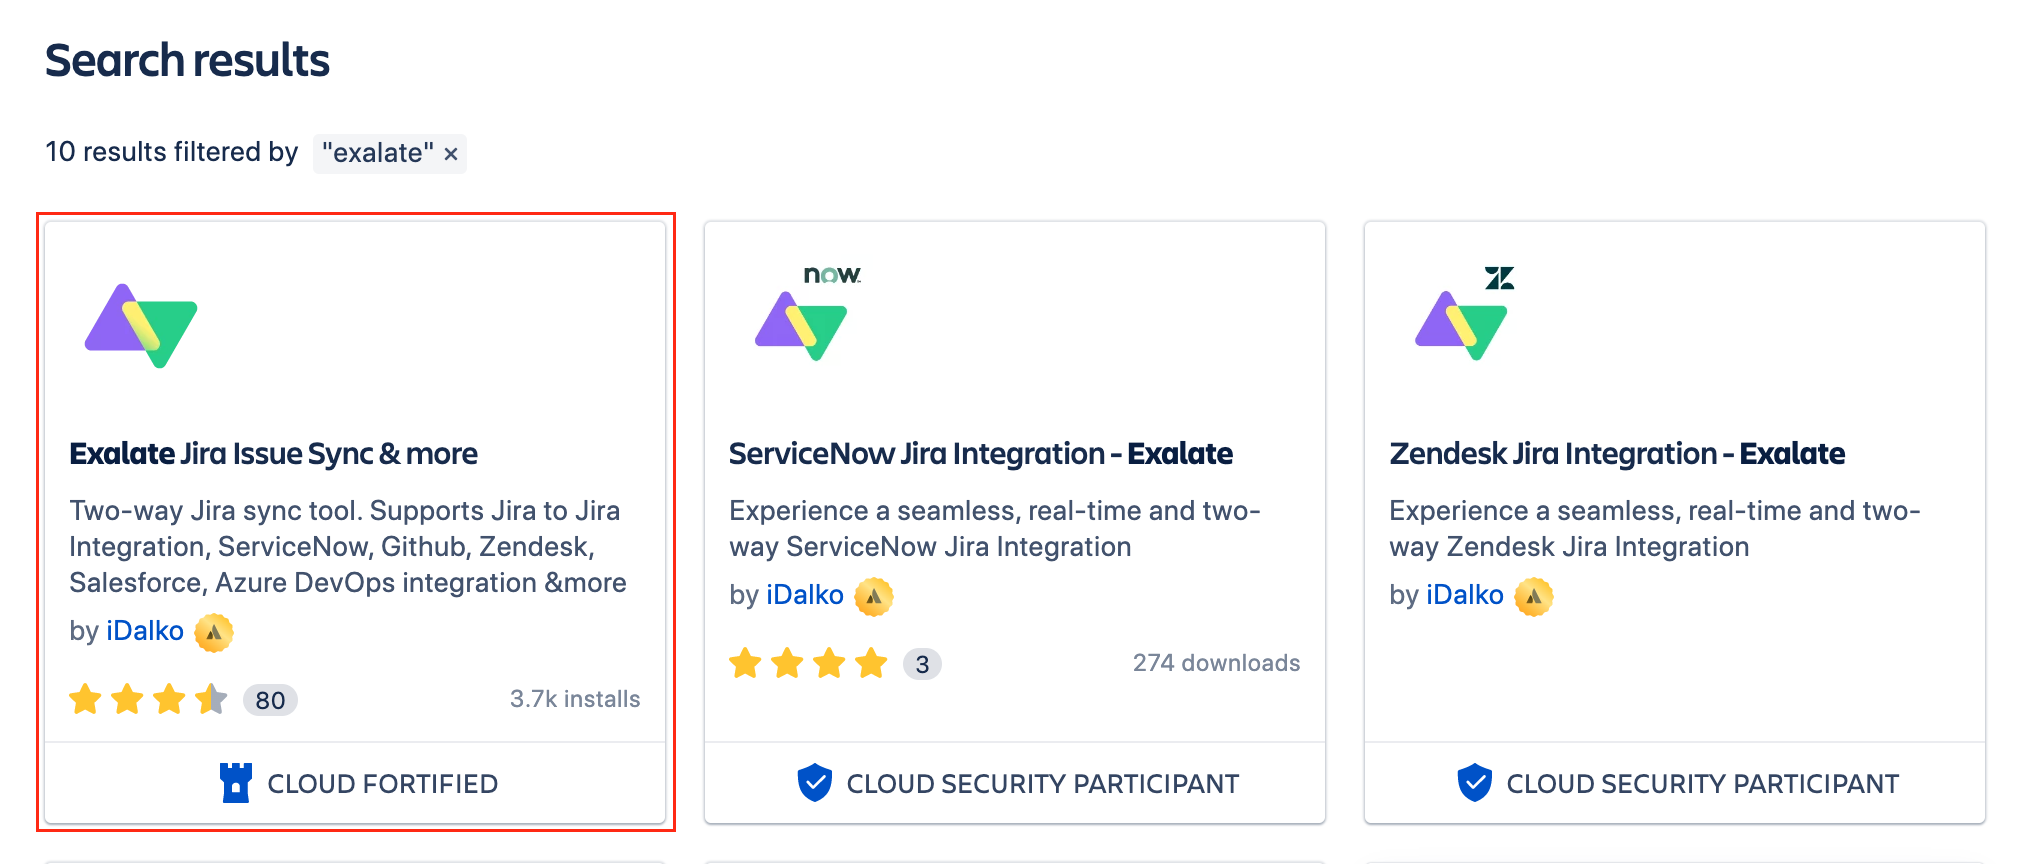
4. Click the app icon for more information and Try it Free
5. Click Start Free Trial

6. You're all set!
Install Exalate on Docker
You can host Exalate for Jira Cloud on your own server. To do so, you need to install Exalate on Docker.
Note: You need to install Docker. Check the docker documentation for more details.
Video Tutorial
For an easy overview, please watch our video on how to install Exalate on Jira Cloud:
Introduction
You can install Exalate for Jira On-premise from the Atlassian Marketplace.
Install Exalate from the Marketplace
Steps to install the Exalate app from the marketplace.
- Log into your Jira instance as an admin.
- Click the admin drop-down and choose Manage Apps.

- Locate Exalate Jira Issue Sync & more.
- Click Free Trial to install the app.
We provide a free evaluation period of 30 days. The evaluation period can be extended twice until 90 days.
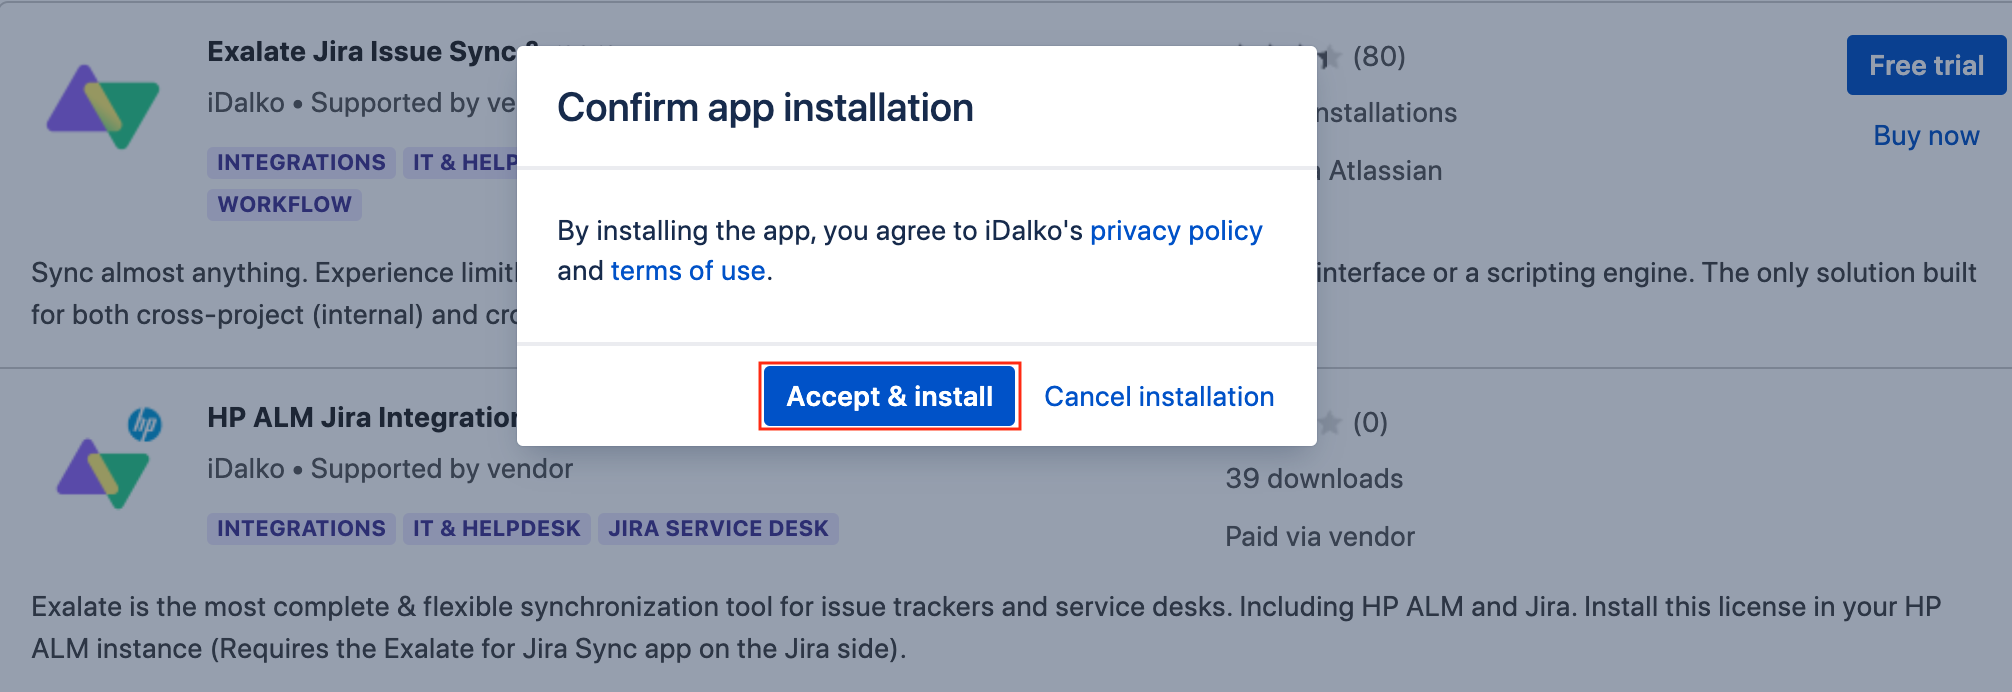
- Click Accept & install to confirm app installation and accept terms and agreements.
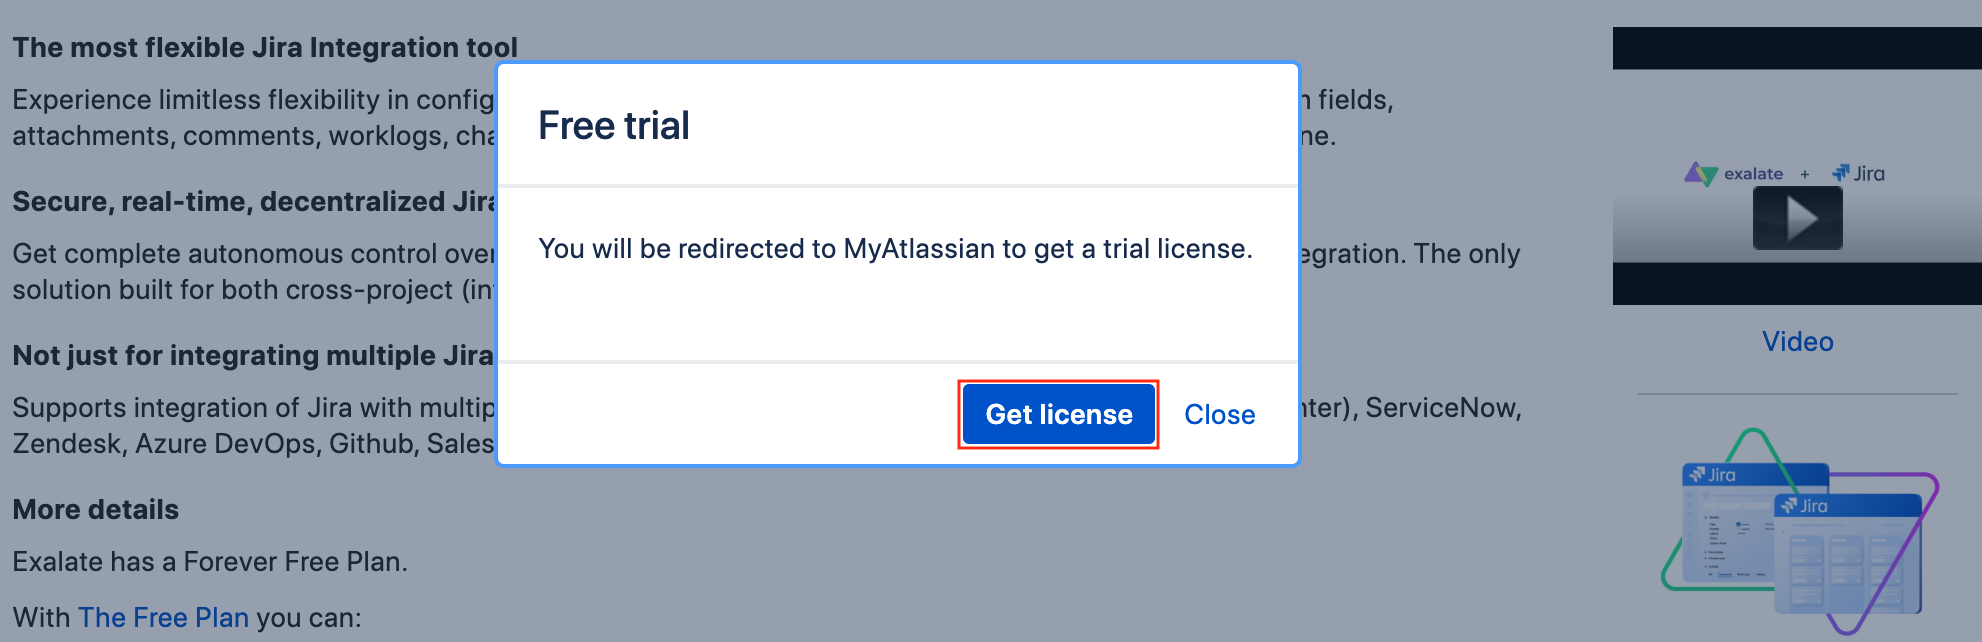
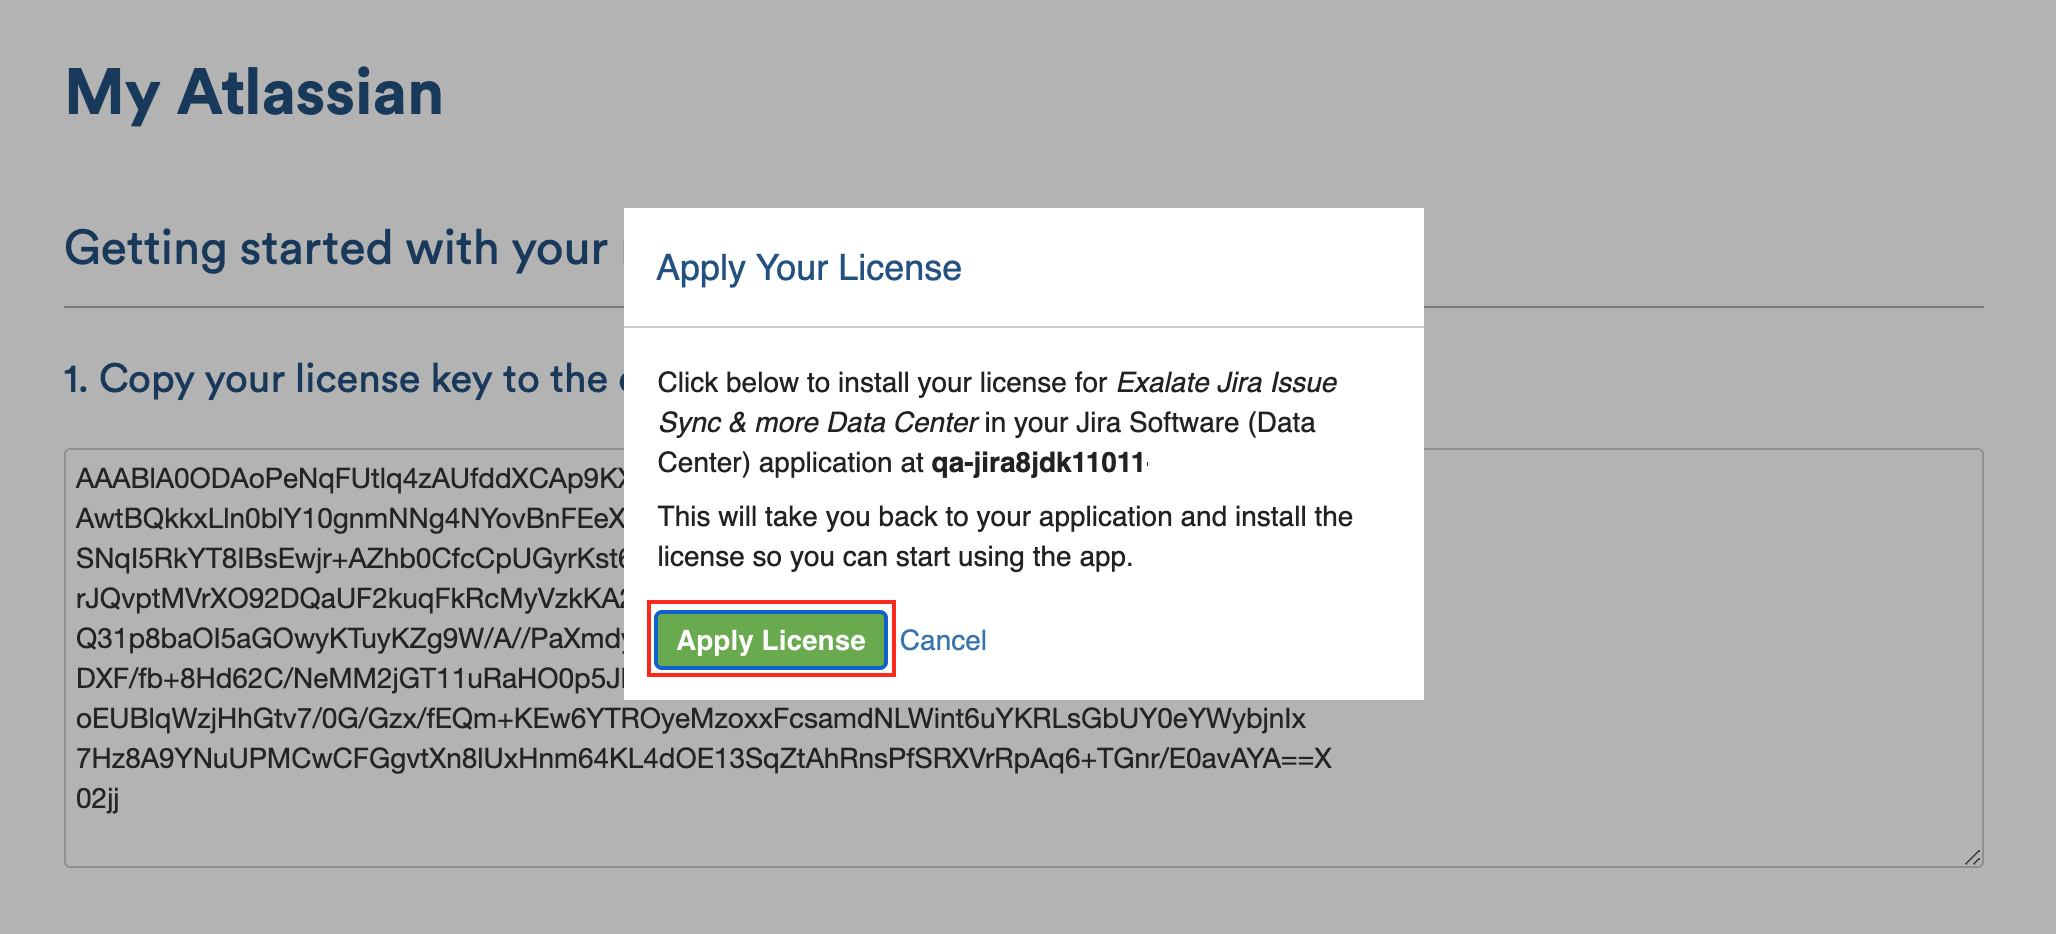
- Click Get License to generate a trial license.
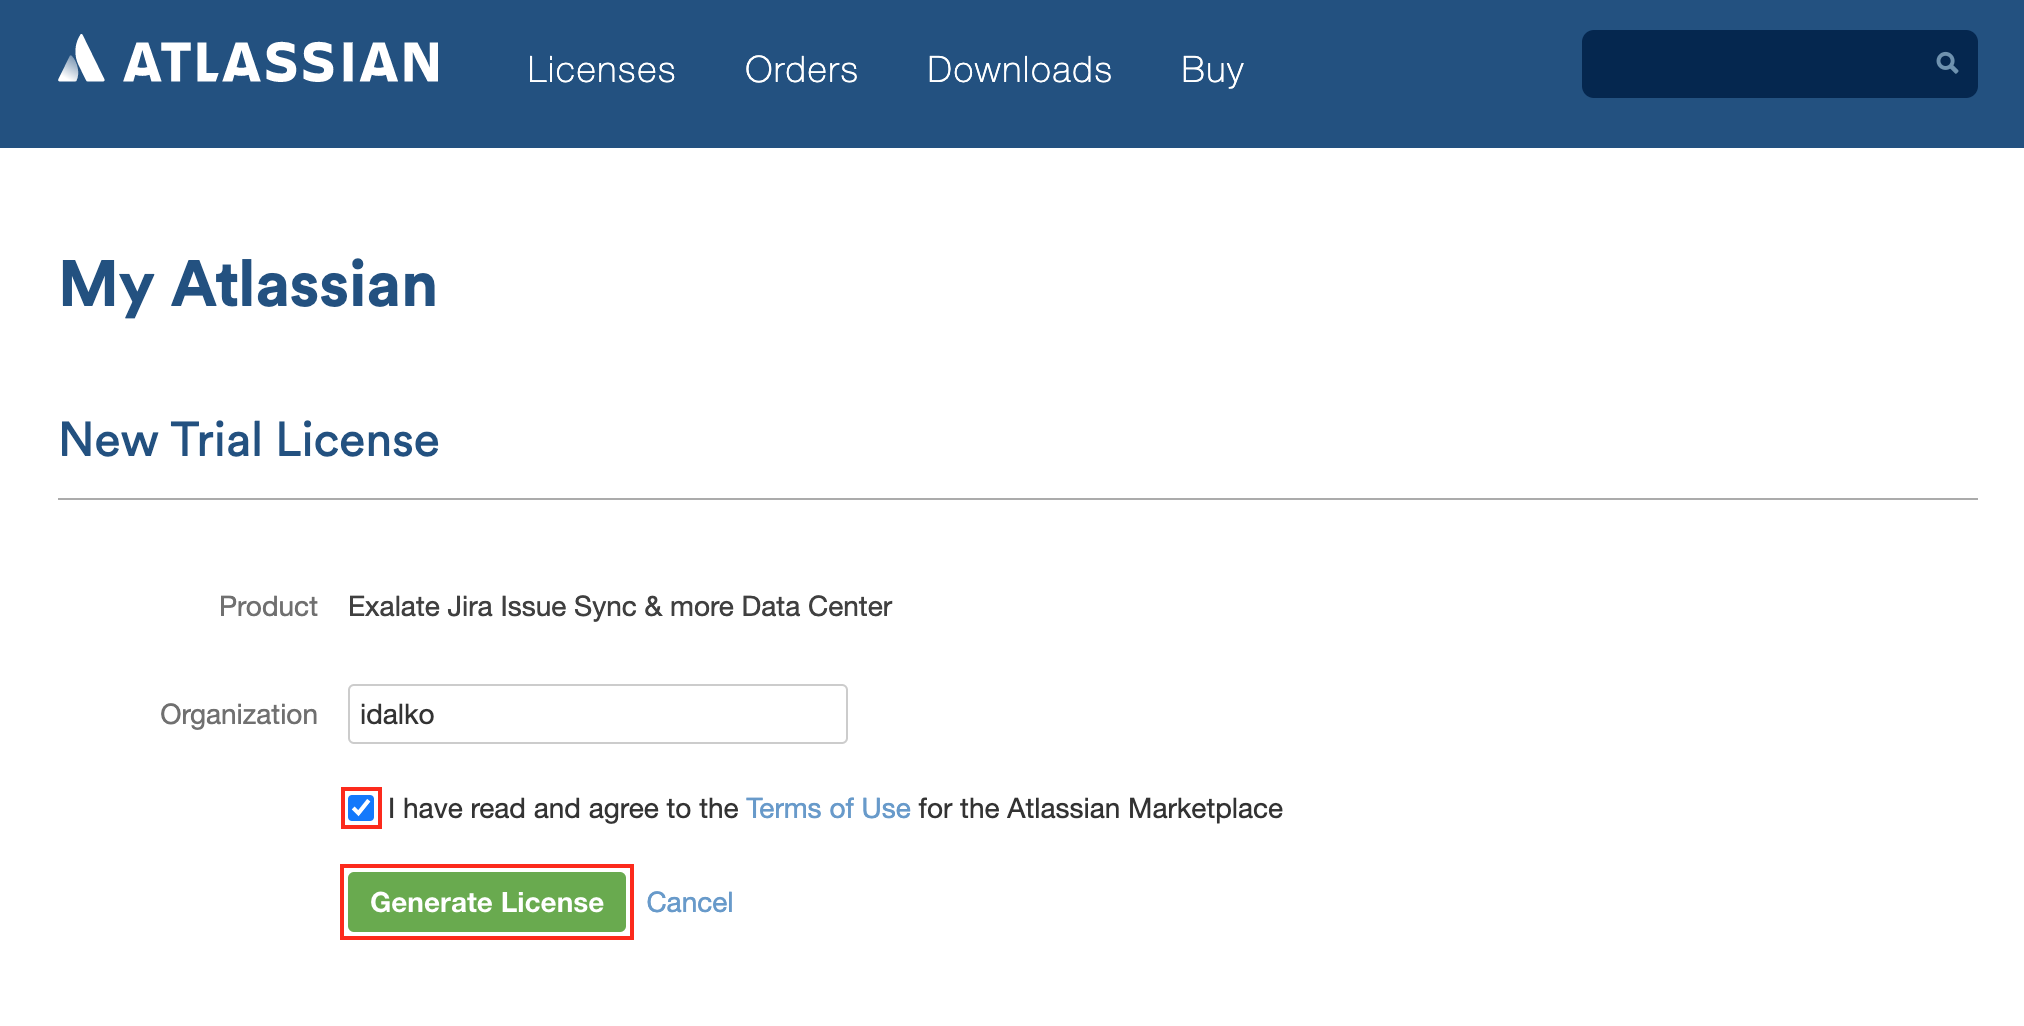
 You are redirected to the My Atlassian page where you should enter your organization name and agree to the Terms of Use for the Atlassian Marketplace
 - Click Generate License.
- Click Apply License.
- You're all set! Proceed to register Exalate on Jira on-premise.


 You are redirected to the My Atlassian page where you should enter your organization name and agree to the

Register Exalate with Jira On-premise
Note: If this is the first time you are installing Exalate, you have to go through a simple registration process before you can start using it.
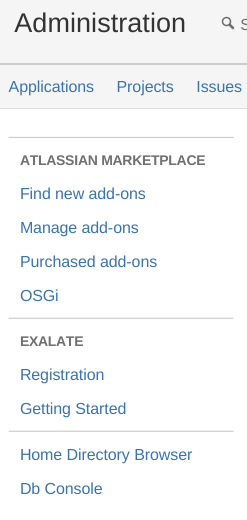
The first thing you need to do is to navigate to the Registration section from the administration menu on the left side:
The next thing you see after navigating to the Registration page would be a form, already filled with your JIRA data.
Before submitting the data, make sure you have read the EULA (End User License Agreement).
Please, notice that we do not sell or share your information with third parties. We only collect information to provide occasional product-related information such as new releases and security-related notices.

After reading the EULA, click Register. You will the following page and the add-on gets activated.

That's all it takes to start using Exalate within your company.
Configuring the Proxy User Permissions
By default, the proxy user is the user who installs Exalate.
To change the proxy user Navigate to General Settings -> Proxy User in the Exalate admin menu to set the proxy user.

In Jira on-premise, the proxy user needs to have the following permissions:
- Browse Project.
- Create issue.
- Edit issue.
- Link issue.
- Transition issue: change statuses (on issue transition).
- If comments are synchronized, the proxy user needs to add, edit, and delete a comment.
- If attachments are synchronized, the proxy user needs to add, and delete attachments.
- If work logs are synchronized, the proxy user needs to add, edit, and delete work logs.
- If security levels are synchronized, the proxy user needs to access the security levels.
- If you're using a trigger the proxy user must be able to search for issues
Note: Jira Service Management permissions: the proxy user needs to be a service desk agent.
Introduction
When installing Exalate for Azure devOps, you have two options:
- install Exalate on Azure DevOps from the Marketplace
- install Exalate on Azure DevOps on Docker
Once you have selected an option and installed Exalate, you must do the following:
- verify Exalate on Azure DevOps
- configure the proxy user permissions
Important: If the user registering Exalate for the first time is not directly part of the Project Collection Administrators (PCA), that user are not able to register the node. The user installing Exalate must not have an "inherited" access to PCA, but MUST instead be directly part of PCA group.
Important: Please note that Exalate installs a Sync Panel to all Azure DevOps processes by default. You can remove this from specific processes by navigating to Project Settings > Process.
Install Exalate on Azure DevOps from the Marketplace
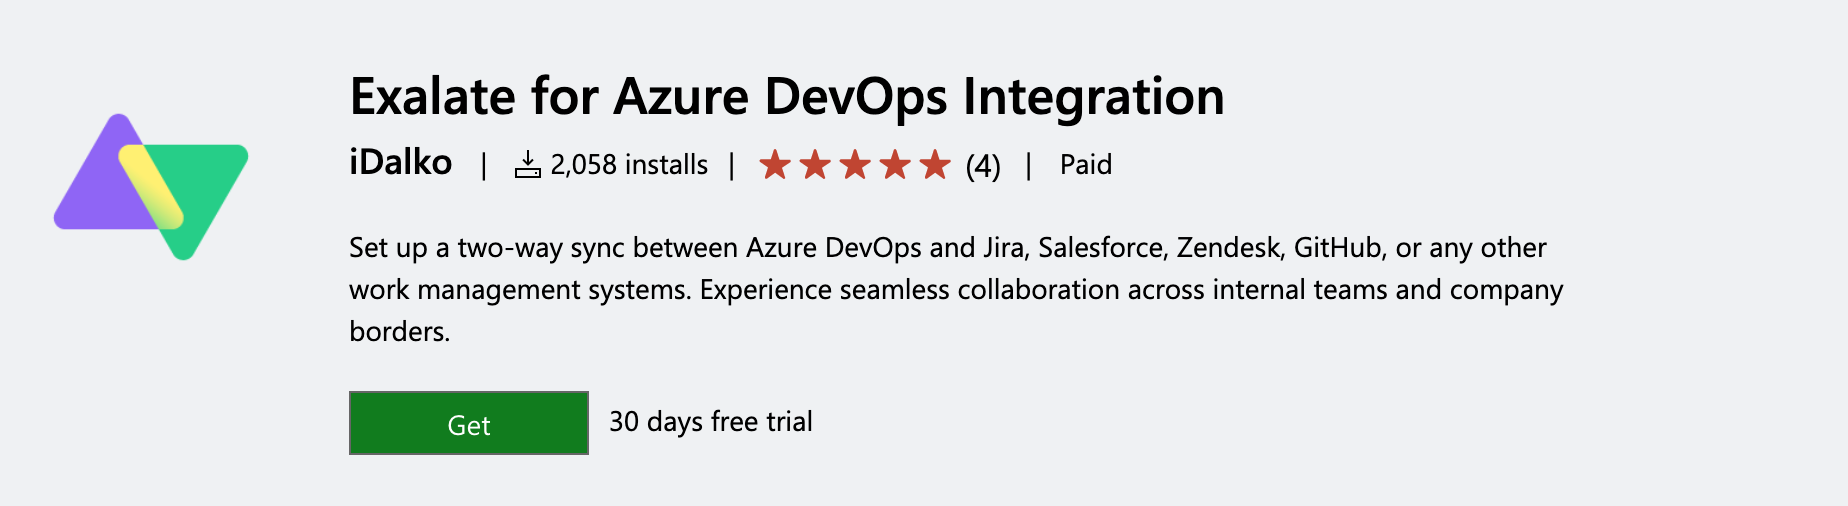
You can find the Exalate app Azure DevOps marketplace.
To install Exalate for Azure DevOps:
- Sign in to your Azure DevOps instance as an admin.
- Navigate to the marketplace. You can do so in multiple ways:
- Navigate to
 -> Browse marketplace.
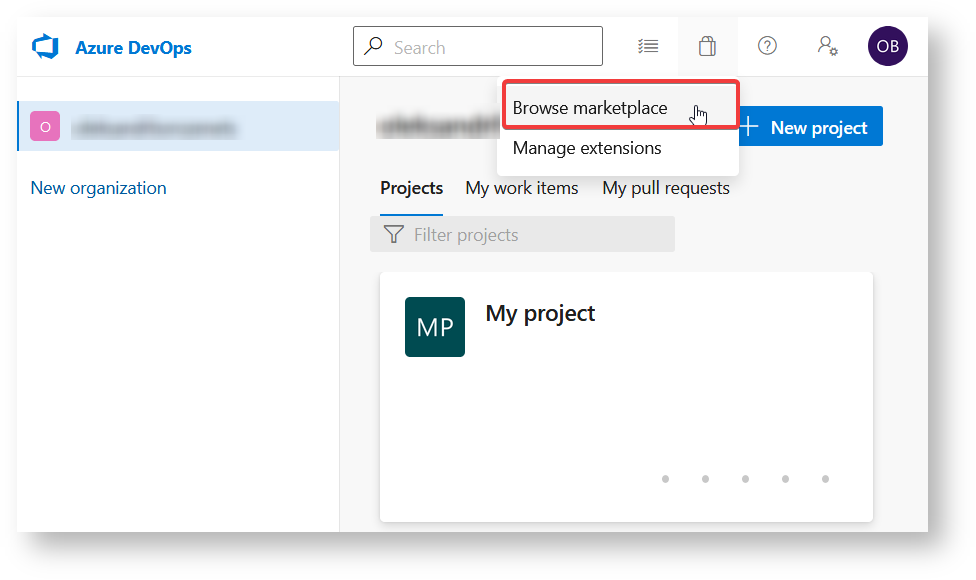
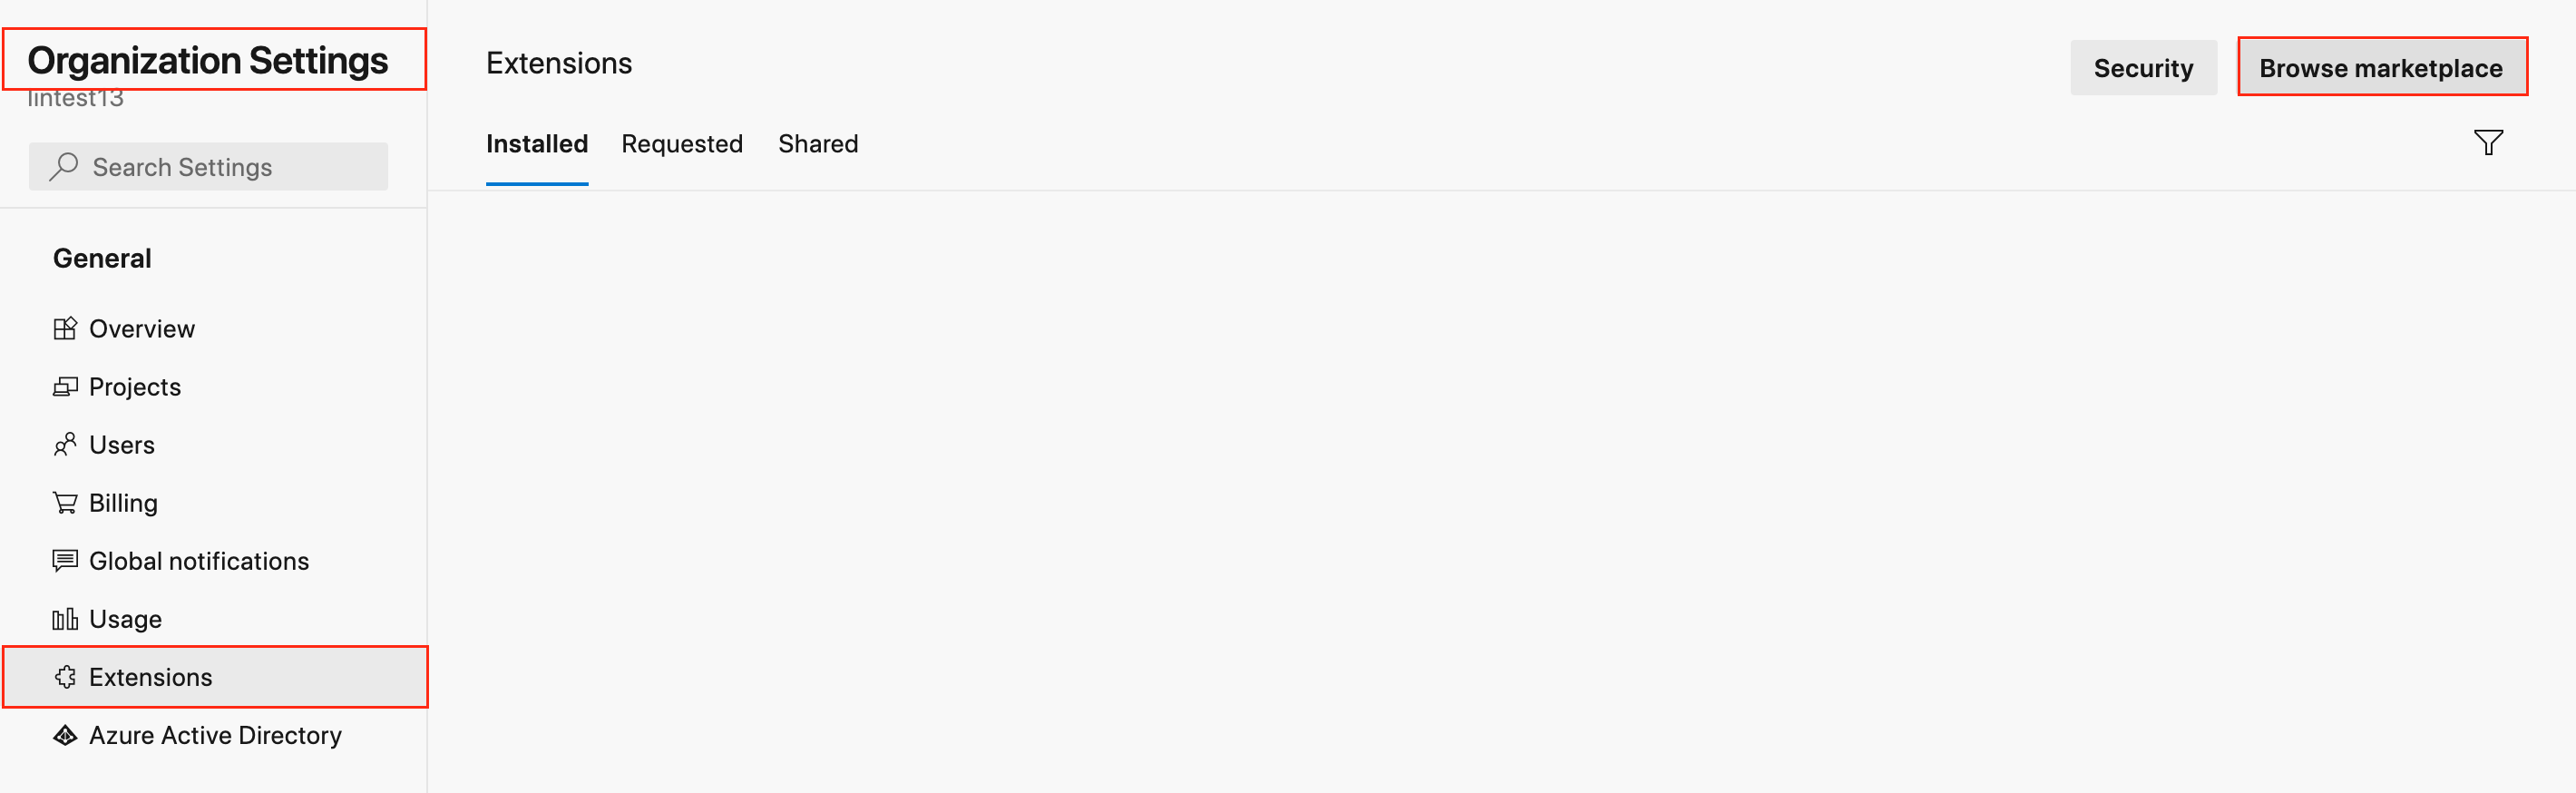
- Navigate to Organization Settings -> Extensions -> Browse marketplace.
- Navigate to
- Find Exalate for Azure DevOps.
- Press Get.
- Select the organizationin your Azure DevOps.
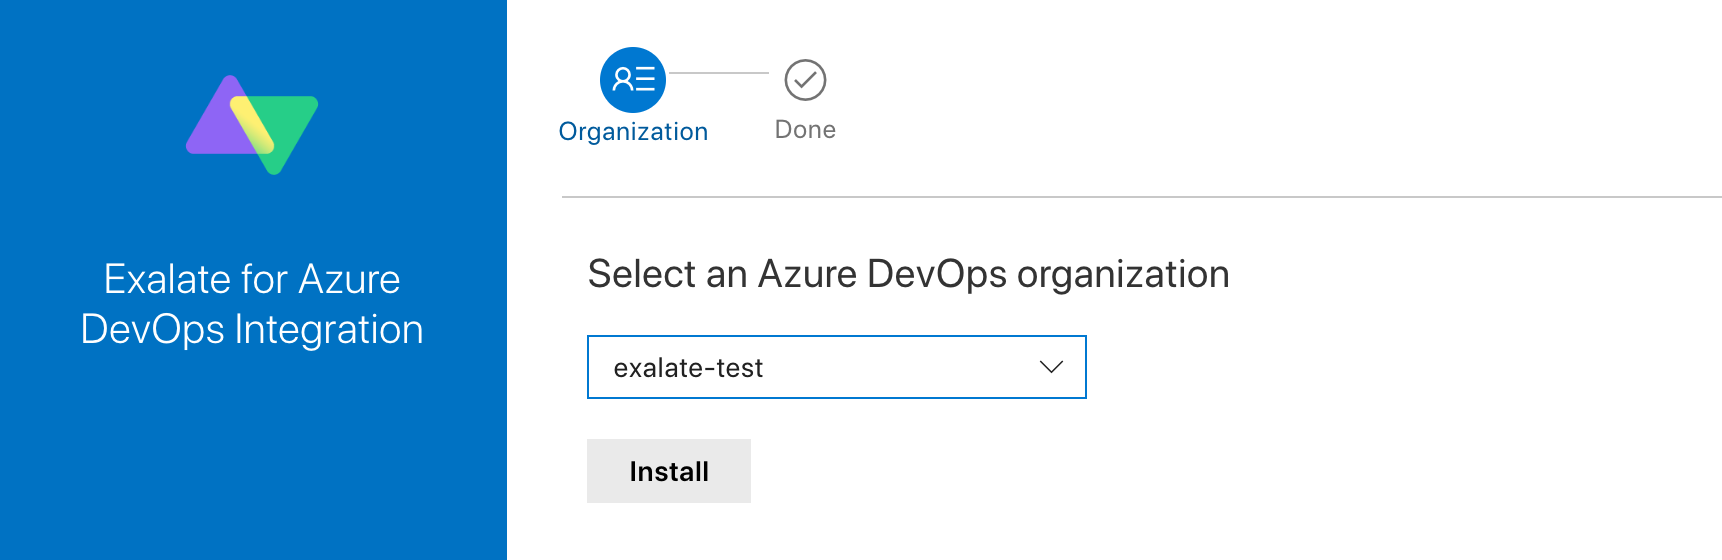
- Press Install.


You are all set!
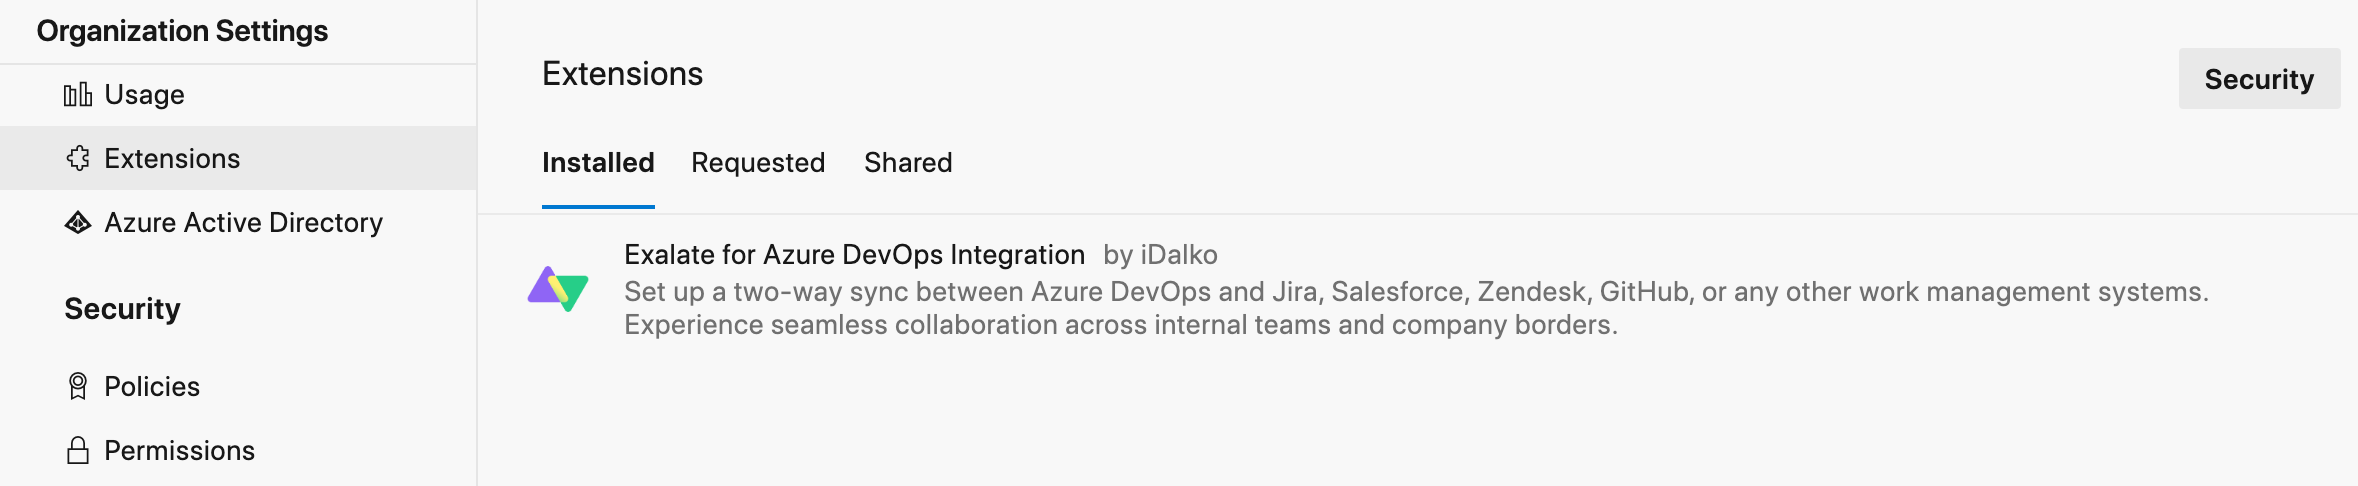
Exalate is available under Organization Settings -> Extensions.
Install Exalate for Azure DevOps on Docker
Exalate App for Azure DevOps can be installed on the server using Docker.
Note: You need to install Docker. Check the docker documentation for more details.
For details on the step-by-step procedure to install Exalate for Azure DevOps on Docker visit this page.
Verify Exalate for Azure DevOps
You need to verify Exalate for Azure DevOps after installing it from the marketplace or on Docker.
Note: The verification process is different for Marketplace and Self-hosted versions.
Marketplace
1. Open Exalate.
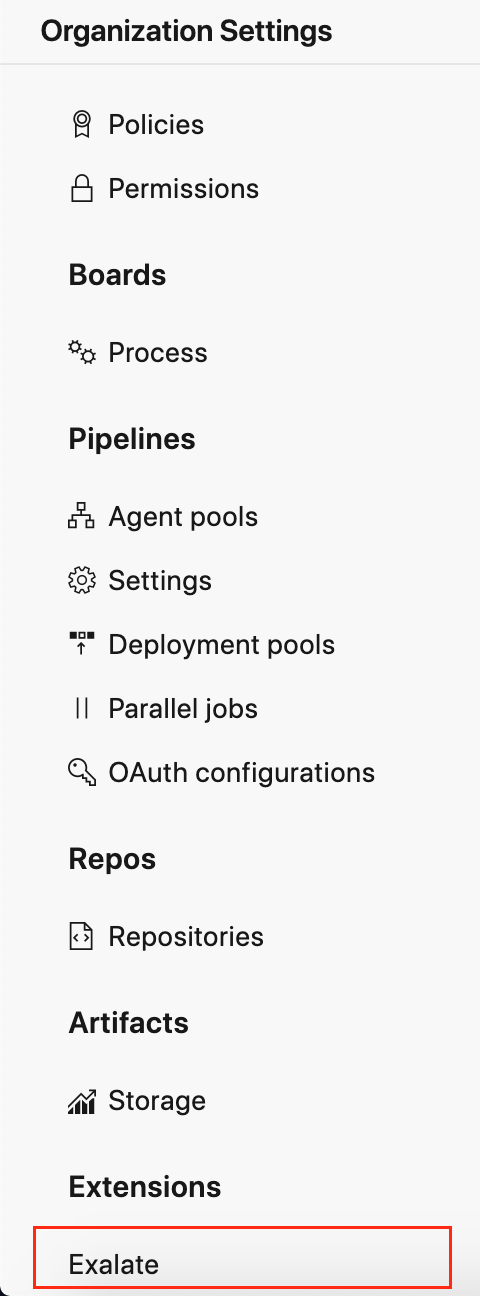
To access Exalate, navigate to Organization Settings -> Extensions.
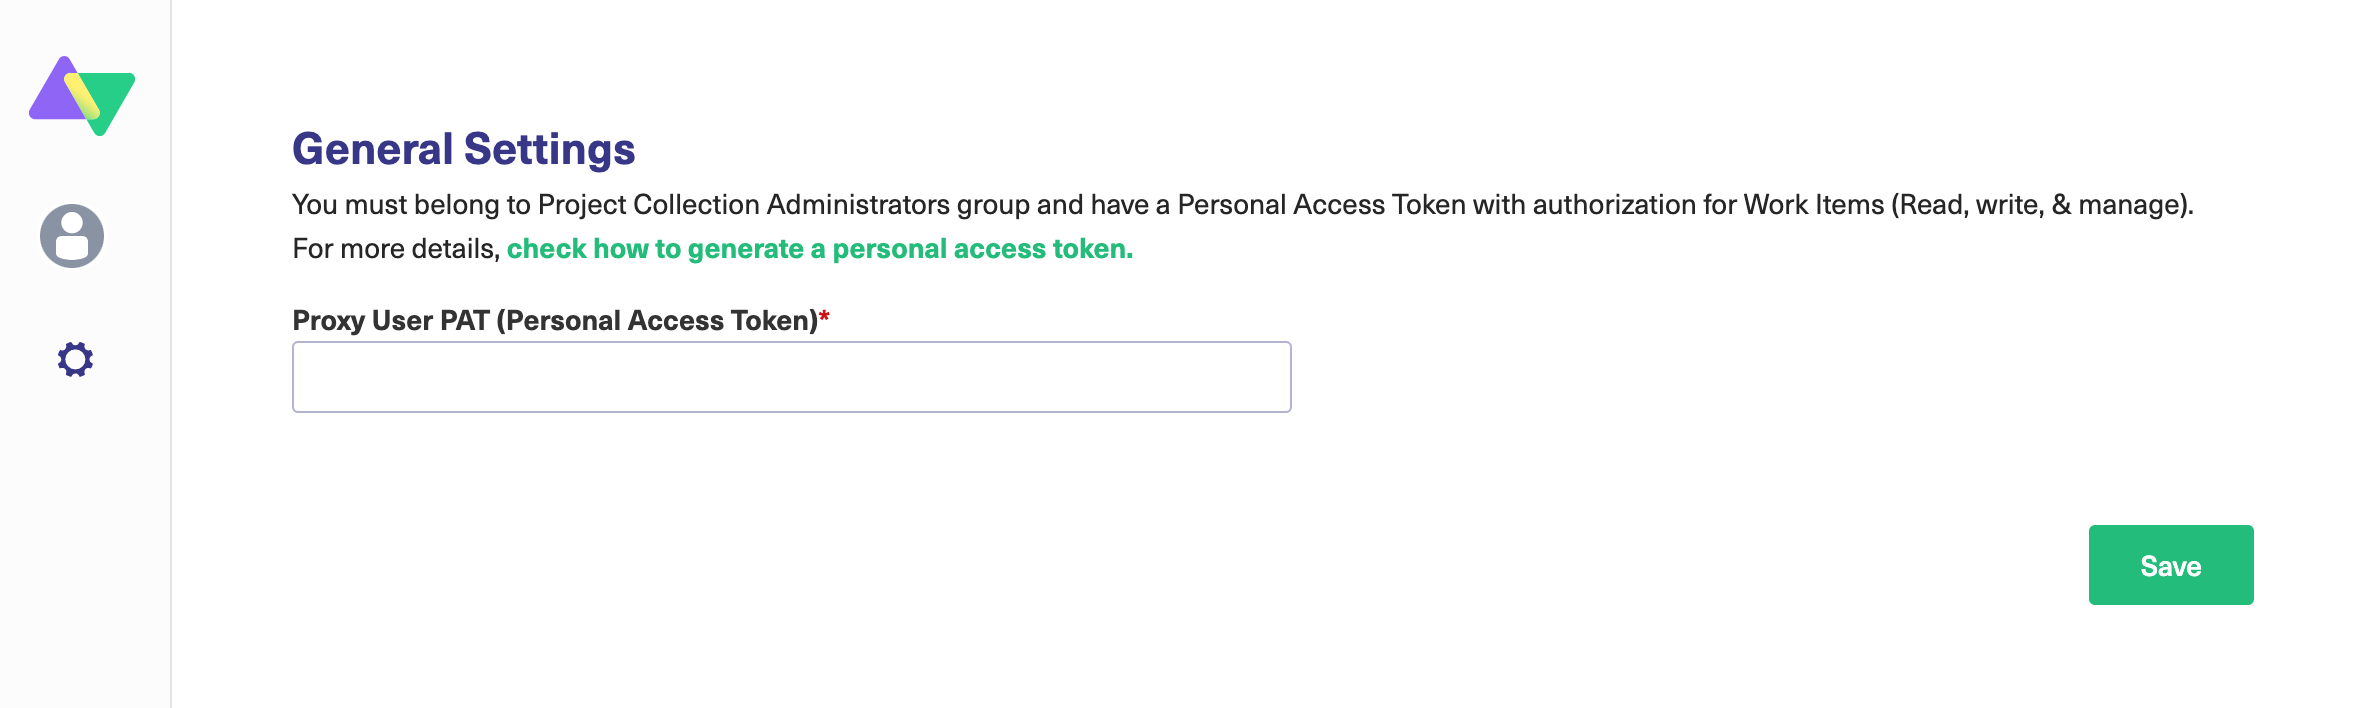
2. Enter your personal access token in the Proxy User PAT (Personal Access Token) field.
Note: You can generate a personal access token (PAT) in Azure DevOps. For more information, please read Azure DevOps: How to generate a personal access token.
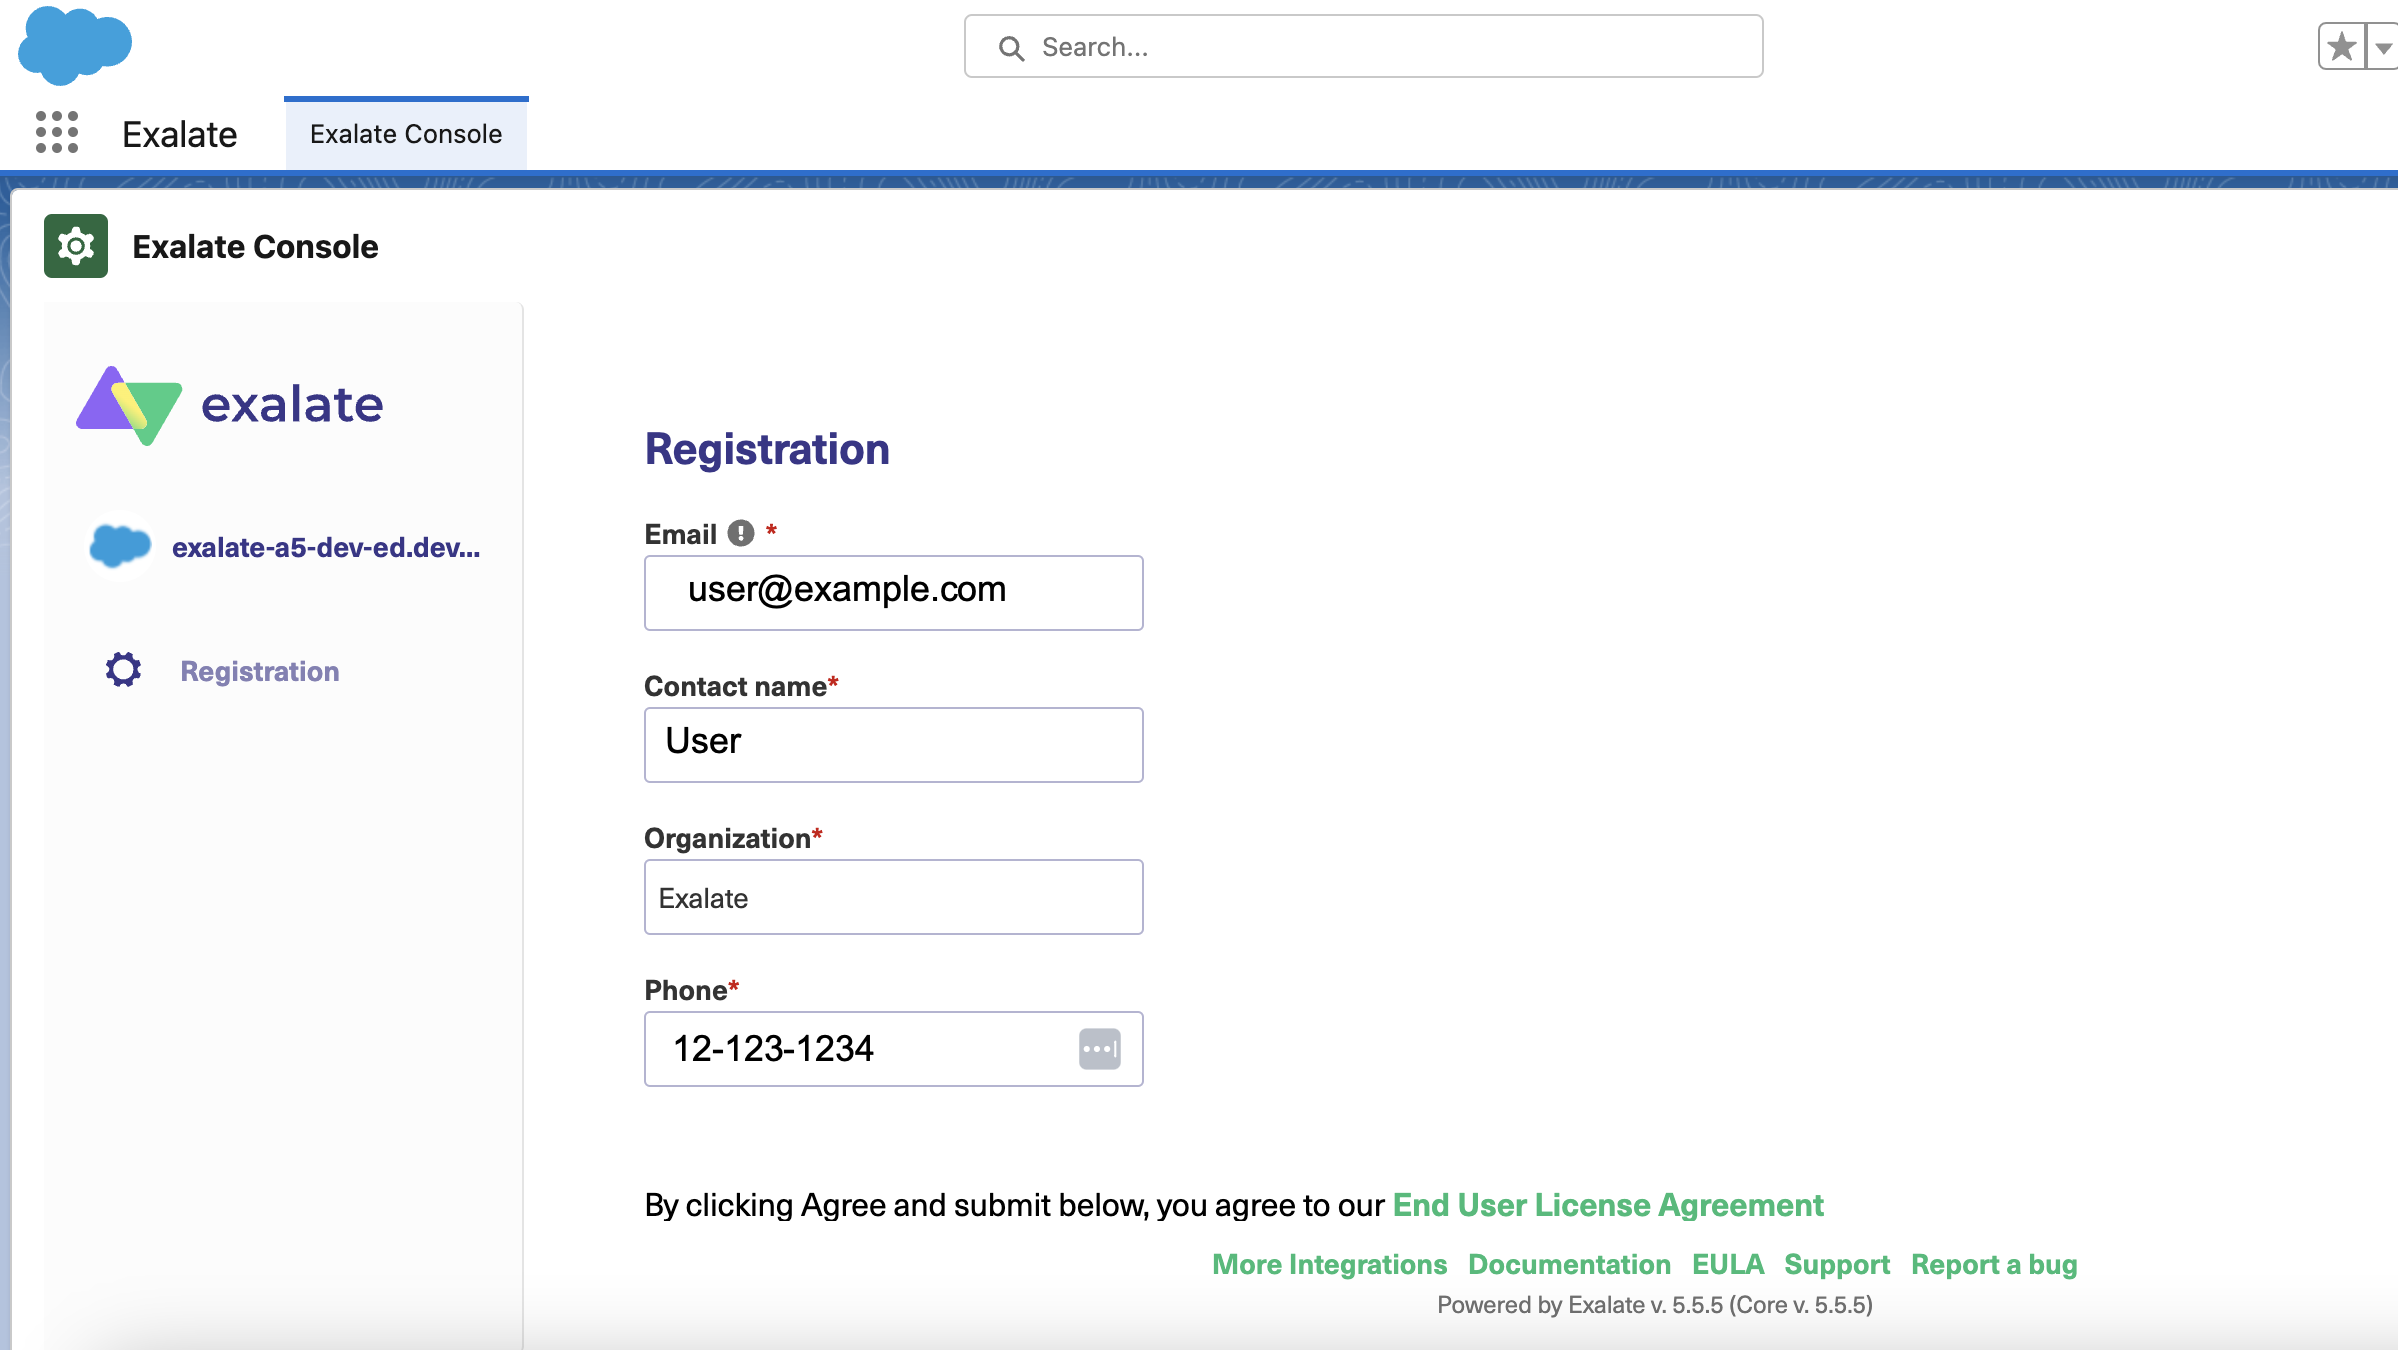
3. Enter your contact details in the Registration screen.
Exalate uses this info to:
- Verify your instance.
- Activate an evaluation license.
- Create an admin account to receive error notifications.
4. Select Agree and submit.
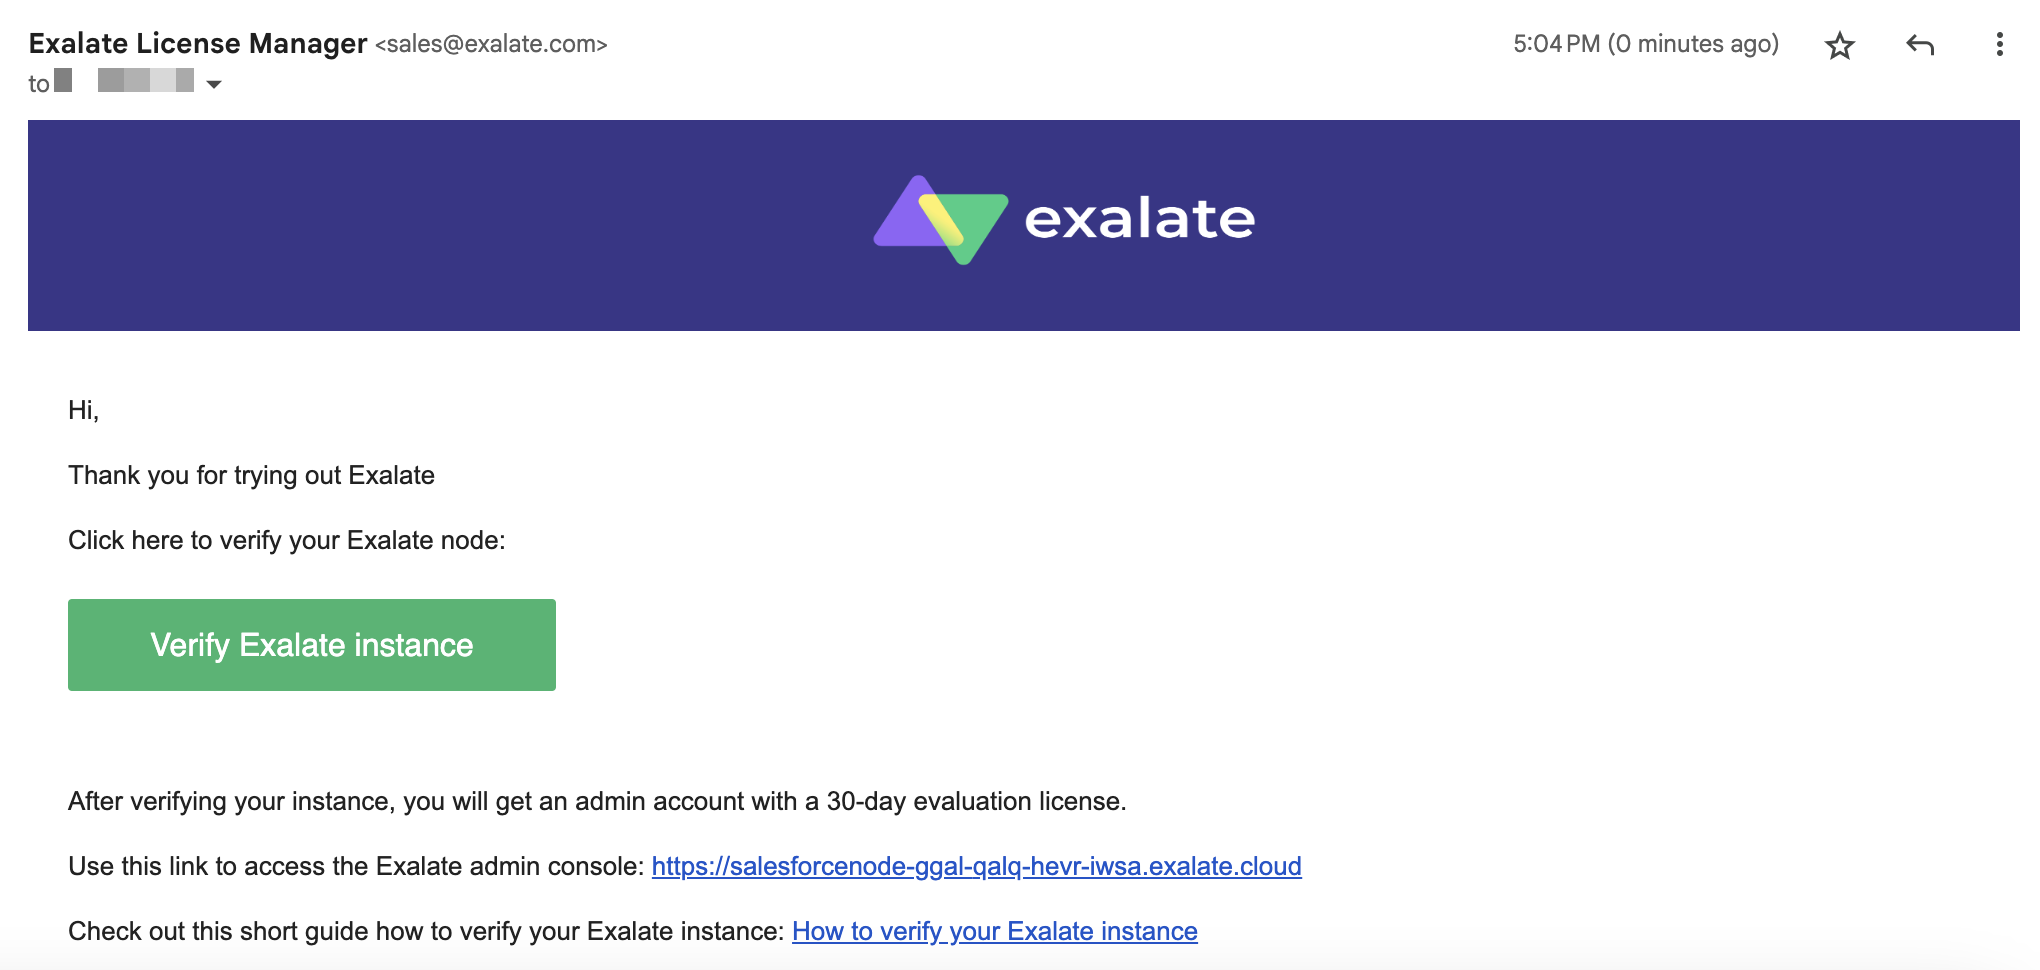
After selecting Agree and submit you get an email to complete our security check.
Note: After clicking Agree and submit you accept our End User License Agreement (EULA). You can read it before accepting. It is also available here:
5. Open your email and select Verify Exalate instance.
You are redirected back to your Exalate console.
6. Select Continue.

Self-Hosted
1. Configure General Settings.
You need to connect the Exalate app with your Azure DevOps instance.
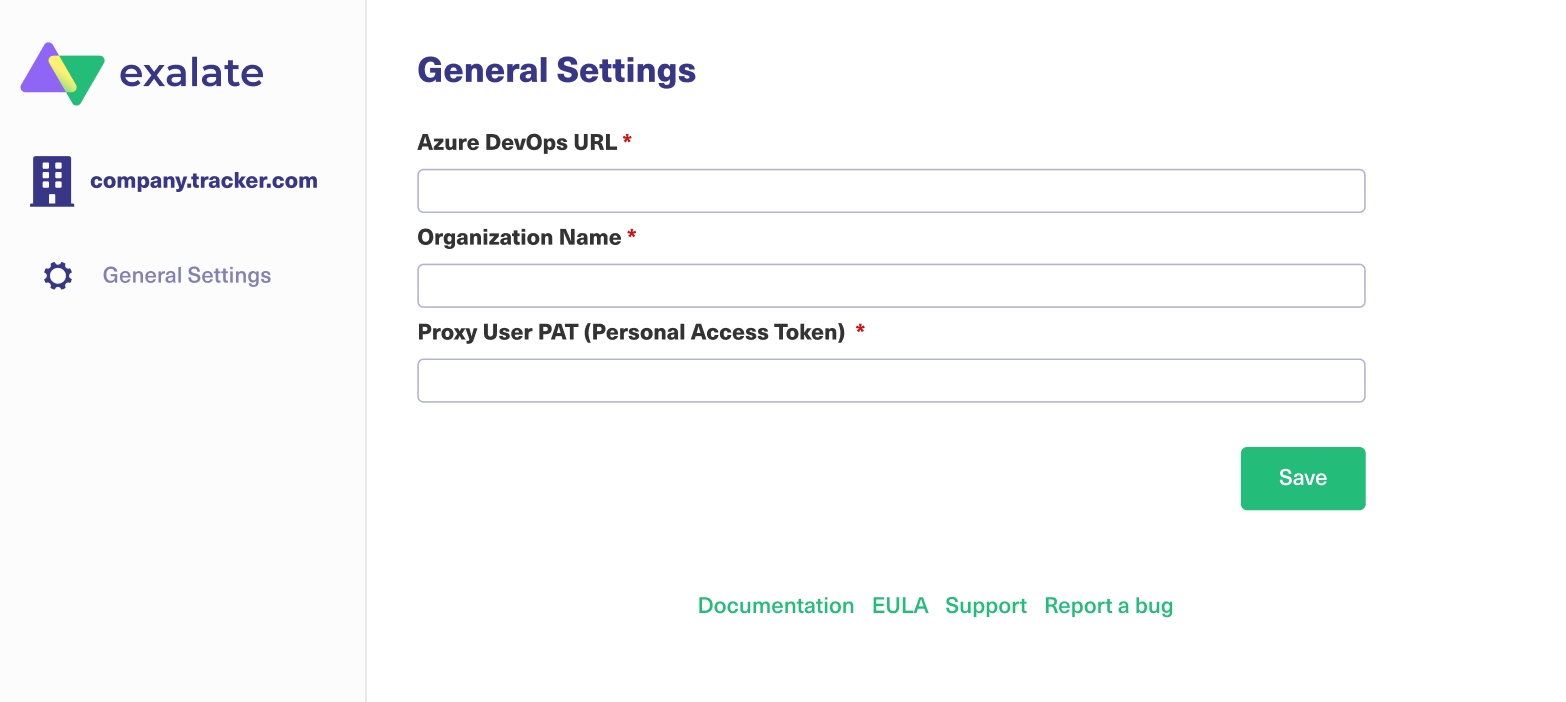
Pre-requisites:
The URL of your Azure DevOps instance.
A Personal Access Token(PAT).
Note: You can generate a personal access token (PAT) in Azure DevOps. For more information, check out Azure DevOps: How to generate a personal access token.
2. Enter your contact details in the Registration screen.
Exalate uses your info to:
- Verify your instance.
- Activate an evaluation license.
- Create an admin account to receive error notifications.
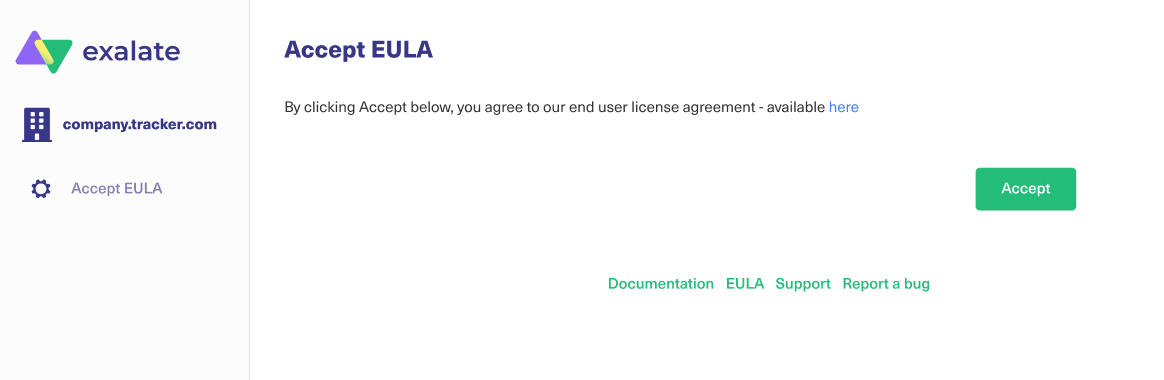
3. Select Agree and submit.
After selecting Agree and submit you get an email to complete our security check.
Note: After clicking Agree and submit you accept our End User License Agreement (EULA). You can read it before accepting. It is also available here:
4. Open your email and select Verify Exalate instance.
You are redirected back to your Exalate console.
5. Select Continue.
Configuring the Proxy User Permissions for Azure DevOps
By default, the Exalate proxy user is the Project administrator and a member of the Project Collection Administrator group.
To integrate Exalate with the Azure DevOps instance you need a Proxy User.
The proxy user is the Azure DevOps user account that fetches information from the Azure DevOps instance and updates work items with incoming changes.
Access to Azure DevOps
Exalate needs to authenticate to the Azure DevOps instance. You can provide such access using the Personal Access Token(PAT).
Use the PAT to access the Exalate admin console. Please read how to generate the PAT(Personal Access Token) in your Azure DevOps instance.
Proxy User Permissions
This user must have the following permissions:
be a Project Administrator and a member of the Project Collection Administrator group on the Organization level
Note: You can add the project administrator to the Project Collection Administrator in your Azure DevOps under Organization Settings → Permissions → Project Collection Administrators.
- Personal Access Token with authorization to Read, Write, and Manage work items.
Video Tutorial
Also, watch our video on how to install Exalate on Azure DevOps:
Introduction
- Install Exalate for ServiceNow on Exalate cloud
- Request an evaluation instance of Exalate for ServiceNow
- Deploy the Exalate Bridge app
- Set up Exalate in your ServiceNow instance using an update set
- Next steps to install Exalate for ServiceNow
- Configure Exalate for ServiceNow
- Install Exalate for ServiceNow on your own server
- Install Exalate for ServiceNow on Docker
- Verify your Exalate for ServiceNow
Install Exalate for ServiceNow on Exalate Cloud
This section describes how to request a ServiceNow integration for Exalate.
Request an Evaluation Instance of Exalate for ServiceNow
1. Go to the Exalate Integrations page: https://exalate.com/integrations/.
2. Select ServiceNow.
![]()
3. Enter your info as requested:

4. Click Submit.
After you submit a request, you get an email containing the node URL and the evaluation license.

Note: if you haven't received an email, please reach out to support@exalate.com.
Deploy the Exalate Bridge app
Important: Dev environments cannot install applications from the ServiceNow store. Click on this link and follow the next steps to deploy the Exalate bridge using an XML-based update set: Set up Exalate in your ServiceNow instance using an update set.
What is the Bridge App?
The Exalate bridge app is a ServiceNow-certified app that allows connecting your ServiceNow environment with the Exalate app.

This bridge app is meant to simplify access to the Exalate for ServiceNow service. When deployed it:
- Creates 2 Roles
- x_idnv_exa_bridge.admin
- x_idnv_exa_bridge.integration
- Creates 3 ACL on the sync_journal_field table
- read, create, write
- Adds a link to the console in the exalate bridge application menu

To know more about the next steps visit the Deploy Exalate for ServiceNow guide.
Configure Exalate for ServiceNow
Once you've configured the Exalate app in the ServiceNow instance, you can proceed with the app configuration.
Step 1: Set up a proxy user on ServiceNow
A proxy user is a ServiceNow service account that is responsible for accessing the information stored on your instance and applying any incoming changes.
Create a service account on your ServiceNow environment. This service account requires a number of permissions as documented here
To simplify this step, you can also use an update package which automatically configures the necessary settings. Details of deploying this updated package are available here
Step 2: Accept the EULA
By using this product we require an explicit approval of the end user license agreement, which can be found here
Step 3: Connect the Exalate for ServiceNow to your instance
In the second step, you need to connect the Exalate for ServiceNow with your instance.
You need:
- The URL of your ServiceNow instance. This URL must be accessible from this application.
- The details of the proxy user: The username and either the password, or an OAuth token. (More information on retrieving the OAuth token are documented here
- The license The evaluation or production license which unlocks the functionality of the application.
You get notified if something fails.
Step 4: Access the Exalate Console
The Exalate console is where integrations are configured. To access the console you need a ServiceNow account with administration permissions.
Prepare your admin username and either the password or an OAuth token
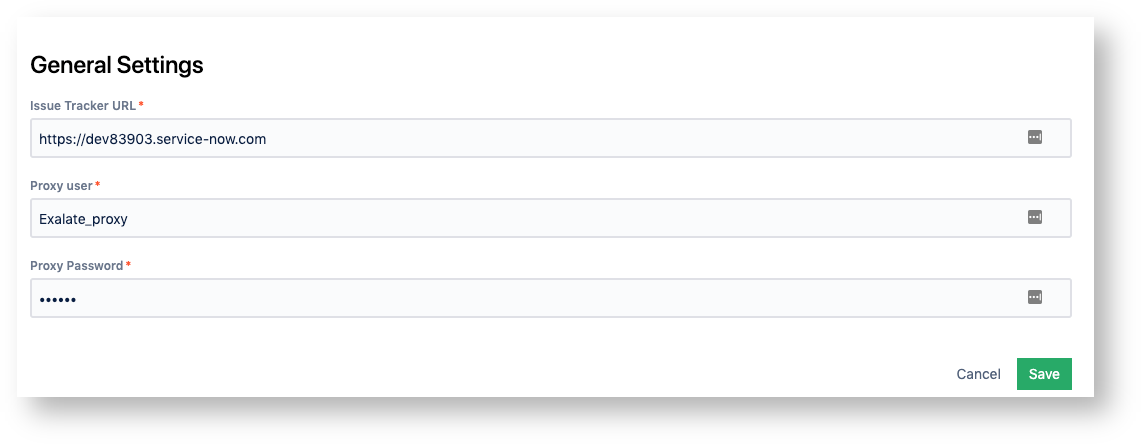
Step 5: Configure General Settings
You need to specify your ServiceNow instance URL, the proxy user access details, and the evaluation license key.
The proxy user is a dedicated user in your ServiceNow instance. The proxy user must have permission to Create/Read/Update entities on ServiceNow. If you want to Create/Read/Update Incidents, Cases, Problems, or Change Requests in ServiceNow, the user needs to have roles for that.
In ServiceNow, proxy users can sync tables or attributes based on the access from their user role. For more information, please read Exalate for ServiceNow: Proxy user permissions .
You can find the license key in the email along with your Exalate app URL.

6. Save the Configuration
You are redirected to the log-in screen.
7. Log in to the Exalate Admin Console
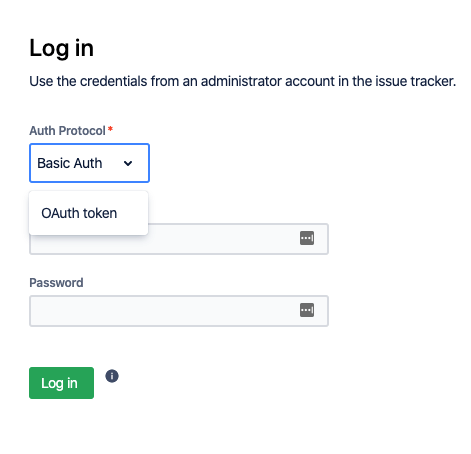
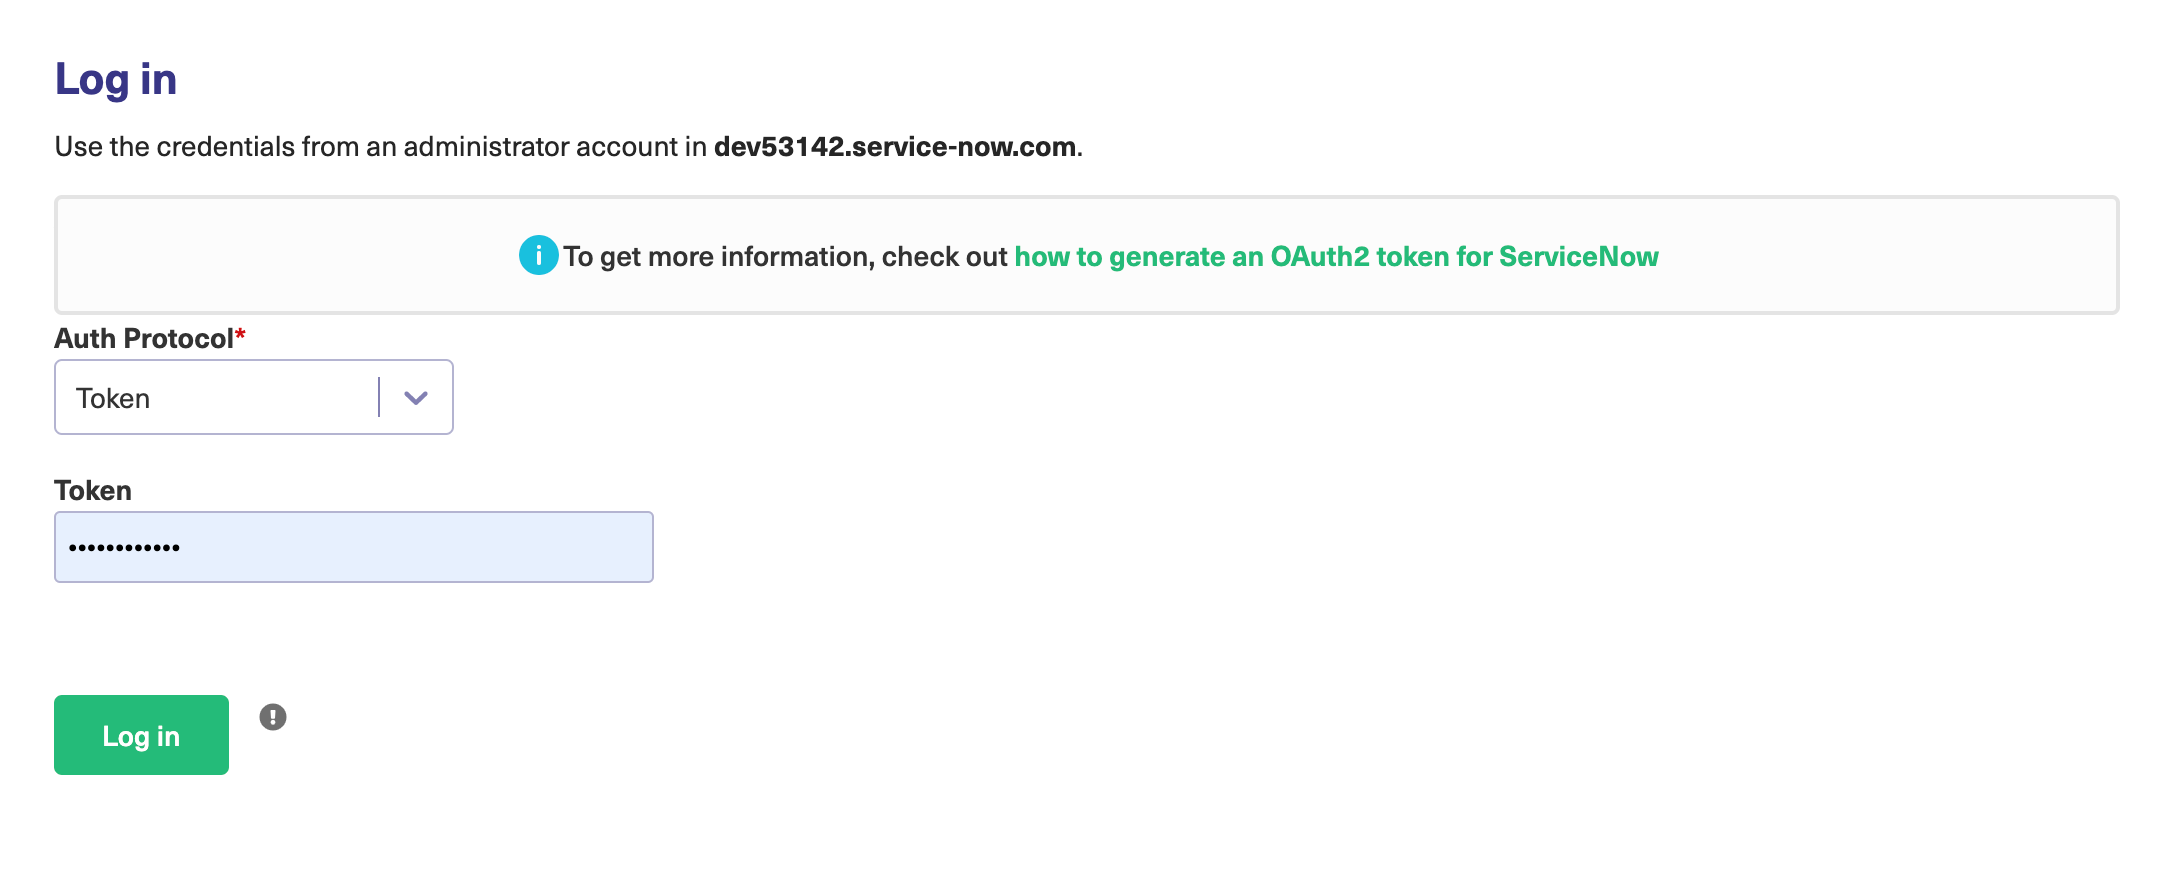
Basic Auth
Use your ServiceNow instance admin access credentials.

Note: We do not store ServiceNow instance access credentials. Exalate only checks if the admin user is valid.
OAuth Token
You need to have a ServiceNow endpoint to log in with an OAuth token.
Set Up OAuth Tokens in Exalate for ServiceNow
Here is the detailed procedure to set up the login with OAuth tokens in Exalate for ServiceNow.
Install Exalate for ServiceNow on Your Own Server
You can host Exalate for Servicenow on your own server. To do so, you need to install Exalate on Docker.
Note: You need to install Docker. Check the docker documentation for more details.
Here is a glimpse of the steps to do that.
- How to install Exalate for ServiceNow
- Preview
- 1. Create or download the docker-compose.yml
- 2. Ensure that a correct database is a setup using a createdb.sh
- 3. Set environment variables if necessary
- 4. Start the application
- Troubleshooting
Please read the detailed procedure in our Install Exalate for ServiceNow on your own server guide.
Configuring Proxy User Permissions
To change the proxy user in Exalate for ServiceNow:
- Log in to the Exalate admin console.
- Navigate to General Settings.
- Input details:
- Servicenow instance URL.
- Proxy user name.
- Proxy user password.
Users and permissions
Note: For security reasons, it is better to create a separate role with specific permissions for a proxy user instead of giving him an administrator role.
To integrate Exalate with ServiceNow you need 2 ServiceNow user accounts:
- The ServiceNow user account that fetches information from the ServiceNow instance and updates the ServiceNow entities with incoming changes.
The proxy user can integrate various tables or attributes depending on the permissions defined by his user role in ServiceNow. - The ServiceNow user is authorized to configure the Exalate app for ServiceNow. The Exalate console user must be an admin in your ServiceNow instance or the proxy user. Exalate uses REST API to communicate with the ServiceNow issue tracker. By default, ServiceNow REST APIs use basic authentication or OAuth to authorize user access to REST APIs/endpoints. Therefore, the Exalate console users must have access to the ServiceNow instance admin configuration.
-
A user as shown below (basic user that is Active) with a set password.
-
Create a user group called exalate_console_admin.
-
The user needs to be assigned to this user group.
Proxy User
Exalate Console User
Delegated Admin Access for Non-System Admins
In some situations, you may need to grant non-system admins access to the Exalate Admin Console without giving away system-wide admin permissions. This would allow you to delegate admin maintenance tasks, such as adding, editing, and deleting Exalate configurations, create connections for all projects, as well as view and manage Errors, Sync Queue, Triggers, Clean-up, and Bulk Connect.
To create a delegated admin in ServiceNow, you need the following:
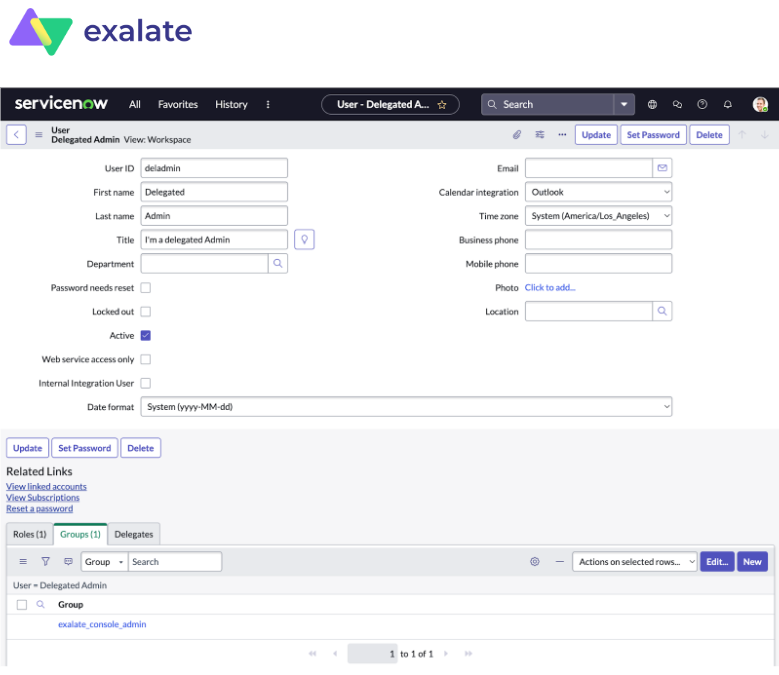
Note: Uncheck the “Passwords needs reset” if the user can not be logged in to the ServiceNow interface.
Important: The system tracker admin must create the exalate_console_admin group.
Important: Role Management V2 REST API plugin must be installed and activated on your ServiceNow instance.
Starting from the New York version this plugin is included by default. But if you've recently updated your ServiceNow instance to the latest version you need to activate Role Management V2 REST API plugin manually. ServiceNow contextual security.
Configuring access on ServiceNow
You can access the ServiceNow instance in one of these ways:
- Basic Login
- In order to log in you use a Username and a Password. Exalate does not store the password in the database, but use the rest connection to attempt to log in to the ServiceNow node.
- OAuth Token
- Authentication with a Username and an OAuth token. Exalate stores the token and use it to access it. The token is refreshed every time the lifespan ends.
Note: OAuth token can be used as long as the refresh token is valid. Read more about setting up the refresh token in the article Access the Exalate app in ServiceNow.
You need to generate a new refresh token after the old one is expired. We suggest setting a longer lifespan for the refresh token.
Video Tutorial
Introduction
In this article we will show you how to install Exalate on Zendesk from the Marketplace, as well as how to configure the proxy user permissions.
Install Exalate on Zendesk from the Marketplace
1. Log in to your Zendesk account.
2. From the Admin Center, go to Apps and Integrations > Apps > Zendesk Support Apps.
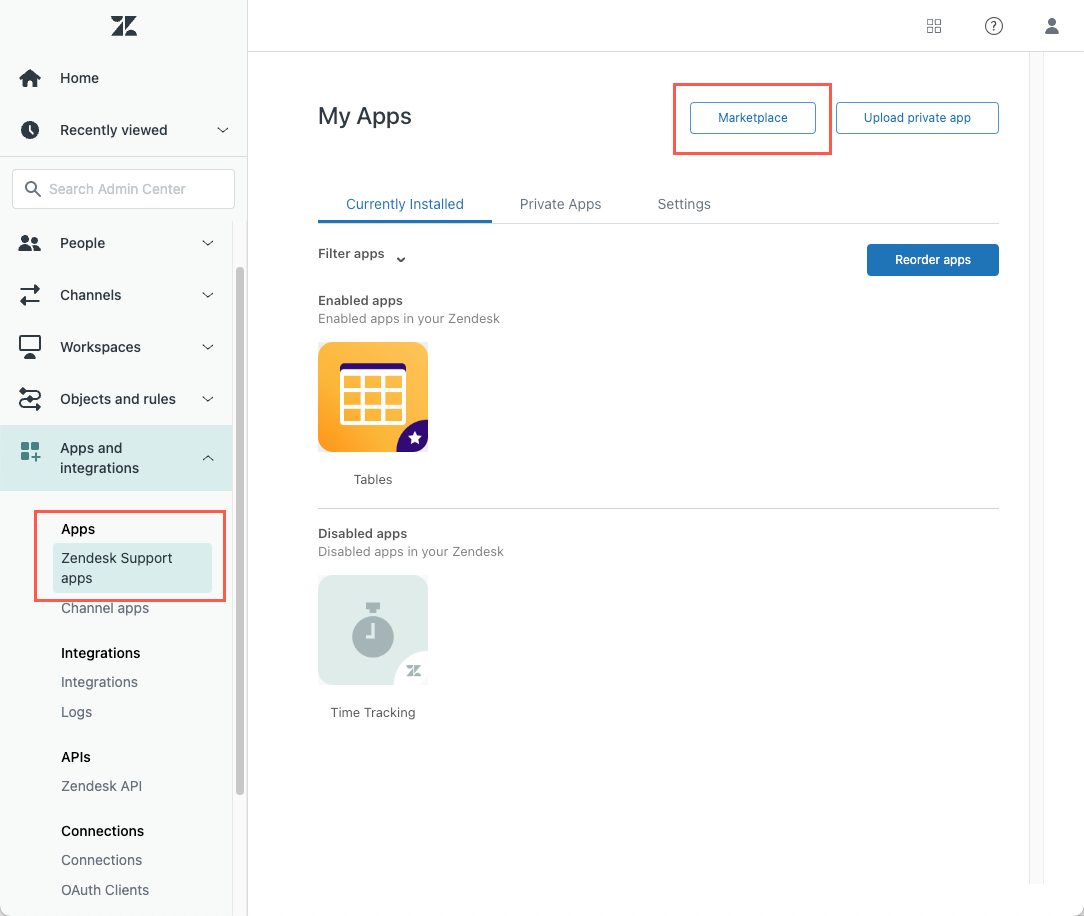
3. Select Zendesk Support app, click on Marketplace and type in Exalate.

4. Click on Exalate, then on the Install button to begin the installation.
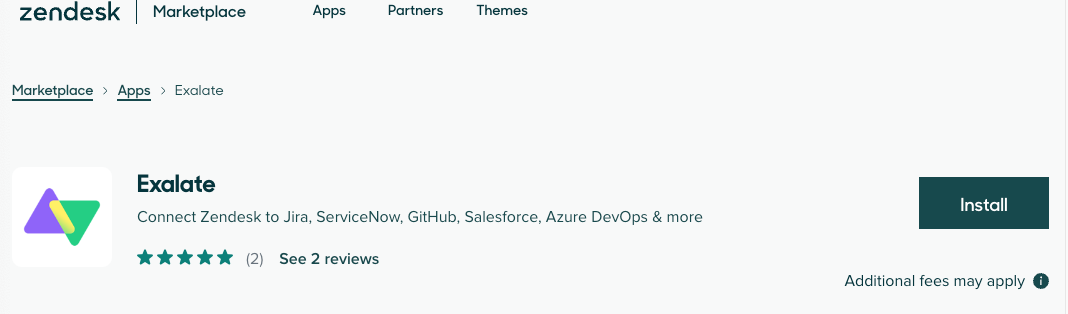
5. Select an account you want to install the app with (applicable only if you have multiple Zendesk accounts) and click Install.

6. Now you need to configure the app before installation. You can update the name of the app and set which roles and groups will be able to access it.

- Title - Your custom name of the app. Required field. The default value for the field is
Exalate - Enable role restrictions? - If checked, you can set which roles can access the app.
- Enable group restrictions? - If checked, you can choose which user groups can access the app.
Limiting Admin Access
In Zendesk it is possible to configure the access to the exalate Admin Console without granting Zendesk admin permissions.
With this feature, only users who have at least one of the following access permissions can access the admin console UI:
- user is not the issue tracker admin but has permission to access the Exalate Console
- user is the system admin within the issue tracker
In this way it is possible to configure the access to the exalate Admin Console without granting full admin permissions to a user.
Limited admin console access can be set up in two ways:
- Create a Custom Role with limited permissions
- Assign an agent to a Custom Role with minimal permissions (Contributor role)
In order to allow access to all internal Zendesk users, Exalate must not have any roles and groups restrictions enabled on the app settings.
7. Click Install when done.
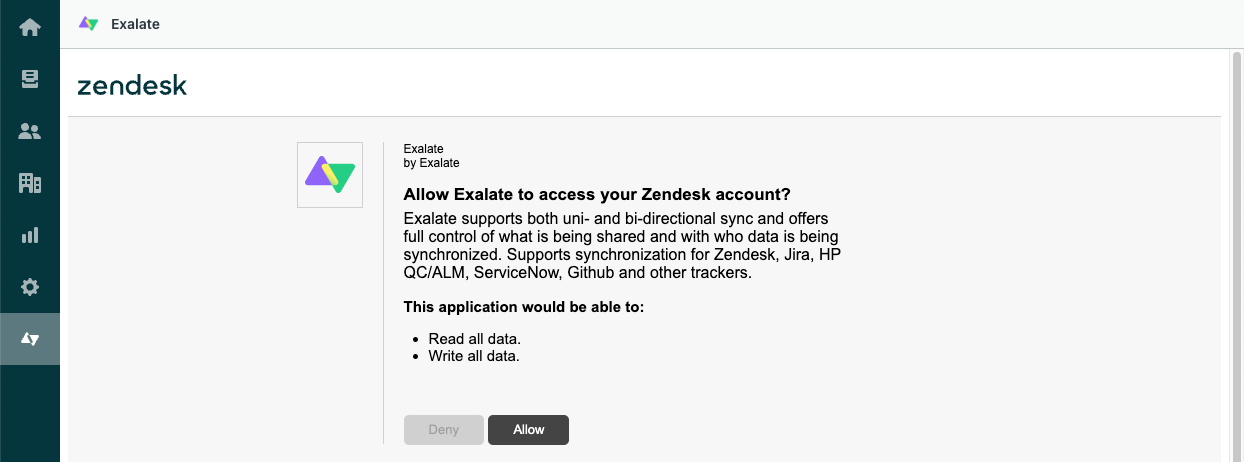
8. Select Exalate in the side panel, then click Allow to confirm that Exalate can have access to read and write your data.
10. Input your credentials in the Registration screen.
Exalate uses this info to:
- Verify your instance.
- Activate an evaluation license.
- Create an admin account to receive error notifications.

11. Select Agree and submit.
After selecting Agree and submit you will get an email to complete our security check.
Note: After clicking Agree and submit you can check our End User License Agreement (EULA). You can also read it here:
12. Open your email and select Verify Exalate instance.
You will be redirected back to your Exalate console.
 14. Select Continue.

Congratulations, you have successfully installed the app!
Proxy User Permissions
Exalate requires a dedicated Zendesk admin as a proxy user.
The proxy user can restrict the roles or groups that can access Exalate. It is possible to enable or disable these restrictions when installing the app, or when managing the app settings.

Note: You can also change the Proxy user in Zendesk if required.
Video Tutorial
Video updated 1/22/24
Introduction
You have two options for installation:
- install Exalate for GitHub from the marketplace.
- install Exalate for GitHub on docker.
Once the installation itself is done, the next two steps are:
- generate a personal access token to log into the Exalate admin console.
- configure proxy user permissions.
Note: Exalate can be installed on Github Cloud and GitHub Enterprise Cloud.
Install Exalate from the Marketplace
Exalate for GitHub is available on the marketplace.
You can install Exalate for organizations or user accounts and grant access to repositories. The app is hosted on our server.
Note: To install Exalate, you need to be an organization owner or have admin permissions in a repository.
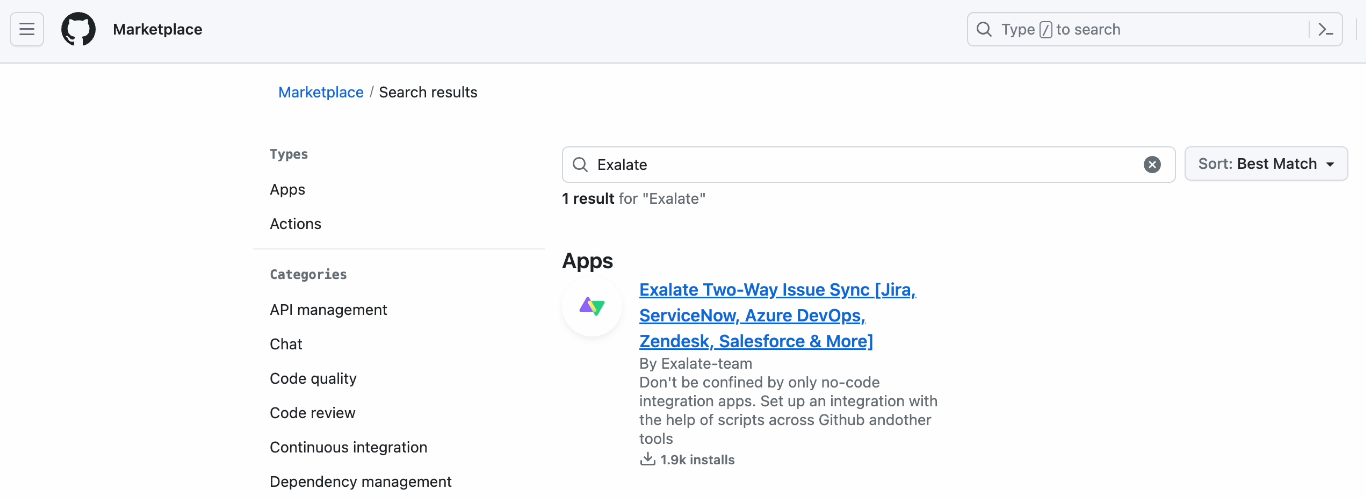
1. Go to the Marketplace and search for "exalate".
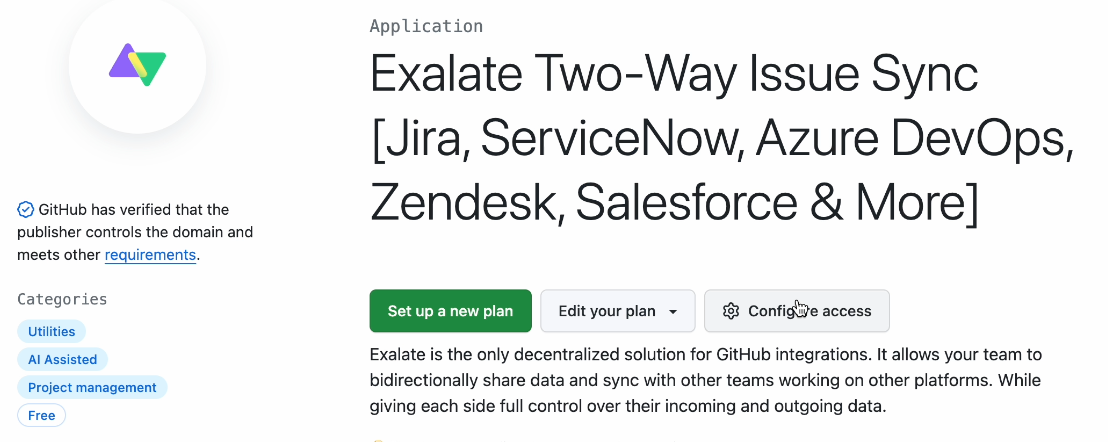
2. Click Set up a new plan
3. Scroll down and search for the account to associate with Exalate.
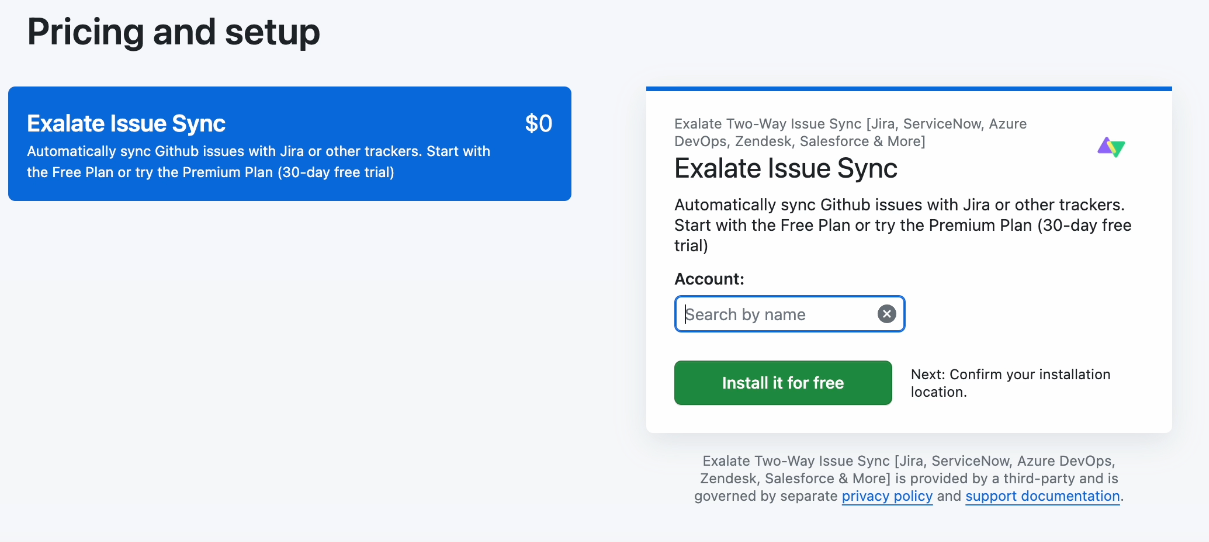
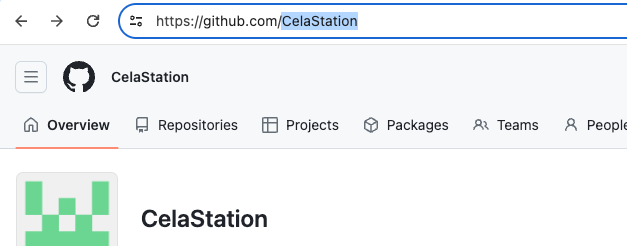
In Account, you can either install Exalate for your entire account, or enter the name of a specific organization within your GitHub account. For our example, we enter the name of an organization we created.
You can search for an organization by name, or go to your GitHub instance and copy it:
4. When done click Install it for free.
5. Now review your order and associate your billing information with your organization.
 6. Click Save when done.
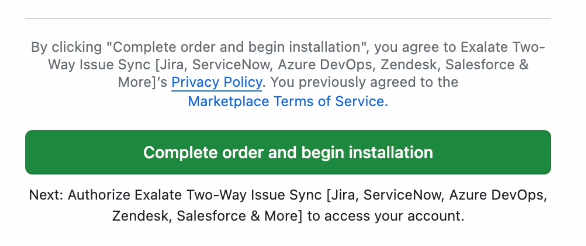
7. Click Complete order and begin the installation.
8. On the next screen click Install.

Note: By default, Exalate is installed on the account that is currently logged in. If you wan to change to a different one, click Cancel and follow the prompts to select a different one.
Note: After clicking Install, you are redirected to the Exalate admin console. We recommend saving the link to easily access Exalate in the future. You can always recover your Exalate app link here: https://connect.exalate.net/github/find
9. On the Registration page fill out the required fields.

10. Click Agree and submit.
11. An email confirmation is sent to the email you specified for your account. With this info Exalate:
- Verifies your instance.
- Activates an evaluation license.
- Makes an admin account to receive error notifications.
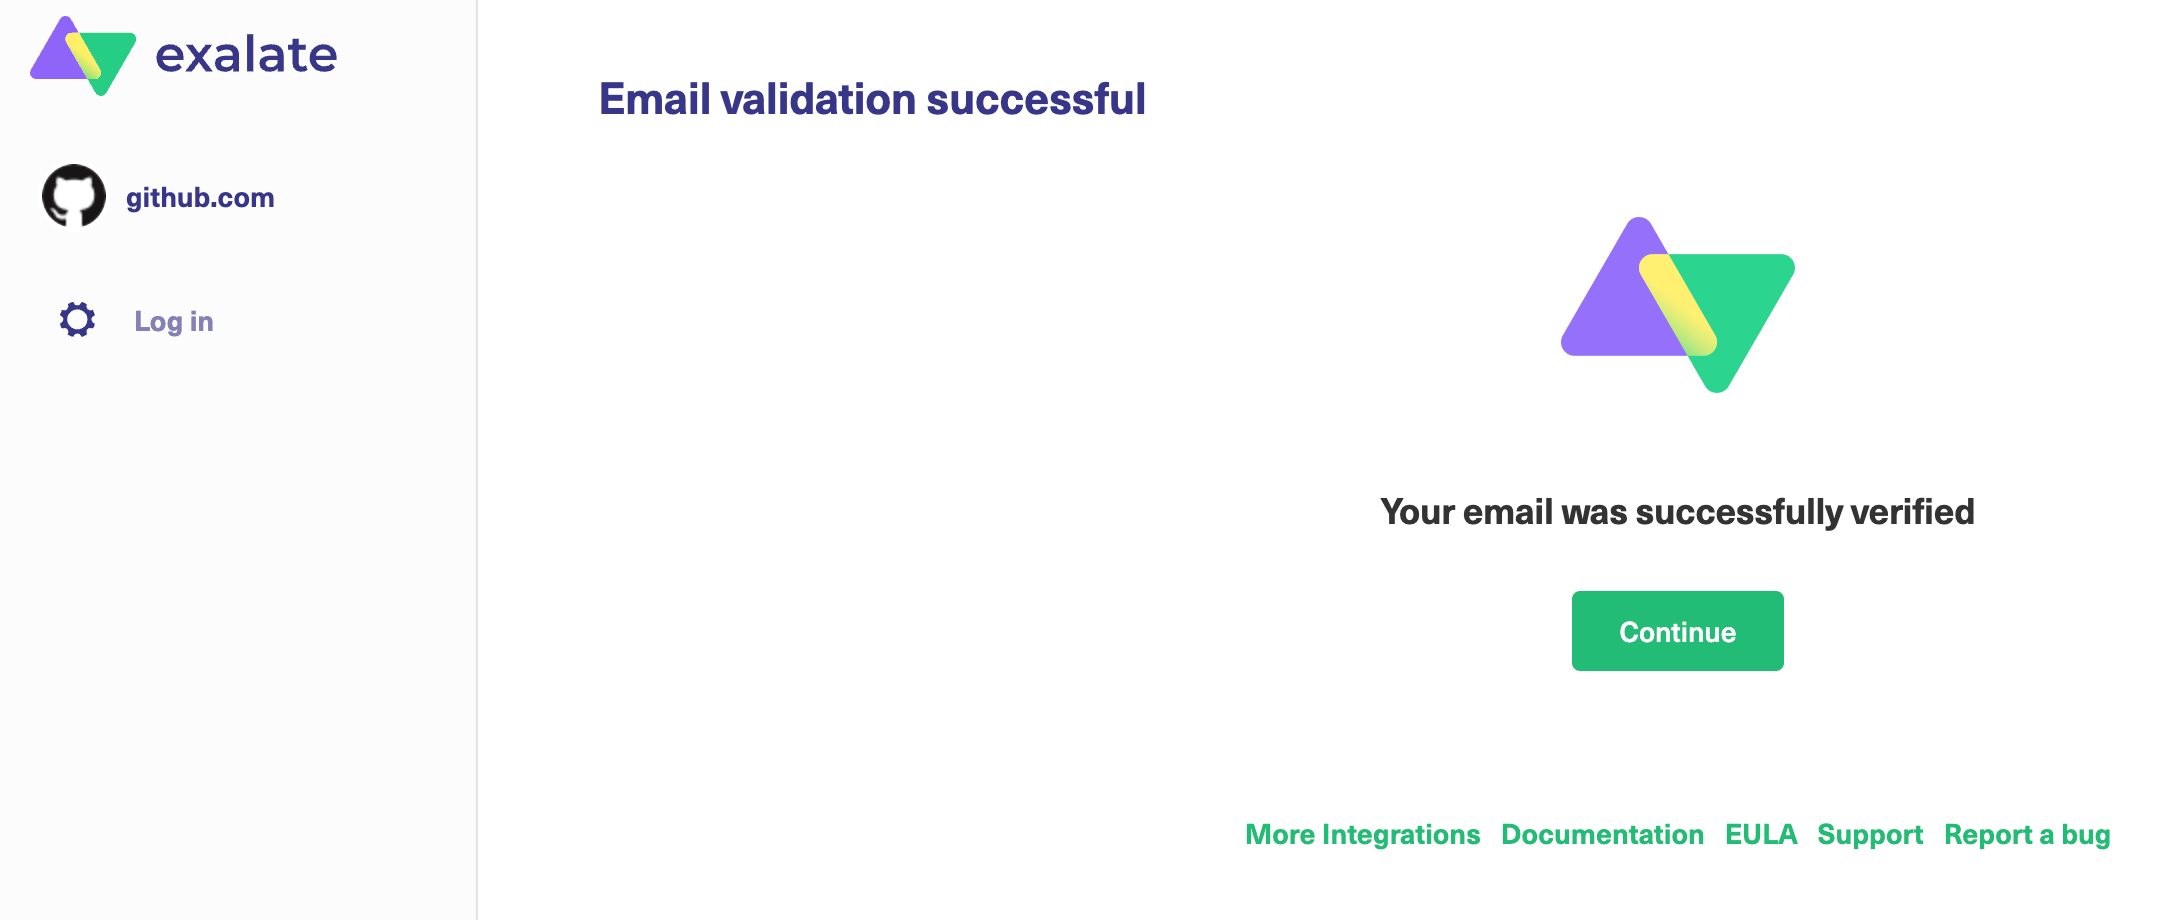
12. Open your email and click Verify Exalate instance.

13. After the validation is successful you are redirected back to the Exalate console. Click Continue to go on to the Registration page.
14. To login to the Exalate console, enter your personal access token in the Token field.

How to Generate a Personal Access Token
Note: You need a Personal Access Token to log in to Exalate for GitHub.
1. Log in to your GitHub account.
The GitHub user must be an organization member or have admin access to a repository where Exalate is installed.
Note: The user account that wishes to access the Exalate dashboard needs to have organization visibility set to Public.
2. In GitHub, go to to Settings > Developer settings.
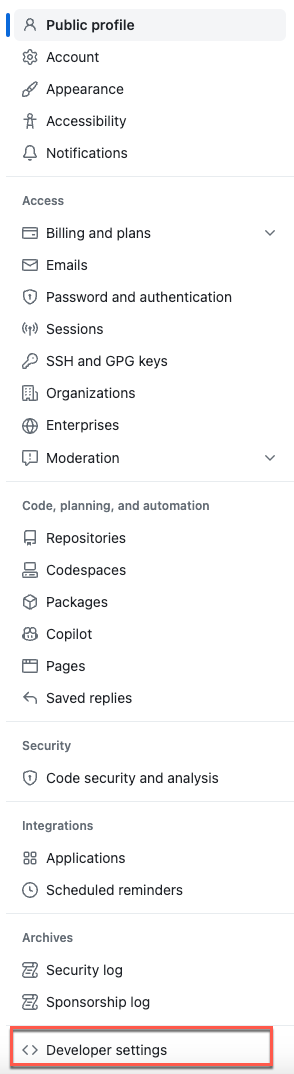
3. Select Personal access tokens > Tokens (classic)
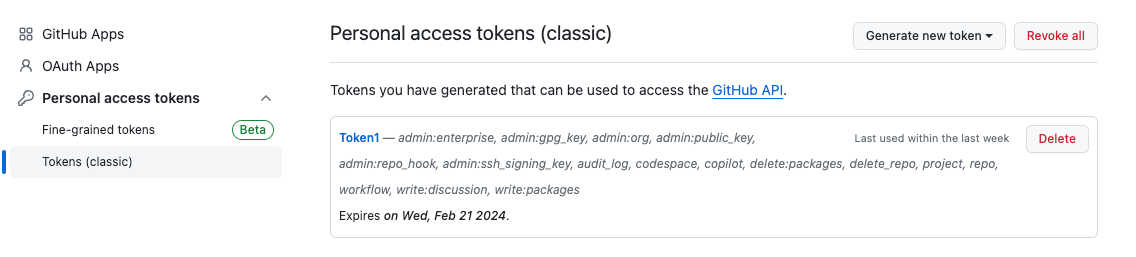 4. Click Generate new token to generate a new access token. Select the scopes or permissions you'd like to grant this token. To use your token to access repositories from the command line, select repo.

Once the token has been generated, you can now use it to log in to your Exalate admin console.
Important: Make sure to save the token, because you can access it only once.
Note: Starting from version 5.1.4 we apply security improvements involving migration to OAuth for the Exalate application for Github.
Configuring Proxy User Permissions
By default, Exalate for GitHub proxy user is the repository admin or the organization owner, who is installing Exalate.
Proxy user permissions in GitHub
The proxy user has the same permissions as an admin or an organization owner in GitHub.
Note: For more information about user permissions, please read these GitHub Docs articles:
Install Exalate for GitHub on Docker
Learn more about How to install Exalate for GitHub on docker
Video Tutorial
Introduction
In this article we are going to show you how to:
- install Exalate on Salesforce from the AppExchange
- Generate a security token to log into the Exalate Admin console on Salesforce.
- install Exalate on Salesforce on Docker.
Install Exalate on Salesforce from the AppExchange
This article describes how to install Exalate to Salesforce from the AppExchange marketplace.
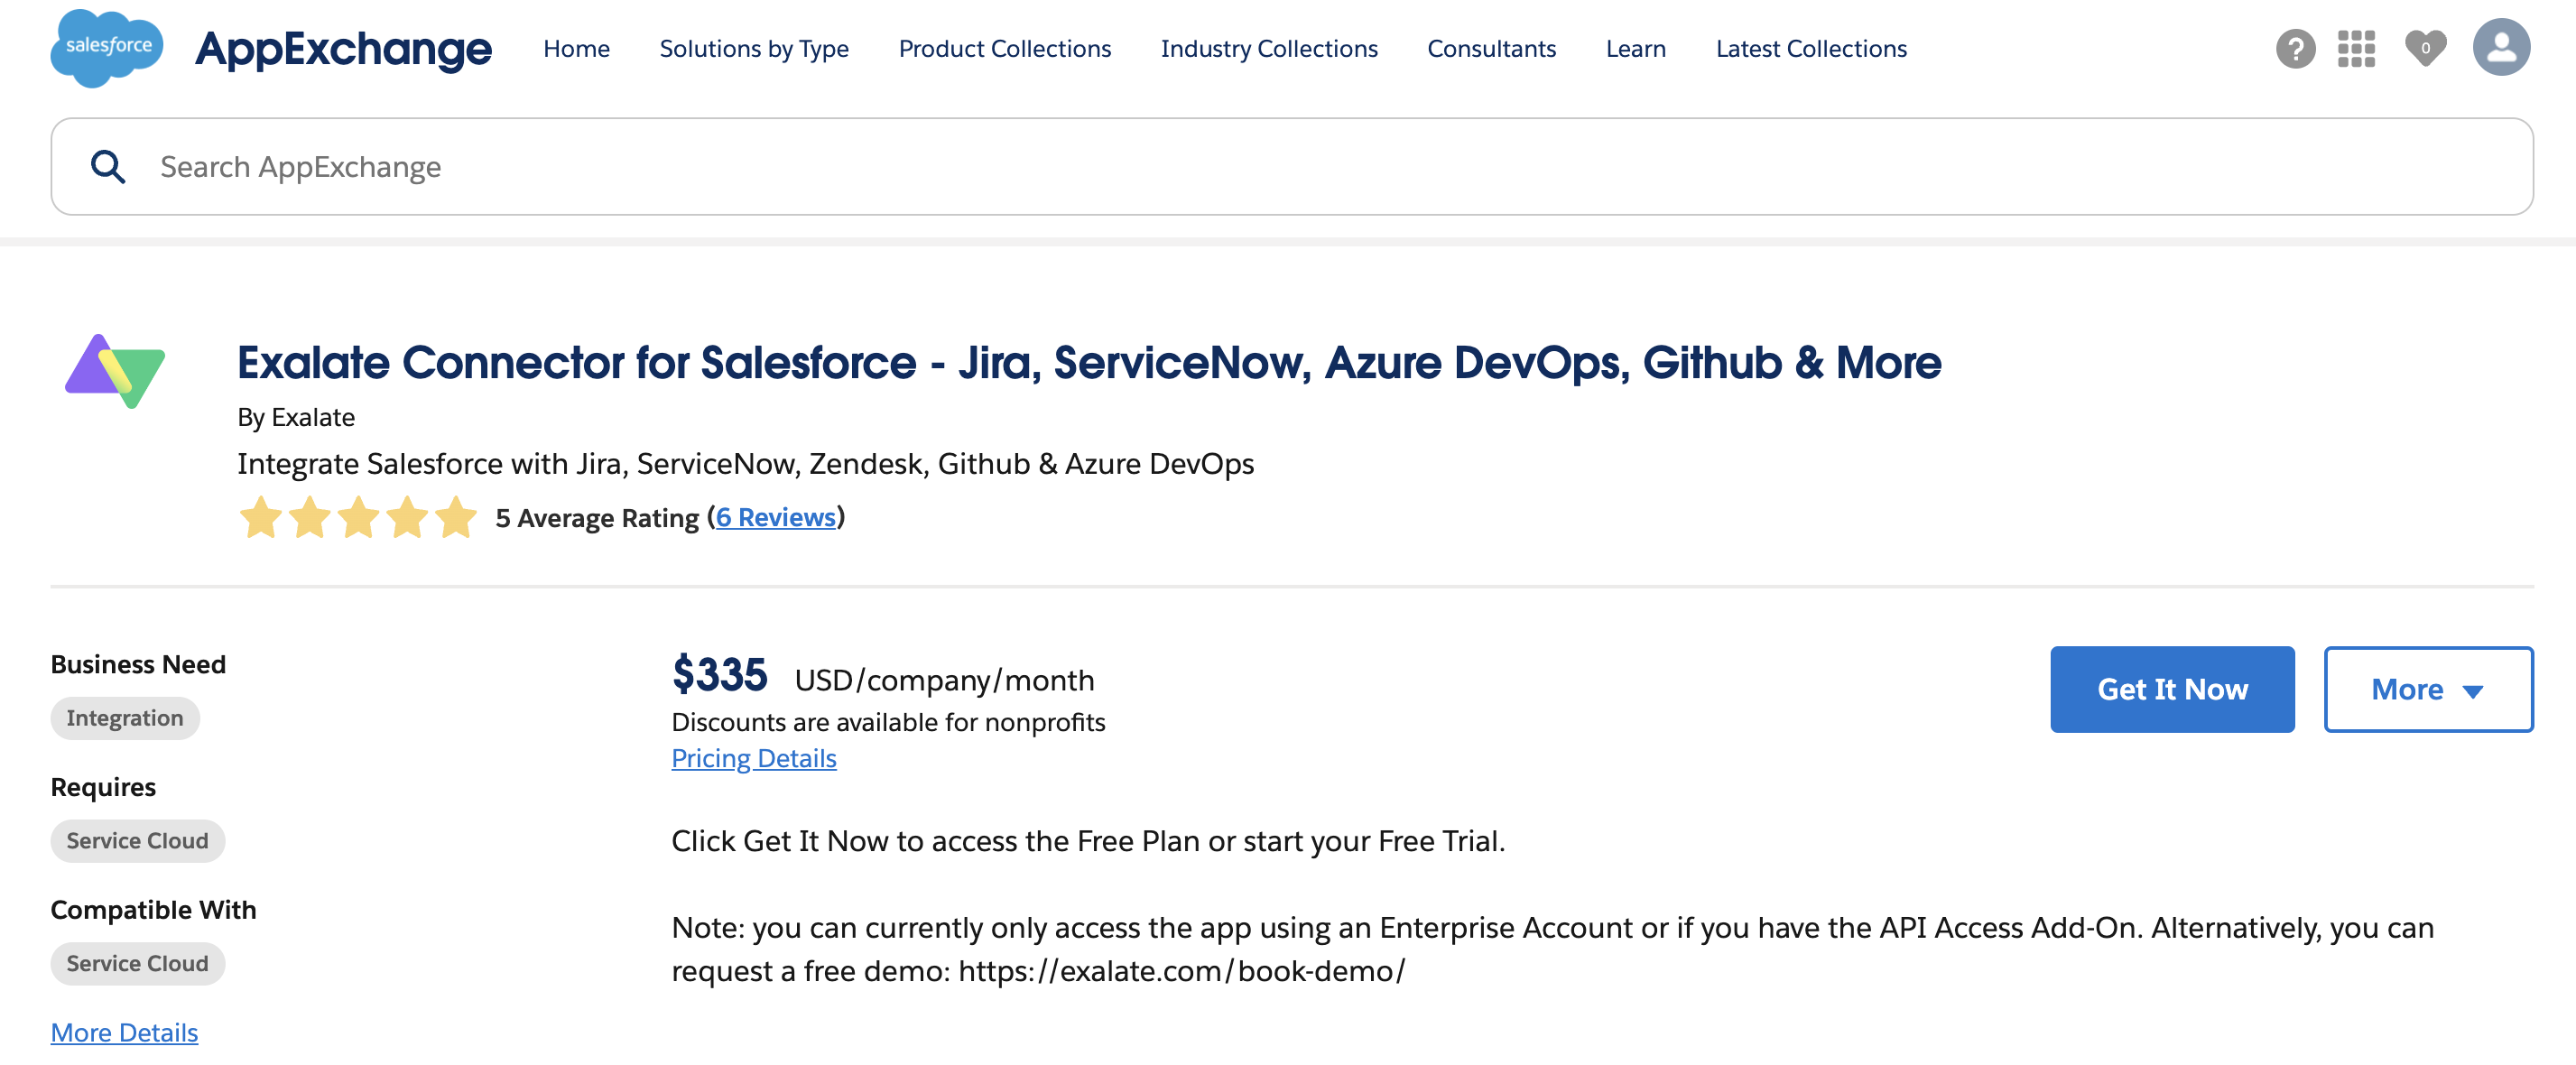
1. Access the AppExchange marketplace and search for the Exalate app
2. Click Get it now
3. Select Production or Sandbox environment depending on where you want to install the package

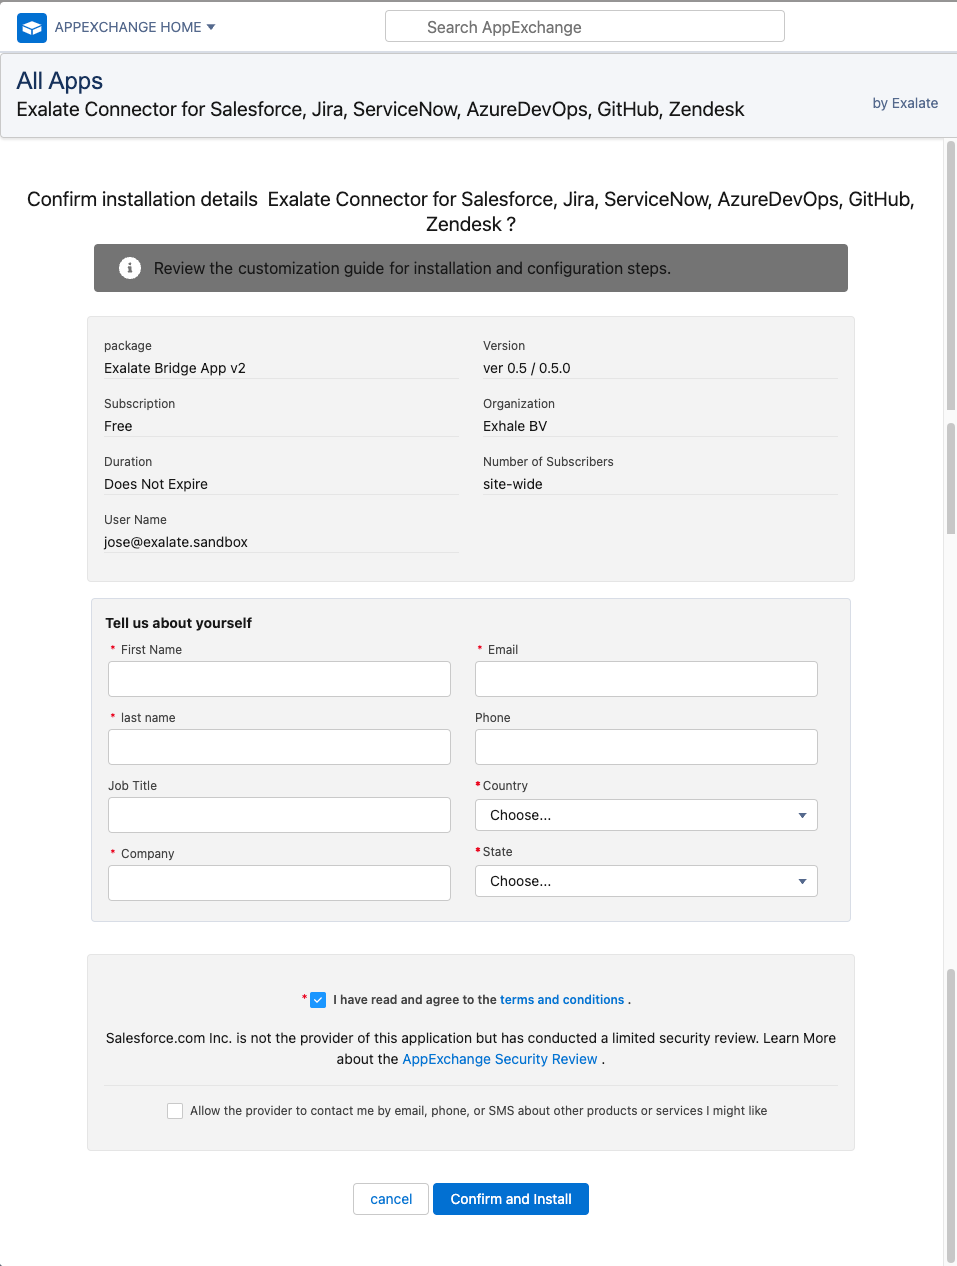
4. Confirm installation details
- Fill out the required fields
- Check that you have read and agree to the terms and conditions
- Click Confirm and Install

5. Log in to your Salesforce account
You are automatically redirected to the salesforce login screen once you confirm the installation

6. Select a group of users that has permission to use the Exalate app
If you install Exalate for Admins Only, only the administrators have permission to use Exalate. You can grant permissions to other users later. Check out How to manage users' permissions in Exalate for Salesforce.
Installing Exalate for All Users grant permission to use the app to all registered users.
If you choose to install Exalate for Specific Profiles, you see the list of the available profiles and their permissions that should be set before you proceed.

7. Click Install
8. Approve third-party access

- Check Yes, grant access to these third-party websites
- Click Continue
Note: mapper.exalate.st is not exchanging requests with your Exalate node. It has been added for development purposes only.
9. Installation complete. Click Done to go back to your Salesforce instance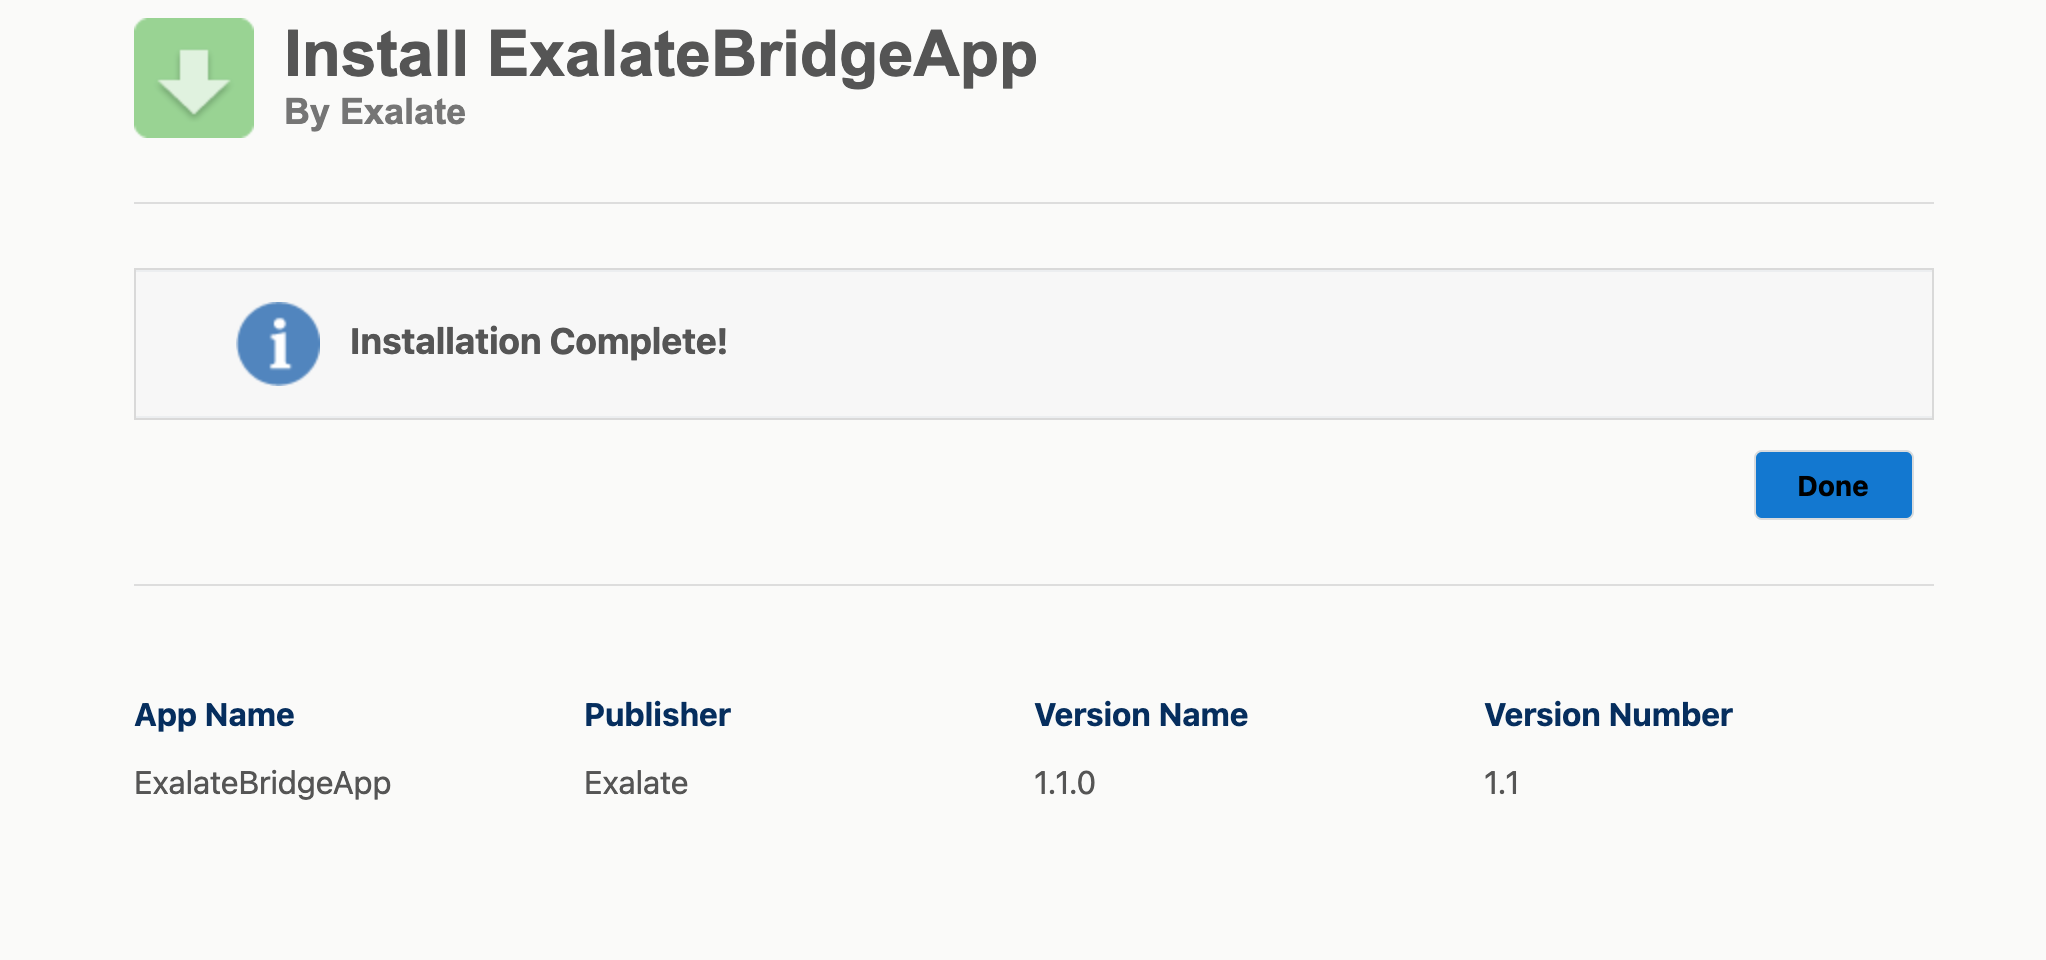
How to create a connected app
10. Next, you need to set the Permissions. Go to Setup> Permission sets.
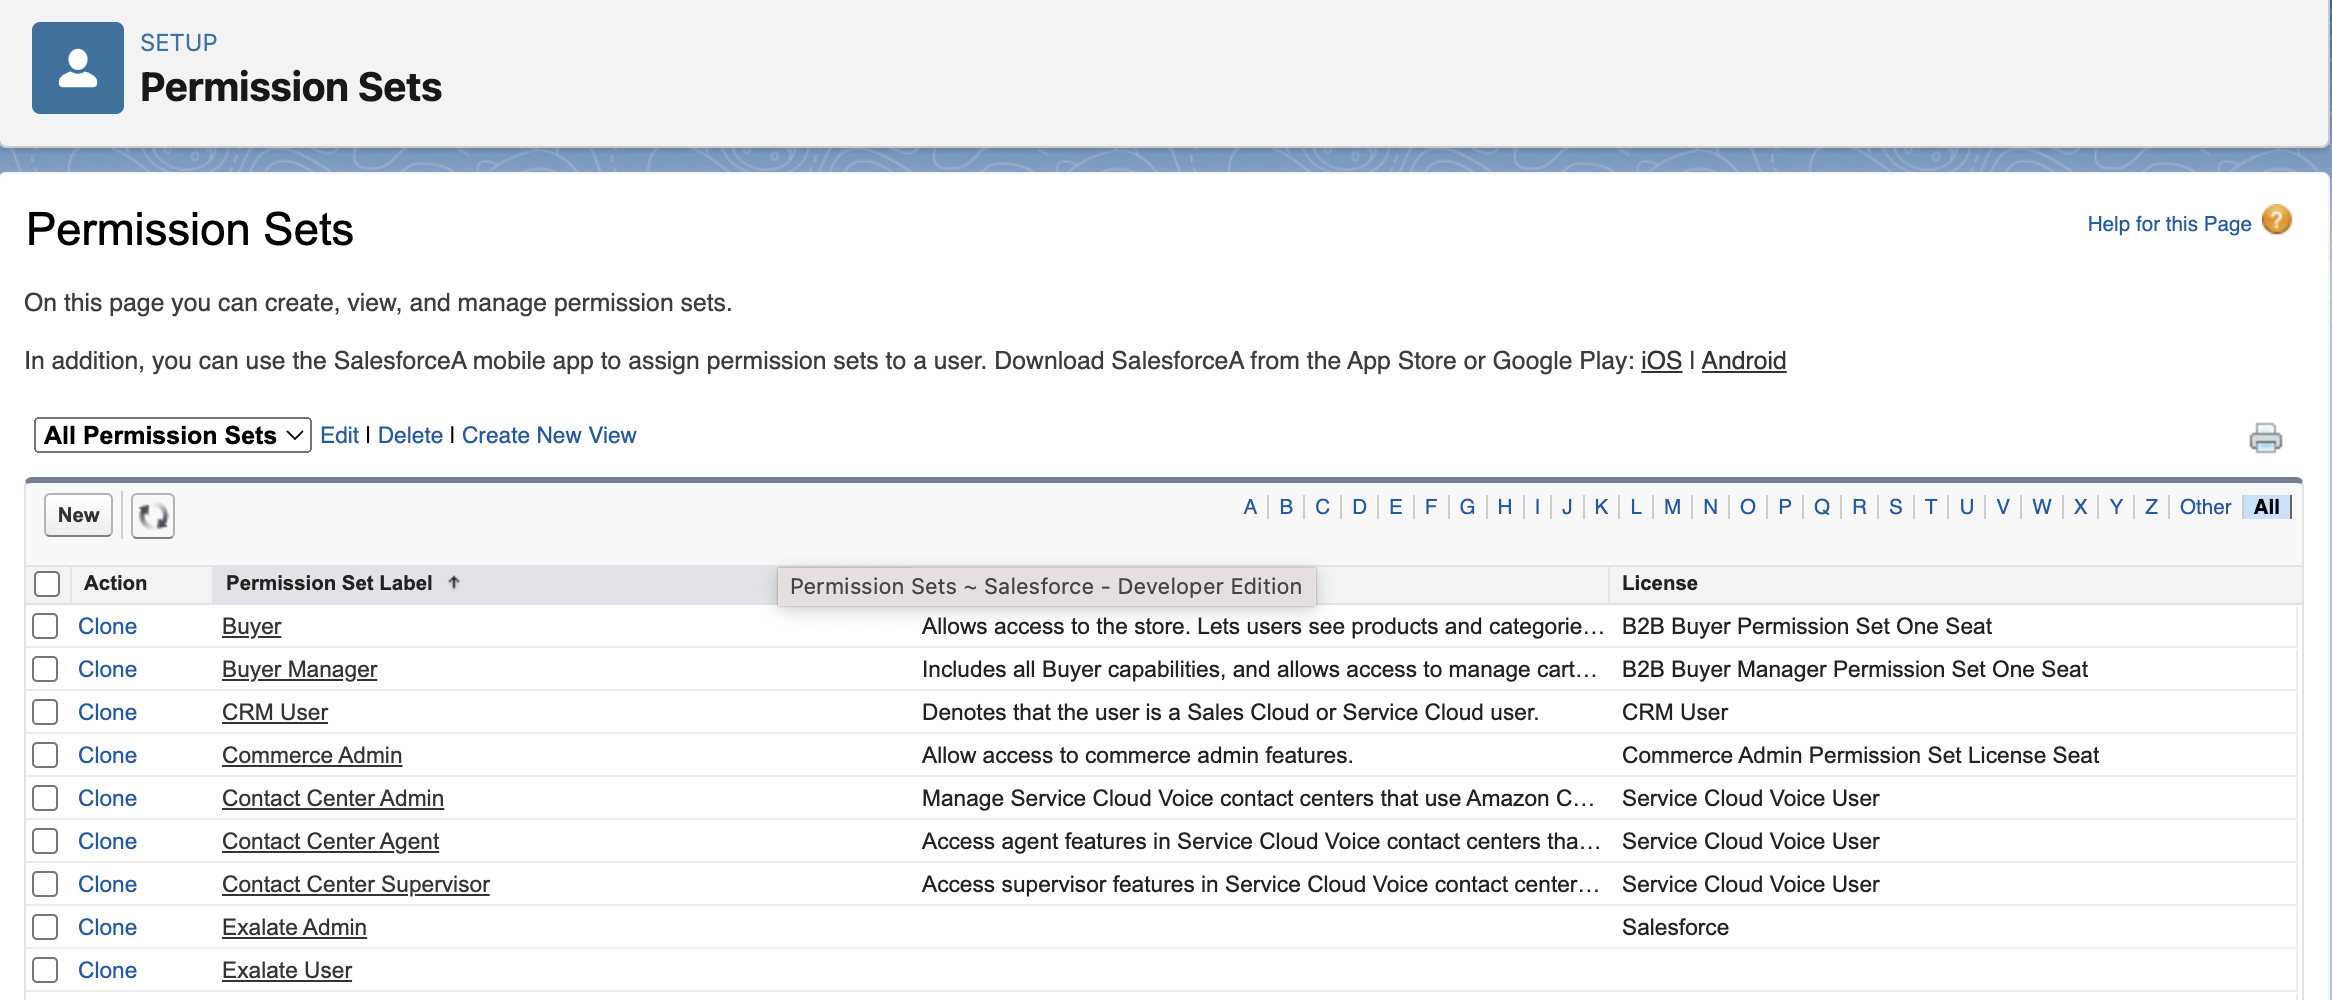
To assign a permission set to a user, go through these steps: Exalate Admin > Manage Assignments > Add assignment > Select User with System Administrator Profile > Assign > Done.
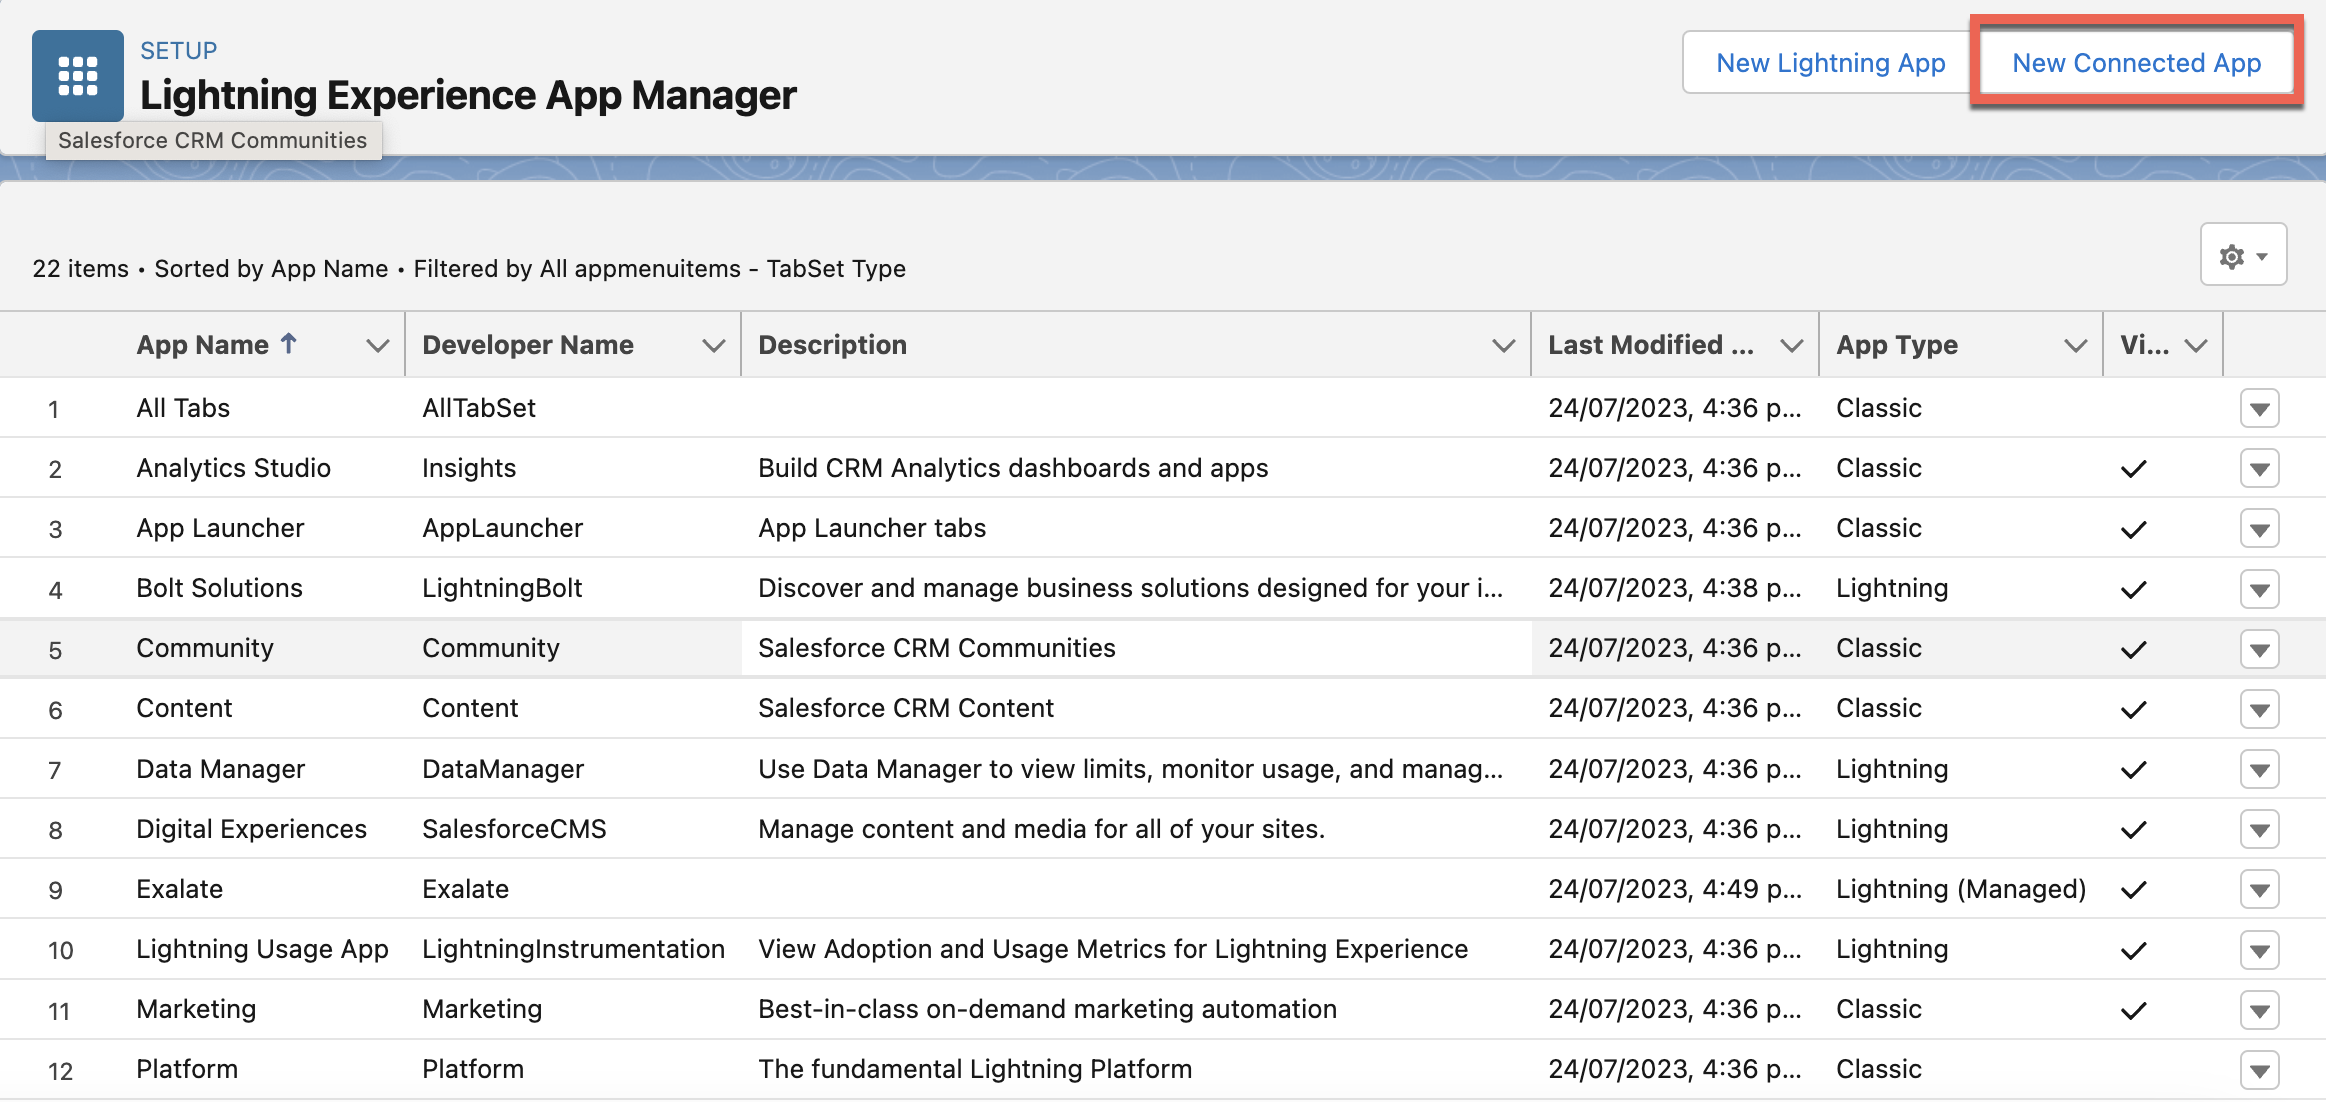
The next step is to create the Connected App. Go to Setup > Apps> App Manager and click on New Connected App.
On the setup page, fill in these fields:
- Connected App Name
- API Name
- Contact Email
- In API (Enable OAuth Settings), check Enable OAuth Settings
- In the Callback URL field paste: https://connect.exalate.net/rest/oauth/callback
- Select and add all rows in Selected OAuth Scopes
- Require Secret for Web Server Flow should be selected
- Require Secret for Refresh Token Flow is optional
Important: Do not select Require Proof Key for Code Exchange (PKCE)! In case this field is not editable, or this feature is required by your organisation, please contact support for help with the additional steps required. This issue is being addressed and is resolved in an upcoming release.

Click Save when done.
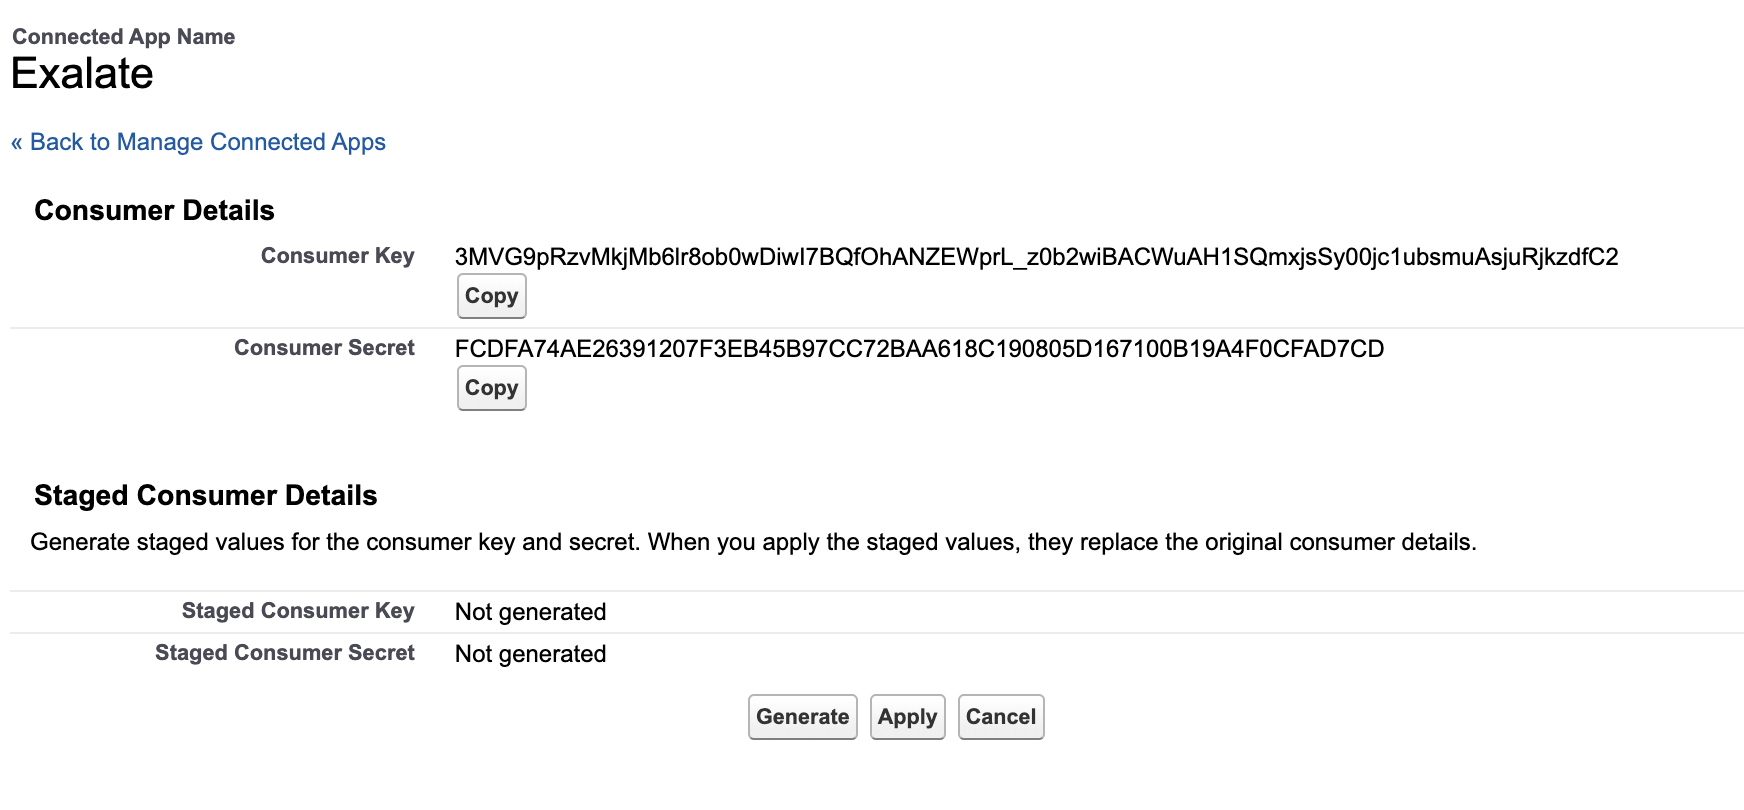
Go to Setup > Apps> App Manager > Your created App > View App and collect the Consumer Key and Consumer Secret from the connected app.
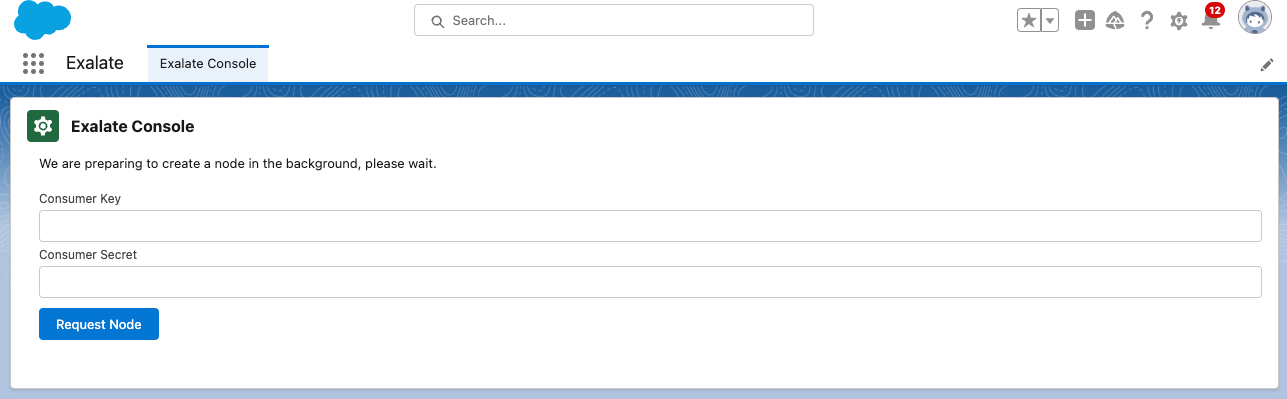
11. Request an Exalate node
Once the application is installed, you can request an Exalate node:
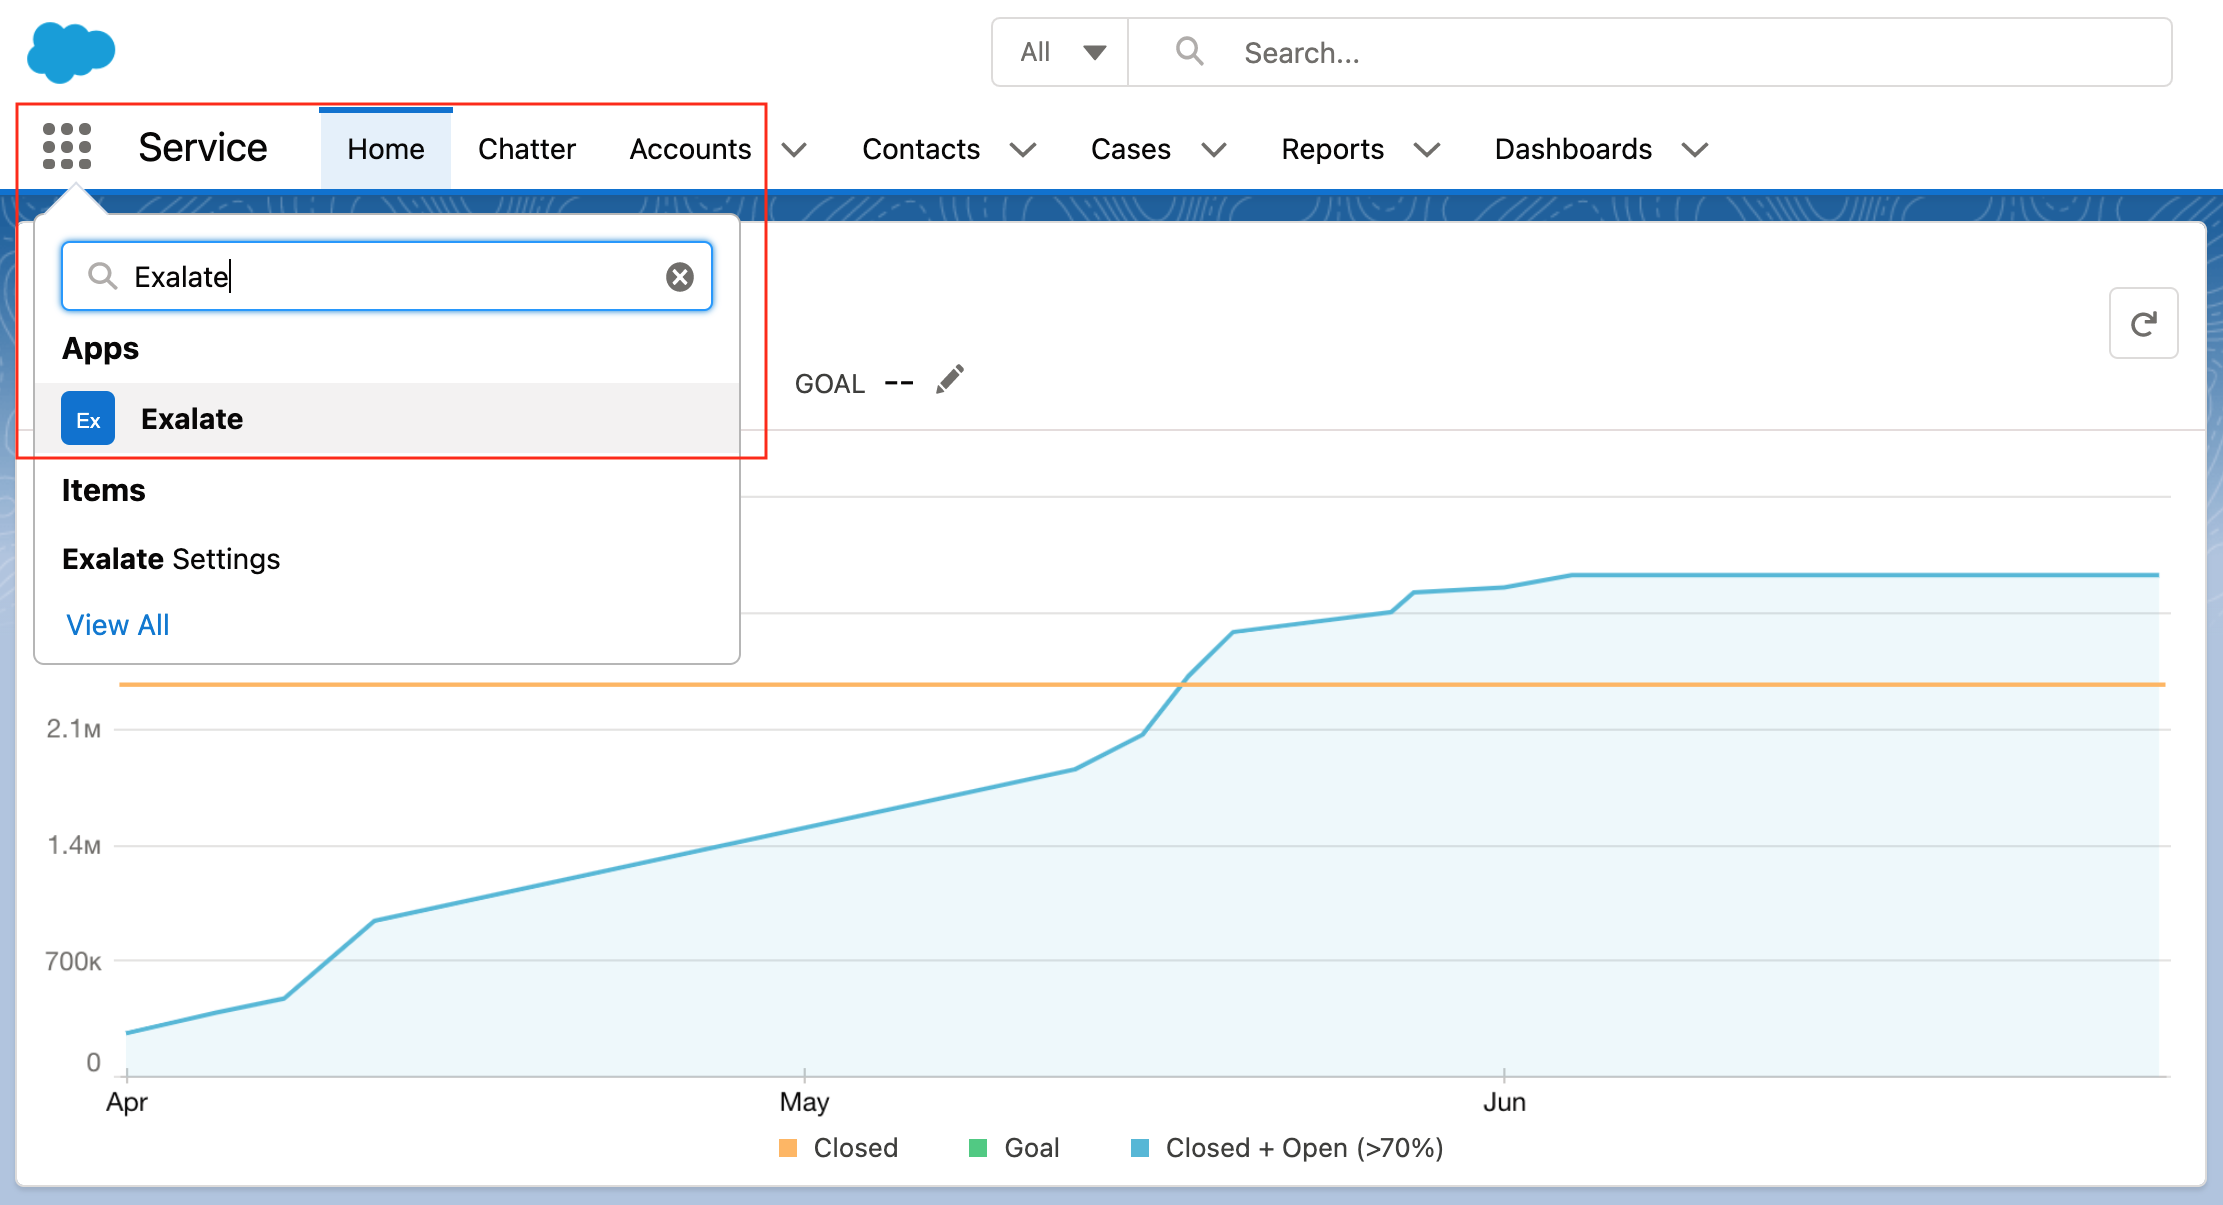
- Access the Exalate app from the search bar
- Copy the Consumer Key and Secret from the connected app and paste here, then click on Request Node.
- Click Allow on the app permissions.
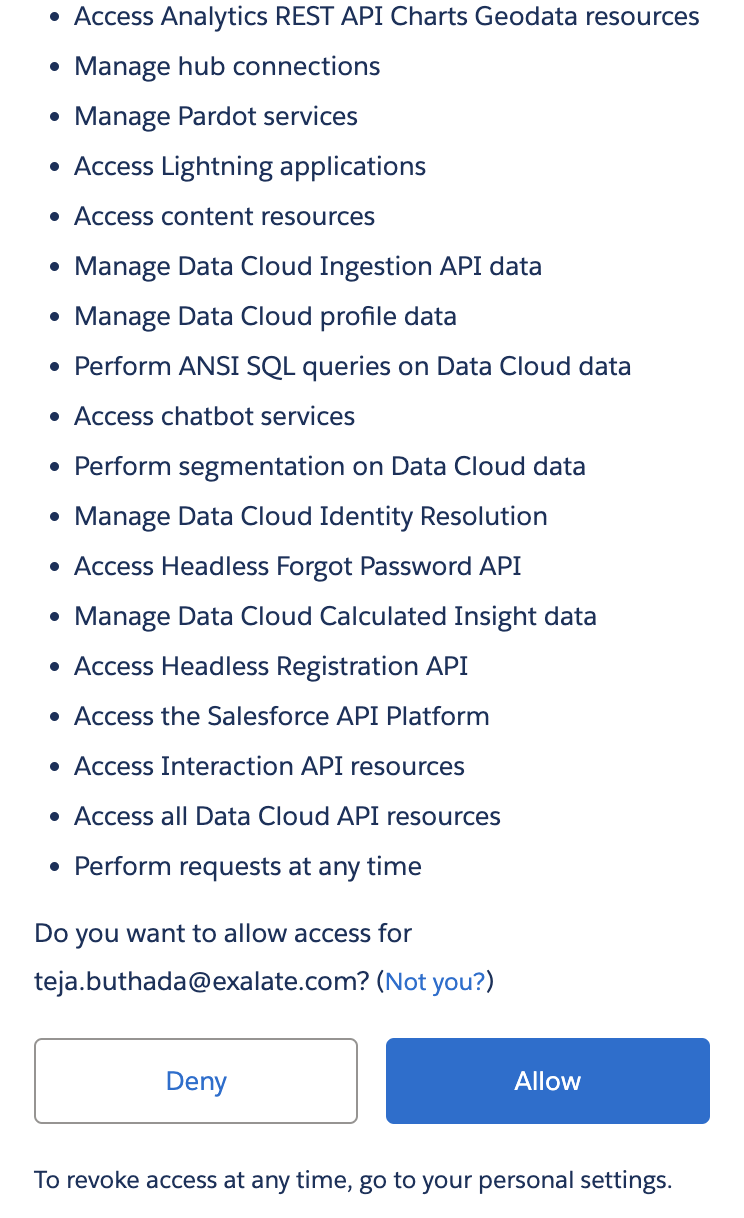
After you allow the permissions you are be redirected back to the Salesforce interface.
12. Add new trusted URL - Go to Setup and search for Trusted URLs
- Click Add new trusted URL
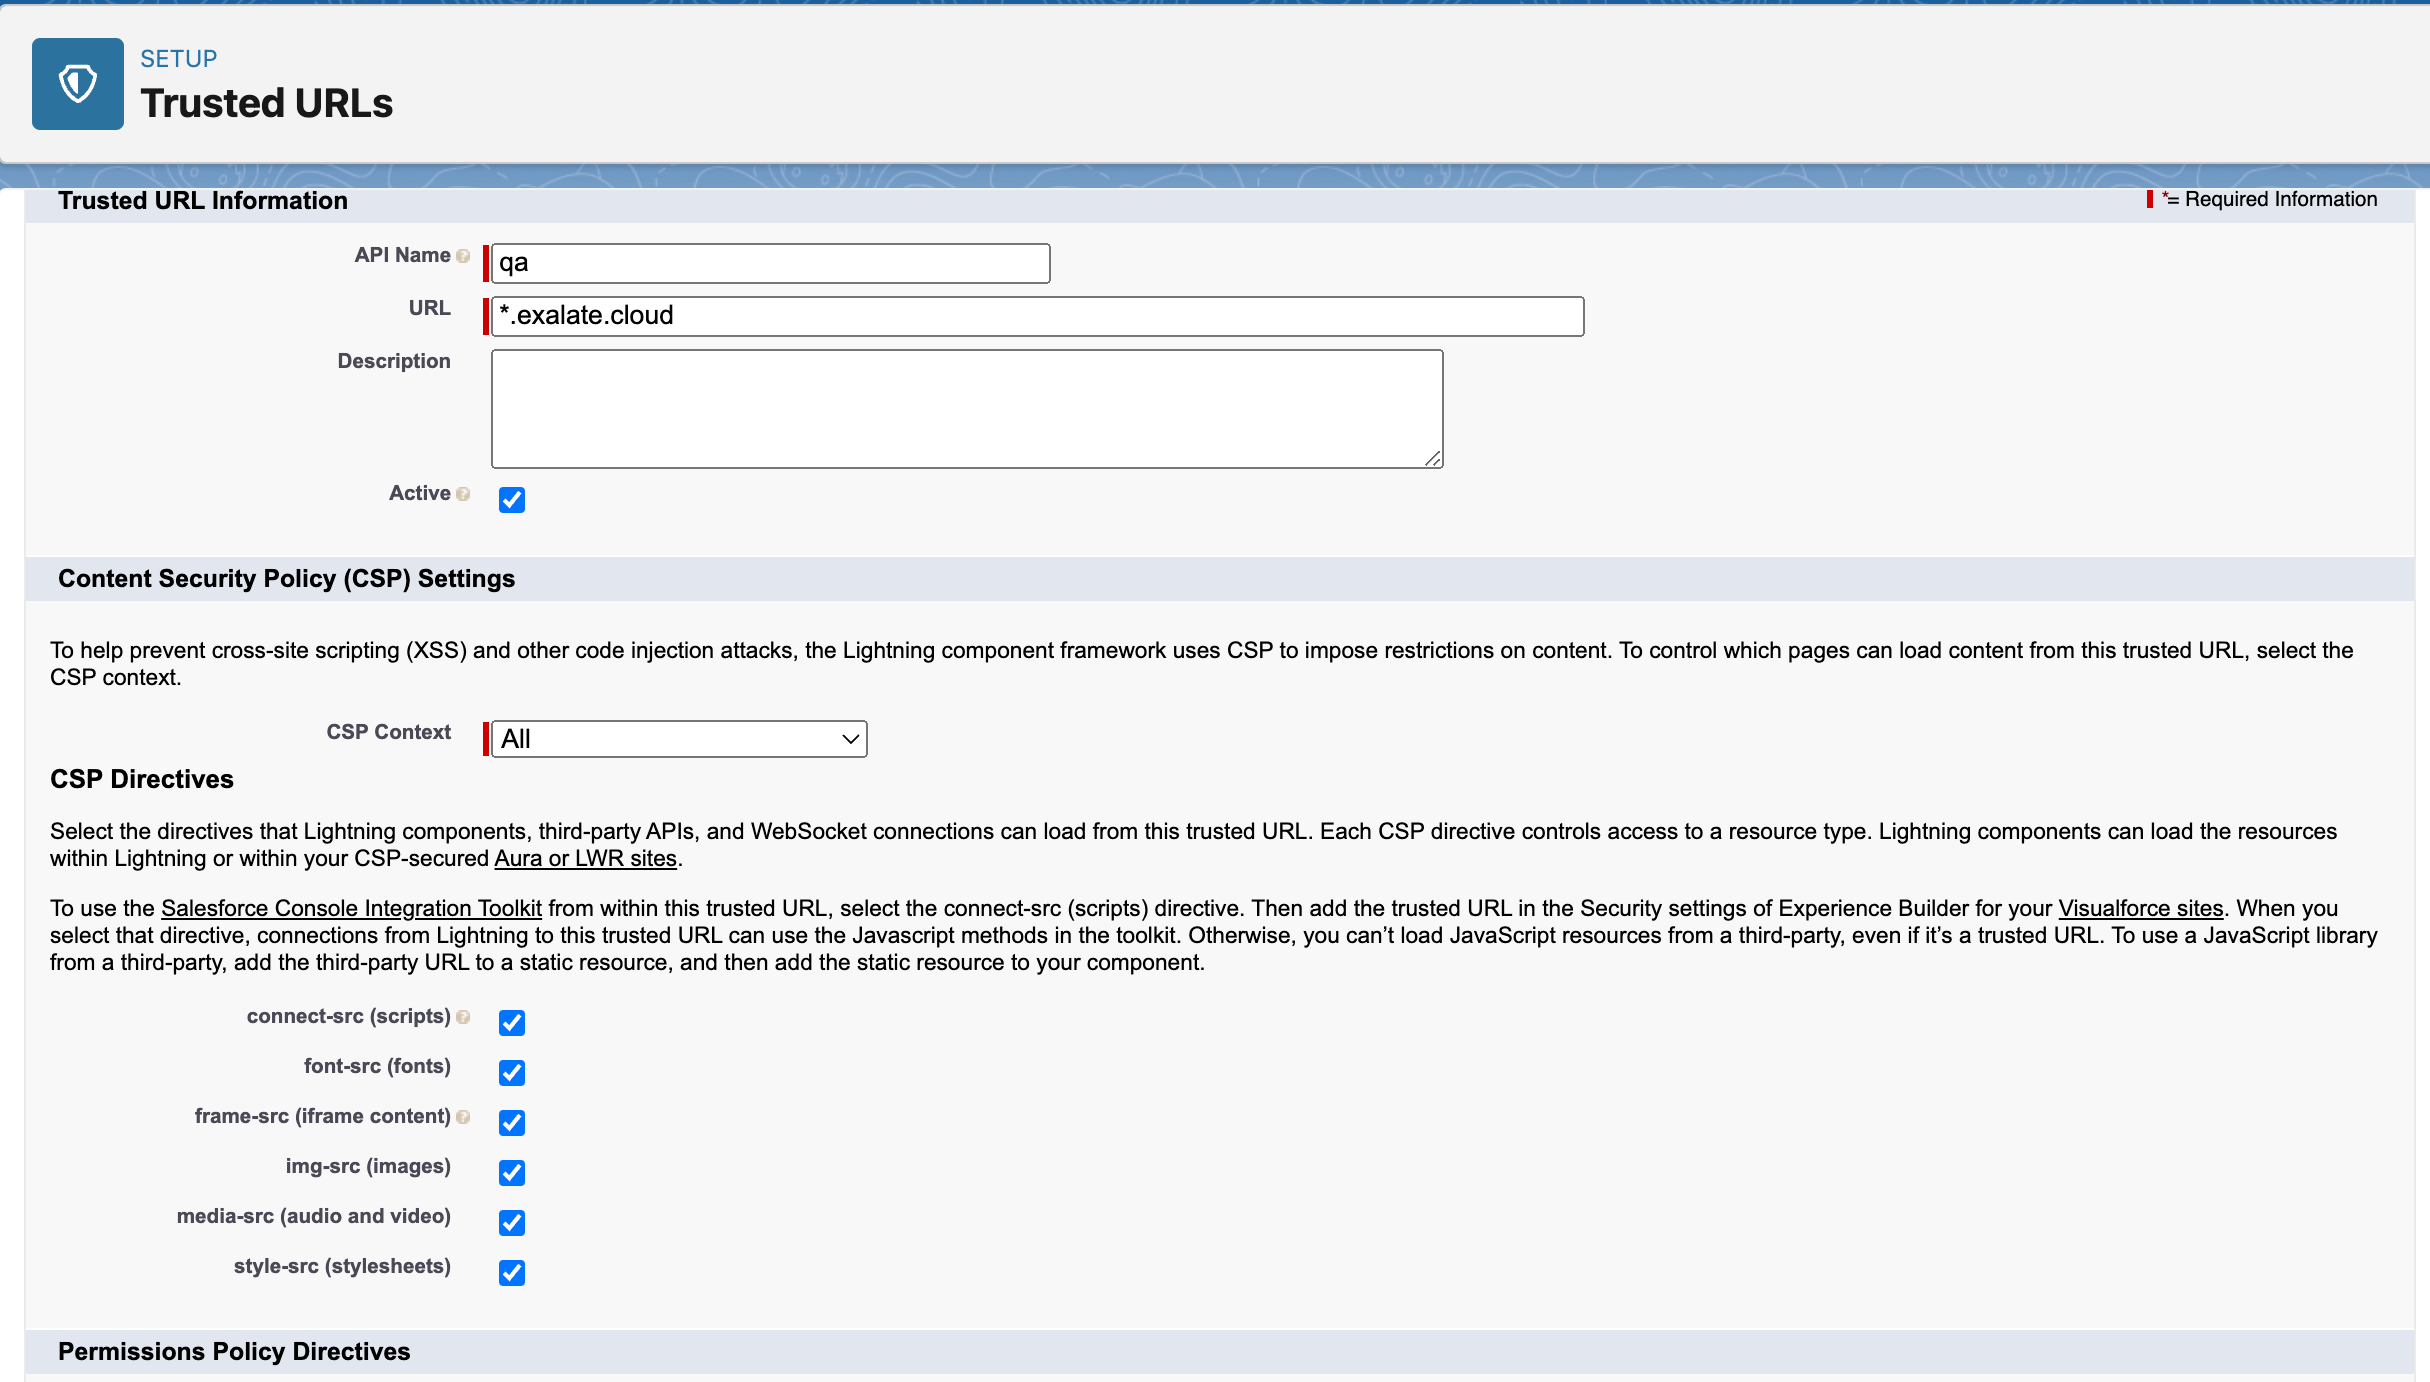
- Fill in Trusted URL Information:
- API Name: free input string
- URL: *.exalate.cloud
- Check all the boxes in CSP Directives section
- Click Save


13. Configure Exalate for Salesforce
Once you have requested the node it is time to configure it. Follow the steps listed below:
1. Fill in your contact information in the registration formExalate sends you a verification email. With this info Exalate:
- Verifies your instance.
- Activates an evaluation license.
- Makes an admin account to receive error notifications.

2. Click Agree and submit, to agree to the EULA and continue.
Note: After clicking Agree and submit, you accept our End User License Agreement (EULA). You can read it here: https://static.idalko.com/legal/eula-addons.pdf
Click Resend email if you have not received a confirmation email. Click Change email to modify the email address provided earlier.
Note: If you encounter an error during verification, check out Solving issues with email verification.
3. Open your email and click Verify Exalate instance
4. Once you receive the email and verify the registration of the node, you are redirected to the Exalate console admin > Connections screen.
Congratulations! The registration process has been completed.
Install Exalate for Salesforce on Docker
You can host Exalate for Salesforce on your own server. To do so, you need to install Exalate on Docker.
Note: You need to install Docker. Check the docker documentation for more details.
- How to install Exalate for Salesforce on Docker?
- Create or download the docker-compose.yml
- Ensure that a correct database is setup using a createdb.sh
- Set environment variables if necessary
- Register the node
- Start the application
- Troubleshooting
Video Tutorial
Warning: We are moving Exalate for HP QC/ALM into basic maintenance mode. This transition period will last until November 2024, after which support will be halted completely. For more information, please see https://exalate.com/blog/end-of-support-hp/.
Exalate architecture requires installing one Exalate application for each instance.
Since HP ALM/QC does not offer any integration option for plugins, you need to install a separate server to store the Exalate for HP ALM/QC application and configure it to communicate with your HP ALM/QC.
System Requirements
Please read All system requirements before installing the Exalate app for HP ALM/QC.
Install Exalate for HP ALM/QC on CentOS 6
Exalate Server for HP ALM/QC hosts the applications to translate the HP ALM/QC defect information to a common format and the way around.
The application requires JAVA and PostgreSQL.
Note: Exalate for HP ALM/QC supports HP ALM v. 11.05 - 12.55. Starting from version 5.0.11, Exalate supports HP ALM/QC version 15.0.
Install and Configure the Database Server (PostgreSQL 9.6)
Please follow the steps to install PostgreSQL on the exalate server as documented here https://wiki.postgresql.org/wiki/YUM_Installation
Ensure that
- the database server comes up when the server is booted
- the data directories are included in the backup strategy
Enable PostgreSQL to Accept Login with Password
You need to modify /var/lib/pgsql/9.6/data/pg_hba.conf to require md5 for local IPv4 connections, such as at the end of the file it does look like
# TYPE  DATABASE        USER            ADDRESS                 METHOD
# "local" is for Unix domain socket connections only such as postgres
local   all             all                                     trust
# IPv4 local connections:
host    all             all             127.0.0.1/32            md5
Restart the Database
systemctl restart postgresql-9.6.service
Installing OpenJDK
Note:
- You need to have Exalate for HPQC version 5.0 and higher
- For versions lower than 5.0, please deploy Oracle Java version 1.8
Commands extracted from https://www.liquidweb.com/kb/install-java-8-on-centos-7/
#refresh repos
yum -y update

#install the openjdk - latest version in the 8 family
yum install java-1.8.0-openjdk

#ensure it is being used - choose the openjdk
update-alternatives --config java


#update the java home in your .bash_profile by adding (the openjdk path depends on what was installed)
export JAVA_HOME=/usr/lib/jvm/java-1.8.0-openjdk-1.8.0.242.b08-0.el7_7.x86_64
export JAVA_JRE=$JAVA_HOME/jre
export PATH=$PATH:@JAVA_JRE/bin/
Install the Exalate server for HP ALM/QC
Note: You can download the Exalate server for HP ALM/QC RPM from here.
Install the latest version of the Exalate app for HP ALM/QC :
# the version number will differ
yum localinstall exalate-hpqcnode-5.0.13.noarch.rpm
This creates these files:
- /opt/hpqcnode/data -> Contains configuration files
- /opt/hpqcnode/logs -> Contains log files
- /opt/hpqcnode/install -> contains all the files (binaries) which are necessary for the application to run
- /etc/init.d/hpqcnode -> Script which allows start, stop and restart hpqcnode application
- /etc/sysconfig/hpqcnode -> System properties
Copy dist files into prod files
cp /etc/sysconfig/hpqcnode.dist /etc/sysconfig/hpqcnode
cp /etc/init.d/hpqcnode.dist /etc/init.d/hpqcnode
cp /opt/hpqcnode/data/hpqcnode.conf.dist /opt/hpqcnode/data/hpqcnode.conf
cp /opt/hpqcnode/data/logger.xml.dist /opt/hpqcnode/data/logger.xml
Adapt configuration files
Adapt /etc/init.d/hpqcnode RUN_AS_USER variable to point to a valid user who is running the application
...
#
#

# Script arguments (start, stop, restart or status)
COMMAND=$1

# ***********************************************
# *************  Set these variables  ***********

RUN_AS_USER=root // Set the user that would be running the application
NAME=hpqcnode
HOME_DIR=/opt/hpqcnode
DATA_DIR=$HOME_DIR/data
APP_DIR=$HOME_DIR/install
SYSCONFIG=/etc/sysconfig/hpqcnode

# ***********************************************

# stop if no configuration available
if [ ! -f "$SYSCONFIG" ]; then printf "no config present ... exiting\n"; exit 1; fi
...
Adapt /etc/sysconfig/hpqcnode parameters:
# ---------
# Data Base specifics
DHPQCNODE_PG_USER=idalko
DHPQCNODE_PG_PWD=idalko
DHPQCNODE_PG_HOST=localhost
#DHPQCNODE_PG_HOST="localhost:5432"
DHPQCNODE_PG_DB=hpqcnode
# ---------
# OS User Name
# Name of the OS User to run the app with
DHPQCNODE_SYS_USER=root
# ---------
# Port specifics
DHPQCNODE_PORT=9000
# ---------
# SMTP specifics
DHPQCNODE_SMTP_HOST_NAME=mail.server.com
DHPQCNODE_SMTP_PORT=465
DHPQCNODE_SMTP_FROM=admin@admin.com
DHPQCNODE_SMTP_USER=admin
DHPQCNODE_SMTP_PASS=1234567
DHPQCNODE_SMTP_SSL=true
# ---------
Start the application
/etc/init.d/hpqcnode start
Troubleshooting
Problems during the installation using yum
If you have problems during the installation of the Exalate server for HP ALM/QC using yum, you can find logs describing possible problems inside /tmp The name for this file is generated randomly automatically by the OS but you should be able to find the file based on the creation date.
In case of 'yum list postgresql*' please see Problems during Installation using Yum .
Problems while running the Exalate server for HP ALM/QC
Logs are generated under the directory: /opt/hpqcnode/data/logs. Refer to these logs to get more information about possible problems and communicate with our support if you need any assistance.
Run Exalate for HP ALM/QC on Docker
Note: You need to install Docker. Check the docker documentation for more details.
1. Create directory and create docker-compose.yml file
Create a directory to hold the docker-compose file:
cd ~
mkdir exalate-hp-qc
Create the docker-compose.yml file in it:
cd exalate-hp-qc
touch docker-compose.yml
cat > docker-compose.yml << 'EOF'
version: '2'

services:
  database:
    restart: always
    image: postgres:12.19
    volumes:
      - voldatabase:/var/lib/postgresql/data
      - ./createdb.sh:/docker-entrypoint-initdb.d/init-user-db.sh
    environment:
      - DB_NAME=hpqcnode
      - DB_USER=idalko
      - DB_PASS=idalko
    networks:
      - database

  hpqcnode:
    restart: always
    ports:
      - 9000:9000
    image: idalko/hpqcnode:latest
    depends_on:
      - database #wait for postgres to be started, not for ready
    volumes:
      - volhpqcnode:/opt/hpqcnode/data
    environment:
      - HPQCNODE_PG_DB=hpqcnode
      - HPQCNODE_PG_USER=idalko
      - HPQCNODE_PG_PWD=idalko
    networks:
      - database
      - default

volumes:
  voldatabase:
  volhpqcnode:

networks:
  database:
    driver: bridge
  default:
    driver: bridge
EOF
2. Ensure that a correct database is setup using a createdb.sh
Create or download a createdb.sh file (referenced from docker-compose.yml):
Note: Click createdb.sh to download the file.
touch createdb.sh
cat > createdb.sh << 'EOCREATEDB'
#!/bin/bash

TEST=`psql -U postgres <<-EOSQL
   SELECT 1 FROM pg_database WHERE datname='$DB_NAME';
EOSQL`

echo "******CREATING DOCKER DATABASE******"
if [[ $TEST == "1" ]]; then
    # database exists
    # $? is 0
    exit 0
else
psql -U postgres <<-EOSQL
   CREATE ROLE $DB_USER WITH LOGIN ENCRYPTED PASSWORD '${DB_PASS}' SUPERUSER;
EOSQL

psql -U postgres <<-EOSQL
   CREATE DATABASE $DB_NAME WITH OWNER $DB_USER ENCODING 'UNICODE' LC_COLLATE 'C' LC_CTYPE 'C' TEMPLATE template0;
EOSQL

psql -U postgres <<-EOSQL
   GRANT ALL PRIVILEGES ON DATABASE $DB_NAME TO $DB_USER;
EOSQL
fi

echo ""
echo "******DOCKER DATABASE CREATED******"
EOCREATEDB
Ensure that the volumes are included in your backup strategy:
- voldatabase
- volhpqcnode
3. Set Environment Variables if necessary
Please note the environment variables used for hpqcnode container. All of them are optional, and in the given example, we've overridden HPQCNODE_PG_DB, HPQCNODE_PG_USER and HPQCNODE_PG_PWD just to explicitly how can different credentials be passed to the Exalate application.
Here's the full list of environment variables
Variable name | Default value | Example | Description |
|---|---|---|---|
| HPQCNODE_PG_HOST | HPQCNODE_PG_HOST=database | HPQCNODE_PG_HOST=localhost | tells Exalate where is the Postgres database to connect to host |
| HPQCNODE_PG_DB | HPQCNODE_PG_DB=hpqcnode | HPQCNODE_PG_DB=exalate | tells Exalate what is the Postgres database name for the exalate application |
| HPQCNODE_PG_USER | HPQCNODE_PG_USER=idalko | HPQCNODE_PG_USER=exalate | tells Exalate what is the Postgres database user name for the exalate application to perform queries with |
| HPQCNODE_PG_PWD | HPQCNODE_PG_PWD=idalko | HPQCNODE_PG_PWD=secret | tells Exalate what is the Postgres database user's password for Exalate to perform queries with |
| HPQCNODE_PORT | HPQCNODE_PORT=9000 | HPQCNODE_PORT=80 | tells what which is port to start Exalate on. Note that this is the port within the exalatehpqc_hpqcnode_1 container, thus if this variable is changed (for example to 80), the ports:
- 9000:9000should also be changed to ports:
- 80:80 |
| HPQCNODE_SMTP_HOST_NAME | HPQCNODE_SMTP_HOST_NAME=mail.server.com | HPQCNODE_SMTP_HOST_NAME=smtp.gmail.com | is used to send email notifications about errors blocking synchronization |
| HPQCNODE_SMTP_PORT | HPQCNODE_SMTP_PORT=465 | HPQCNODE_SMTP_PORT=587 | is used to send email notifications about errors blocking synchronization |
| HPQCNODE_SMTP_FROM | HPQCNODE_SMTP_FROM=admin@admin.com | HPQCNODE_SMTP_FROM=my.name@gmail.com | is used to send email notifications about errors blocking synchronization |
| HPQCNODE_SMTP_USER | HPQCNODE_SMTP_USER=admin | HPQCNODE_SMTP_USER=my.name | is used to send email notifications about errors blocking synchronization |
| HPQCNODE_SMTP_PASS | HPQCNODE_SMTP_PASS=1234567 | HPQCNODE_SMTP_PASS=secret | is used to send email notifications about errors blocking synchronization |
| HPQCNODE_SMTP_TLS | HPQCNODE_SMTP_TLS=true | HPQCNODE_SMTP_TLS=true | is used to send email notifications about errors blocking synchronization. Can be set to false, but then the HPQCNODE_SMTP_PORT should be set to the port, that accepts non-SSL and non-TLS connections |
4. Start the Application
cd ~/exalate-hp-qc
docker-compose up -d
How to Manage the Application on the Docker
Run queries to the application's database
cd ~/exalate-hp-qc
docker exec -it exalatehpqc_database_1 bash
su postgres
psql -A $DB_NAME
One can find all the tables using psql's \dt+ command:
\dt+
All the postgres SQL queries are permitted
To exit the application's DB:
\q
# \q exits the psql
exit
# exits the postgres user session
exit
# exits the exalatehpqc_database_1 bash session
Inspect the application's filesystem
cd ~/exalate-hp-qc
docker exec -it exalatehpqc_hpqcnode_1 bash
Remove the application
cd ~/exalate-hp-qc
docker-compose rm
Remove the application data
Warning: do this only if you want to delete all the synchronization information, including the current synchronizations enqueued to be performed and synchronization status. Make sure that the remote side (you exalate issues with) knows that you're stopping synchronization and are ready to handle synchronization errors.
cd ~/exalate-hp-qc
# docker volume ls | grep exalatehpqc_vol |  awk '{ print $2 }' | xargs docker volume rm
docker volume rm exalatehpqc_voldatabase
docker volume rm exalatehpqc_volhpqcnode
Configure Exalate to Communicate with HP ALM/QC Instance
To configure Exalate:
1. Open Exalate for HP ALM/QC.
2. Configure General Settings.
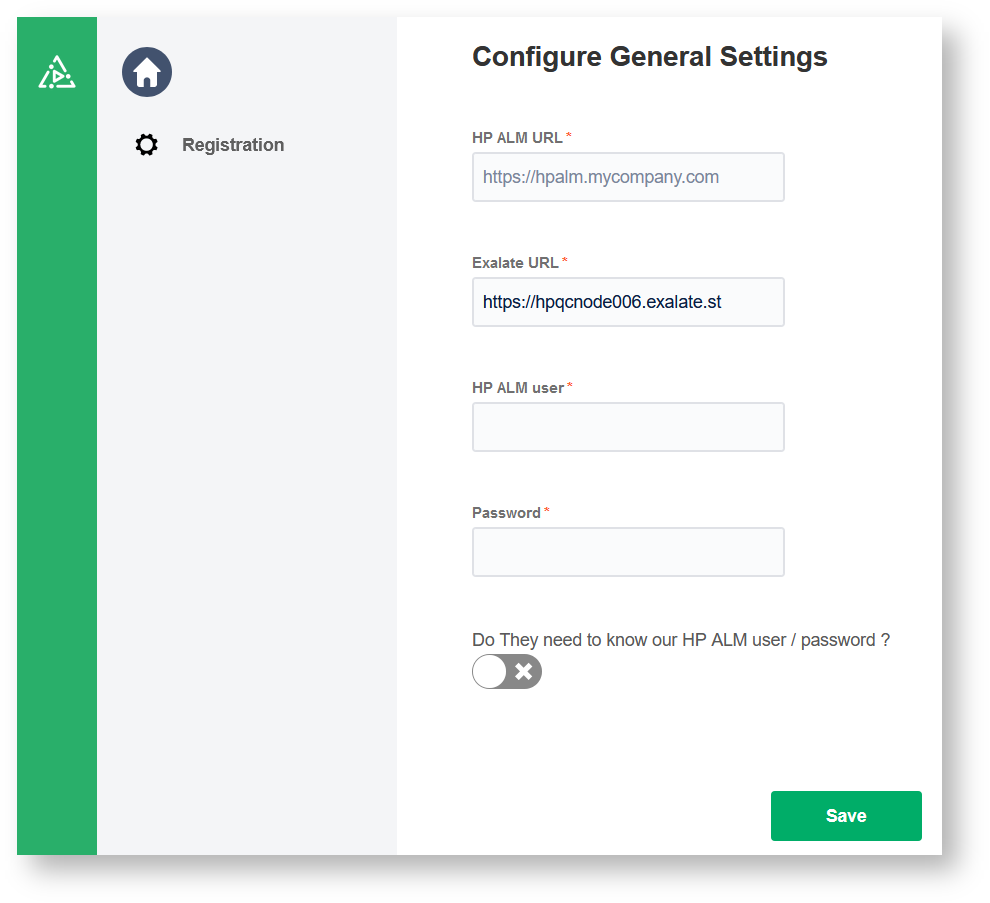
3. Click Save.
4. Fill in your contact details in the Registration screen.
Exalate uses this info to:
- Verify your instance.
- Activate an evaluation license.
- Create an admin account to receive error notifications.
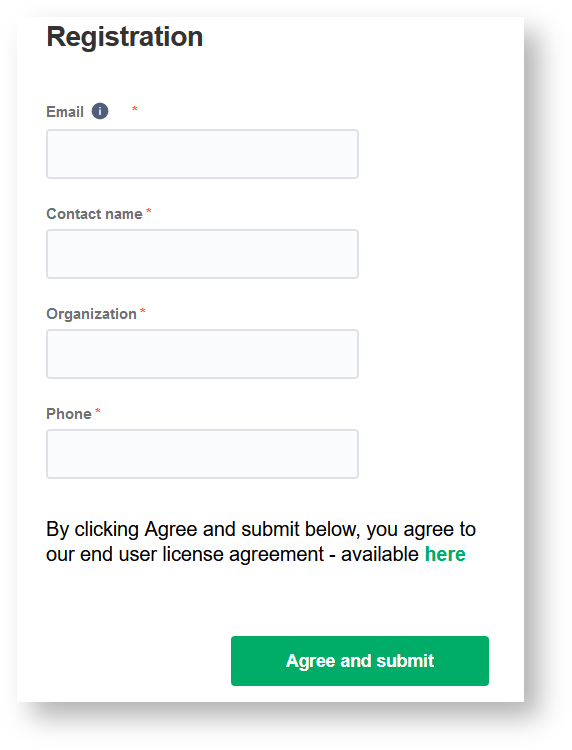
5. Click Agree and submit.
After clicking Agree and submit, you get an email to complete a security check.
Note: After clicking Agree and submit, you accept our End User License Agreement (EULA). It is also available here:
6. Open your email and click Verify Exalate instance.
You are redirected back to your Exalate console.
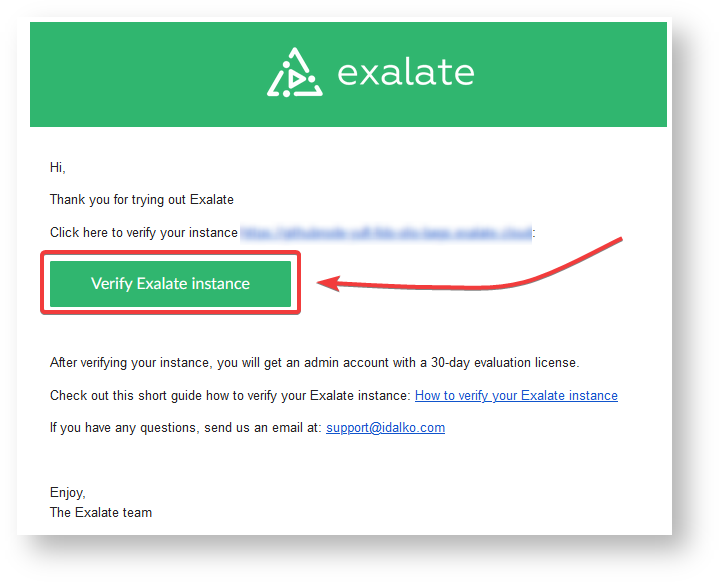
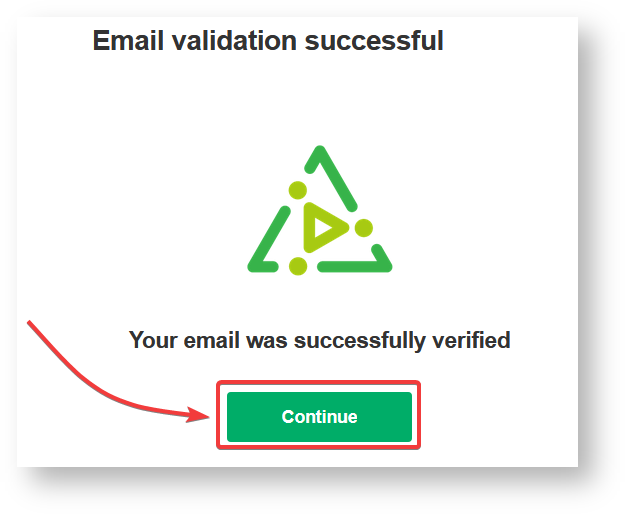
7. Click Continue.
After clicking Continue, you complete the verification procedure, so you can log in to the Exalate admin console.
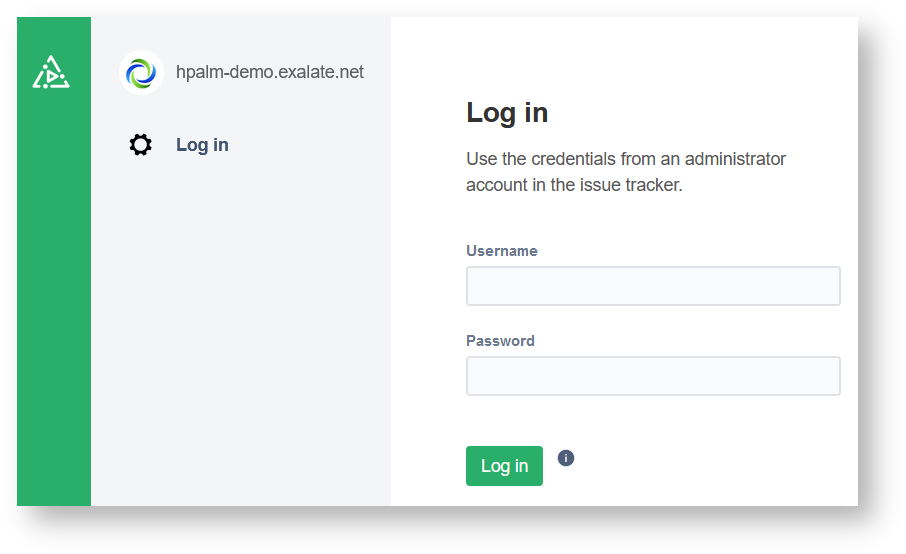
8. Log in to your Exalate admin console.
Input the Username and the Password of the proxy user to log in.
Troubleshooting
Problems during the installation of Exalate for HP ALM/QC
If you have problems during the installation of the Exalate app for HP ALM/QC, you can find logs describing possible problems inside /tmp. The name for this file is generated randomly automatically by the OS but you should be able to find the file based on the creation date.
Problems while running Exalate for HP ALM/QC
Logs are generated under the directory: /opt/hpqcnode/data/logs. Refer to these logs to get more information about possible problems and communicate with our support if you need any assistance.
Support
Please read our Support options.
Exalate needs to exchange information with the HP ALM instance. After Exalate for HP ALM/QC is deployed on the server, you need to establish the connection between the Exalate app for HP ALM/QC and HP ALM/QC instance.