To configure your synchronization use case, you will need to use advanced Groovy scripting. It requires setting up the scripting environment.
This article describes how to set up the development environment and find out what Jira and Exalate APIs you can use.
If you want script changes to load directly into the Sync Rules make sure you have your Jira instance connected with the development environment:
- update scripts directory with Git
- install and use the IDE on the same server, where you have Jira installed
To set up an Integrated Development Environment(IDE)
- Install Java JDK
- Install Atlassian SDK: Windows, Mac or Linux
- Install an IDE:
- we suggest to use IntelliJ IDEA Community Edition - it's free. Use default configuration.
- Install Git
- Configure IDE to use Maven from the Atlassian SDK:
- Find your Atlassian SDKs Maven Home:
- On Windows:
- Open Start - cmd
type
atlas-version
You will get the result as the example below.
ATLAS Version:    6.2.9
ATLAS Home:       C:\Applications\Atlassian\atlassian-plugin-sdk-6.2.9
ATLAS Scripts:    C:\Applications\Atlassian\atlassian-plugin-sdk-6.2.9\bin
ATLAS Maven Home: C:\Applications\Atlassian\atlassian-plugin-sdk-6.2.9\apache-maven-3.2.1
AMPS Version:     6.2.6
--------
Executing: "C:\Applications\Atlassian\atlassian-plugin-sdk-6.2.9\apache-maven-3.2.1\bin\mvn.bat" --version -gs C:\Applications\Atlassian\atlassian-plugin-sdk-6.2.9\apache-maven-3.2.1/conf/settings.xml
Apache Maven 3.2.1 (ea8b2b07643dbb1b84b6d16e1f08391b666bc1e9; 2014-02-15T04:37:52+10:00)
Maven home: C:\Applications\Atlassian\atlassian-plugin-sdk-6.2.9\apache-maven-3.2.1\bin\..
Java version: 1.8.0_91, vendor: Oracle Corporation
Java home: C:\Program Files\Java\jdk1.8.0_91\jre
Default locale: en_AU, platform encoding: Cp1252
OS name: "windows 10", version: "10.0", arch: "amd64", family: "dos"
Find the ATLAS Maven Home:
ATLAS Maven Home: C:\Applications\Atlassian\atlassian-plugin-sdk-6.2.9\apache-maven-3.2.1
on Mac or Linux:
- Run terminal
Type
atlas-version
You will get the following result:
Find the ATLAS Maven Home:ATLAS Version: 6.1.0 ATLAS Home: /Applications/Atlassian/atlassian-plugin-sdk-6.1.0 ATLAS Scripts: /Applications/Atlassian/atlassian-plugin-sdk-6.1.0/bin ATLAS Maven Home: /Applications/Atlassian/atlassian-plugin-sdk-6.1.0/apache-maven-3.2.1 AMPS Version: 6.1.2 -------- Executing: /Applications/Atlassian/atlassian-plugin-sdk-6.1.0/apache-maven-3.2.1/bin/mvn --version -gs /Applications/Atlassian/atlassian-plugin-sdk-6.1.0/apache-maven-3.2.1/conf/settings.xml Java HotSpot(TM) 64-Bit Server VM warning: ignoring option MaxPermSize=256M; support was removed in 8.0 Apache Maven 3.2.1 (ea8b2b07643dbb1b84b6d16e1f08391b666bc1e9; 2014-02-14T19:37:52+02:00) Maven home: /Applications/Atlassian/atlassian-plugin-sdk-6.1.0/apache-maven-3.2.1 Java version: 1.8.0_92, vendor: Oracle Corporation Java home: /Library/Java/JavaVirtualMachines/jdk1.8.0_92.jdk/Contents/Home/jre Default locale: en_US, platform encoding: UTF-8 OS name: "mac os x", version: "10.13.2", arch: "x86_64", family: "mac"
ATLAS Maven Home: /Applications/Atlassian/atlassian-plugin-sdk-6.1.0/apache-maven-3.2.1
- On Windows:
- Start IntelliJ IDEA
- Navigate to Configure (Preferences) - Build, Execution, Deployment - Build Tools - Maven. Change the Maven Home directory setting from Bundled to Maven Home directory from the previous step
- Find your Atlassian SDKs Maven Home:
- Copy an example project
Download the example project:
jiracloud-scripts.zip
jiraserver-scripts.zip
Extract the project from archive to proceed to the next step. - Open the example project directory in your IntelliJ IDEA
- Mark as source your scripts directory in the project structure:
File - Project Structure - Modules tab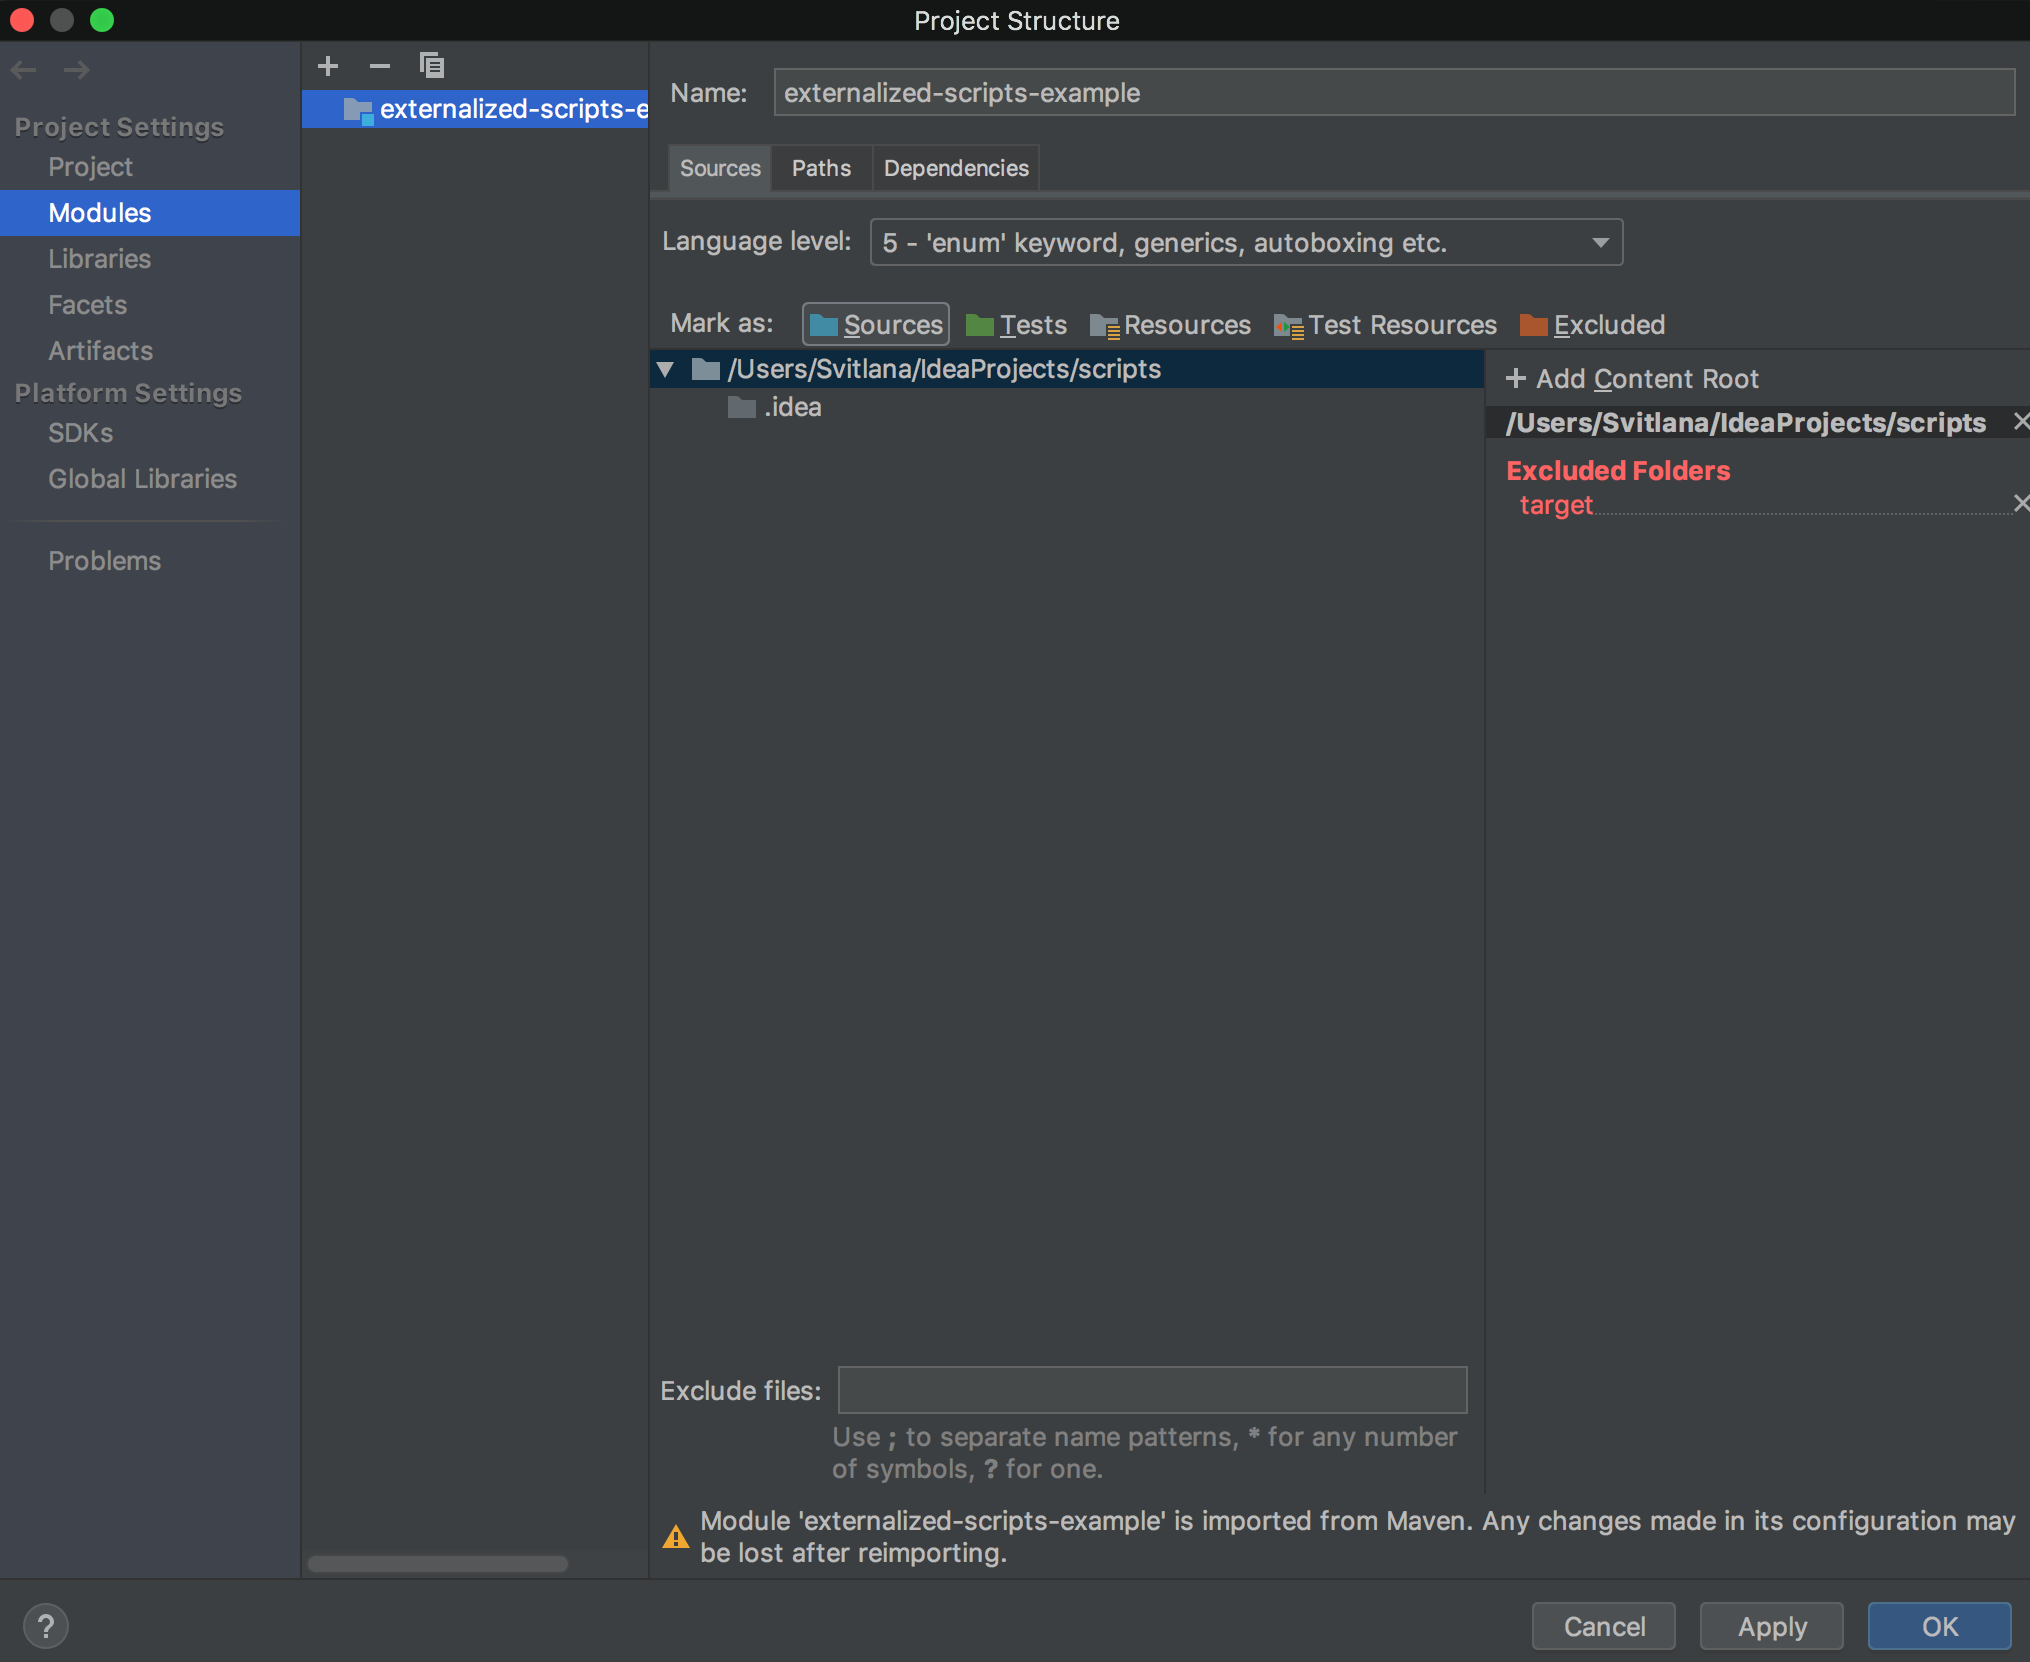
- Download Atlassian and Exalate libraries to get the autocomplete when editing scripts.
Run the following command in your IntelliJ IDEA terminalatlas-mvn clean compile
Reimport all maven projects to finish the configuration.

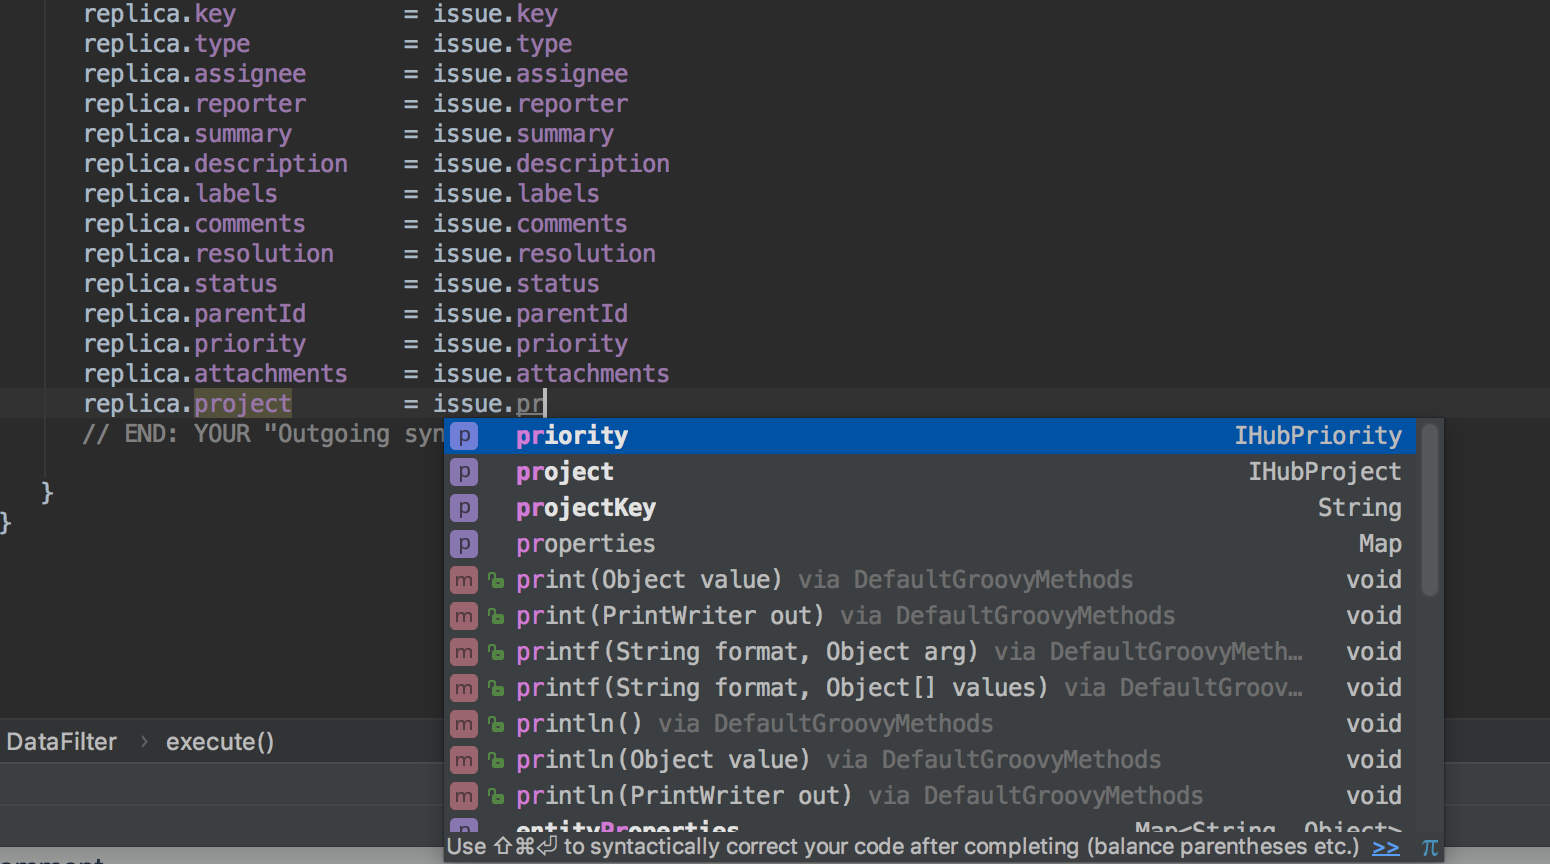
Congratulations! Example advanced scripting environment is ready.
Now you can navigate to any of these scripts from your development environment. IntelliJ will provide autocomplete for the available variables and the Jira API(com.atlassian.jira.component.ComponentAccessor).
Resolve dependencies on the Exalate distribution
The maven points to an old version of the exalate jar.
To ensure you work with the latest version - download it from the Atlassian marketplace, and include it onto your local maven repository using a command like
mvn install:install-file \
   -Dfile=<path-to-file> \
   -DgroupId=<group-id> \
   -DartifactId=<artifact-id> \
   -Dversion=<version> \
   -Dpackaging=<packaging> \
   -DgeneratePom=true
To version your scripts, connect the project with a git repository
- create a git repository with your project: Setting up a repository
- clone the repository as scripts directory to your Jira: git-clone